Add an Identity Provider (IdP) before you configure SAML single sign-on to access the Trend Vision One console.
Procedure
- On the Trend Vision One console, go to .
- Click Download the metadata
XML.The Trend Vision One Service Provider metadata XML file downloads to your computer.
- Go to your IdP to configure the settings and download the
IdP metadata XML file.For more information, see the topic below for your IdP.

Note
If you have updated your IdP certificate, you must regenerate the IdP metadata XML file and download the new file. If you have already added the IdP to Trend Vision One, you must upload the new file in the Identity Providers app. - On the Trend Vision One console, go back to .
- Click Add Identity Provider.
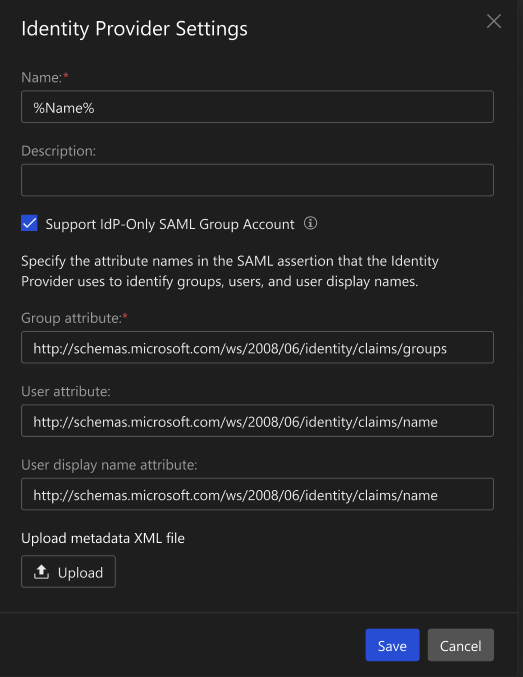
- Specify a Name and Description for the IdP.
- (Optional) Configure the IdP to support adding IdP-Only SAML Group Account users by specifying attributes provided
in the IdP system.
- Select the Support IdP-Only SAML Group Account
checkbox.Adding IdP-Only SAML Group Accounts does not require user and group synchronization from your IdP. Trend Vision One accepts assertions from the identity provider and uses them to authenticate users into the Trend Vision One console.
- Specify the Group attribute, the attribute containing the identifiers of the user groups defined in the IdP.
- (Optional) Specify the User attribute, the attribute containing the identifier of the user signing in through the IdP, allowing individual users to be distinguished.
- (Optional) Specify the User display name
attribute, the attribute determining the display name of
the user in the SAML assertion.If the optional User attribute and User display name attribute are not specified, the default value used is the NameID of the user from the SAML assertion.

- Select the Support IdP-Only SAML Group Account
checkbox.
- Click Upload and select the metadata XML file that you downloaded from your IdP.
- Click Save.
- Click Close to return to the Identity
Providers screen, or click Add SAML Users
to add SAML user accounts in User Accounts.For more information, see Configure accounts.

