

To use Anti-Malware, you need to perform the following:
When you have completed the preceding steps, review Configure malware scans and refine the Anti-Malware scan behavior.
The majority of the Anti-Malware settings can be configured either for each individual
computer or in a policy that applies to multiple computers (for example, to all Windows
2008 Servers), with the latter being easier. For more information, see Policies, inheritance, and overrides.
CPU usage and RAM usage varies by the Anti-Malware configuration. For information
on optimizing Anti-Malware performance on the agent, see Performance tips for Anti-Malware.
For additional information, see Protect against malware.
Enable the Anti-Malware module 
Procedure
- Go to Policies.
- Double-click the policy for which you want to enable Anti-Malware.
- Go to .
- From Anti-Malware State, select On.
- Click Save.
Select the types of scans to perform
After enabling Anti-Malware, configure the types of scans Workload Security needs to perform, as follows:
- Go to Policies.
- Double-click the policy to configure.
- Click .
- Enable or disable each type of scan:
- To perform the scan using default settings, select Default
- To perform the scan using a malware scan configuration that you can customize, select a malware scan configuration.
- To disable the scan, for the malware scan configuration select No Configuration.
- Click Save.
Trend Micro recommends that you configure Workload Security to perform weekly scheduled
scans on all protected servers. You can do this using Scheduled Tasks (see Schedule Workload Security to perform tasks).
Configure scan inclusions
To reduce scanning time and minimize the use of computing resources, you can configure
Workload Security malware scans to include only specific folders, files, and file
types in all types of scans. You can also include process image files in real-time
malware scans that are run on Windows computers. For more information, see Specify the files to scan.
You can select multiple lists for your inclusions list.
All inclusions are specified by selecting inclusion lists (inherited or non-inherited)
on the Inclusions tab of the Malware Scan Configuration editor:
Procedure
- Go to Policies.
- Double-click the policy for which you want to enable Anti-Malware.
- Go to .
- Select the type of scan to which you want to add the inclusions:
- Real-time
- Scheduled
- Manual
- To add all of the inherited lists, select Use inherited list.
- To add non-inherited lists, select the lists and click Add.To create a new list, select New. For details, see Create a list of files for use in policies.To delete a non-inherited list, select its garbage can icon. To remove inherited lists, you must deselect Use inherited lists.
- Select Save.
Configure scan exclusions
To reduce scanning time and minimize the use of computing resources, you can configure
Workload Security malware scans to exclude specific folders, files, and file types
from all types of scans. You can also exclude process image files from real-time malware
scans that are run on Windows computers. For more information, see Specify the files to scan.
If any performance-related issues are experienced when Workload Security Anti-Malware
protection is enabled, you can use exclusions to help troubleshoot these issues by
excluding specific folders or files from scanning.
All exclusions are specified by selecting exclusion lists (inherited or non-inherited)
on the Exclusions tab of the Malware Scan Configuration editor:
Procedure
- Go to Policies.
- Double-click the policy for which you want to enable Anti-Malware.
- Go to .
- Configure Recommended Scan settings for Real-time scans.

Important
Recommended Exclusions is not available in all regions.Automatically assigning recommended exclusions is an advanced feature.Carefully review the recommended exclusions before enabling the feature to ensure any potential security risks are understood for your environment.- To manage whether agents can use recommendation scan results to dynamically apply
exclusions, configure the setting for Automatically assign application-based recommended exclusions.
-
Inherited: Use the parent policy settings.
-
No: Do not automatically assign recommended exclusions.
-
Yes: Automatically assign recommended exclusions.
-
- To manage recommended exclusions manually, click Assign/Unassign in the Assigned Recommended Exclusions list.
- Select the applications you want to exclude from real-time scans.
- To manage whether agents can use recommendation scan results to dynamically apply
exclusions, configure the setting for Automatically assign application-based recommended exclusions.
- To prevent Recommended Exclusions from assigning an application as an exclusion, configure
the application properties.
- Click Assign/Unassign in the Assigned Recommended Exclusions list.
- Click the application you want to exclude and click Properties...
- Go to Options.
- Configure the setting Exclude from Recommendations.
-
Inherited: Use the parent policy settings.
-
No: Recommended Exclusions can assign the application as an exclusion.
-
Yes: Recommended Exclusions cannot assign the application as an exclusion.
-
- Configure the exclusion lists.The following lists can be configured by navigating between Real-Time, Scheduled, and Manual.
-
File List
-
Directory List
-
File Extension List
-
Process Image File List (Real-Time scan only)
-
- To add all of the inherited lists, select Use inherited lists
- To add non-inherited lists, select the lists and click Add.To create a new list, select New. For details, see Create a list of files for use in policies.To delete a non-inherited list, select its garbage can icon. To remove inherited lists, you must deselect Use inherited lists.Selecting Enforce applied computers to inherit lists applies policy inclusions and exclusions to all computers using that policy. This setting applies policy scan lists to computers regardless of a computer's Use inherited lists setting.
- Select Save.
Scan for recommended exclusions on computers
To discover if any applications Trend Micro recommends for Anti-Malware exclusions
are installed on your endpoints, you can scan for recommendations from the Computer
editor.
Procedure
- Go to Computers and open the computer editor for the endpoint you want to manage.
- Go to .
- Under Recommended Exclusions, click Scan For Recommendations.The agent scans the endpoint for any installed application on the Recommended Exclusions list. The process might take up to 10 minutes to complete. You can refresh the screen to check for the results. The Last Scan for Recommendations should update once complete.
- After the scan completes, check the number of Detected Applications.If the number is 0, the endpoint does not have any recommended applications not already added to the Assigned Recommeneded Exclusions list.
- To assign more exclusions, click Assign/Unassign.
- Filter the list for Recommended for Assignment.
- Select the applications you want to exclude and click OK.
- Click Save to save the settings.
- To clear the recommendation scan results, click Clear Recommendations.
Configure multiple scan list exclusions or inclusions
You must enable a scan list type for malware scan inclusion or exclusion to use the
scan list type with multiple lists.
To configure an inclusion for use with multiple lists:
- Go to Computer or .
- Click Edit next to the malware scan configuration for Real-Time Scan, Manual Scan, or Scheduled Scan.
-
Go to Inclusions:
- For a directory list, select Directory List and choose a scan list.
- For a file extension list, select File Extension List and choose a scan list.
- Click OK.
To configure an exclusion for use in multiple lists:
- Go to Computer or .
- Click Edit next to the malware scan configuration for Real-Time Scan, Manual Scan, or Scheduled Scan.
- Go to Exclusions:
- For a directory list, select the Directory List checkbox and choose a scan list.
- For a file list, select the File List checkbox and choose a scan list.
- For a file extension list, select the File Extension List checkbox and choose a scan list.
- For a process image file list, select the Process Image File List checkbox and choose a scan list.
- Click OK.
After configuring the inclusion or exclusion lists you want to use in multiple scan
lists by following the instructions above, you can Configure scan inclusions or Configure scan exclusions for as many scan lists as you want.
Scan list inclusions or exclusions are combined using any added scan lists as well
as any added file lists, directory lists, or file extension lists from computers or
policies. Duplicates between lists do not interfere with the behavior of inclusions
or exclusions.
WARNINGAll directories disables directory lists from multi-list scan inclusions. All files disables file lists from multi-list scan inclusions.
|
Ensure that Workload Security can keep up to date on the latest threats
To remain effective against new viruses and exploits, agents need to be able to download
the latest software and security update packages from Trend Micro or indirectly, from
your own Relay. These packages contain threat definitions and patterns. Relay-enabled
agents, organized into relay groups (also managed and configured by Workload Security)
retrieve security updates from Trend Micro, and then distribute them to other agents.
Procedure
- Go to
- Configure Workload Security's ability to retrieve security updates from Trend Micro.
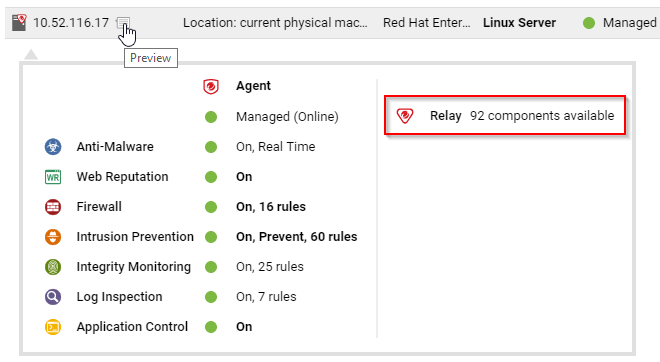
Make sure you have at least one relay-enabled agent, and it is assigned to the appropriate
agents. To determine if an agent is a relay, next to a computer, click Preview.
- Go to .
- Verify that there is a scheduled task to regularly download available updates for both security and software updates.