

Real-time mail scan rules define how ScanMail scans and filters incoming and outgoing
messages.
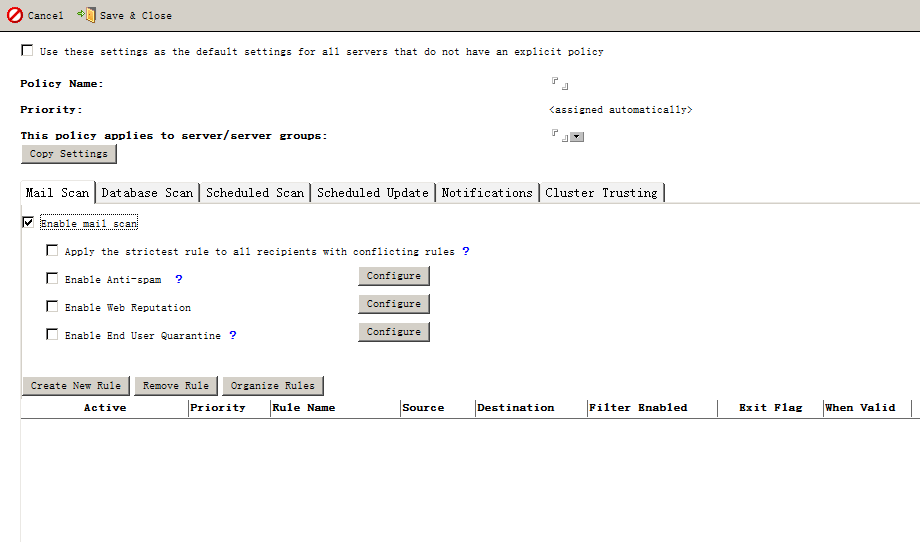
To create a mail scan rule:
-
Create or modify a policy (See Creating Rules) or (See Modifying Policies) for more information.
-
From the working area, click the Mail Scan tab.
-
Select Apply the strictest rule to all recipients with conflicting rules to implement the strictest mail scan rule when multiple rules are triggered during mail scanning. See Apply the Strictest Rule for details.
-
If you have the Suite or Suite with Data Loss Prevention edition, select Enable Trend Micro Anti-spam and click Configure to specify anti-spam settings (See Configure Anti-Spam Filtering).
-
If you have the Suite or Suite with Data Loss Prevention edition, select Enable Web reputation and click Configure to enable specify Web reputation settings.
-
Click Create New Rule.
-
On the New Mail Rule screen, select Stop processing succeeding rules if the mail matches this rule (enable Exit Flag) to instruct ScanMail to stop processing other rules and finalize the action on the message when it matches one of the rules.

Tip
To improve performance when ScanMail scans messages, enable Stop processing succeeding rules if the mail matches a rule in a mail scan rule. -
On the General tab, specify the rule name.
-
Set general settings (See Configure General Mail Scan Rule Settings).
-
Click the Scan Options tab to set how ScanMail scans and filters messages:
-
Security Risk Scan (See Configuring Security Risk Scan)
-
APT Prevention Filter (See Configuring APT Prevention Filter)
-
Scan Restrictions (See Configuring Scan Restrictions)
-
Message Filter (See Configuring the Message Filter)
-
Graymail Filter (See Configuring the Graymail Filter)
-
Attachment Filter (See Configuring the Attachment Filter)
-
Content Filter (See Create a New Content Filter)
-
Data Loss PreventionFilter (See Configuring Data Loss Prevention Filter Options)
-
Script Filter (See Configuring Script Filter)
Tip
When creating a rule, Trend Micro recommends that you save a copy of blocked messages to the Quarantine Database rather than deleting them. Once you have verified that the new rule is free of unintended consequences, modify and change the scan action. -
-
Set the scan notification (See Setting the Scan Notifications).
-
Configure Redirect Options (See Configuring Redirect Options).
-
Insert disclaimers (See Inserting Disclaimers).
-
Set the rule schedule (See Setting the Rule Schedule).
-
Click Save & Close.