

Use the Anti-spam Configuration screen to configure how the Trend Micro Anti-Spam engine filters unsolicited or unwanted
messages. The Anti-Spam Configuration screen provides options that define the heuristic
detection level or the Approved Senders and Blocked Senders lists, which ScanMail
uses to filter for unwanted messages.
To configure Anti-spam filtering:
-
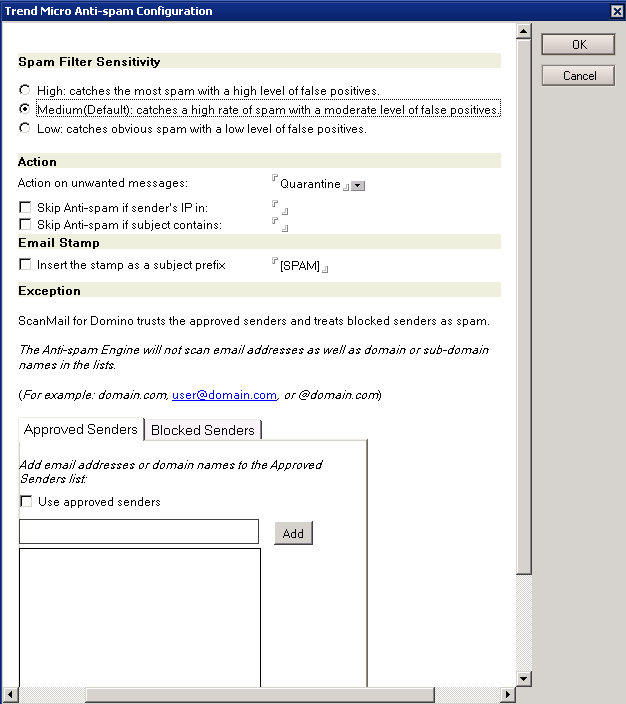
On the Mail Scan tab, select Enable Trend Micro Anti-spam, and then click Configure. The Trend Micro Anti-spam Configuration Window appears.
-
On the Trend Micro Anti-spam Configuration window, select the anti-spam mail filter level:
-
High- the most rigorous level of spam detectionScanMail monitors all messages for suspicious files or text, but there is a greater chance of false positives. False positives are email messages that ScanMail filters as spam when they are actually legitimate messages.
-
Medium- the default settingScanMail monitors at a high level of spam detection with a moderate chance of filtering false positives.
-
Low- the most lenient level of spam detectionScanMail will only filter the most obvious and common spam messages, but there is a very low chance that it will filter false positives.
-
-
In Action on Spam, select the action to take for unwanted messages: Pass, Quarantine, or Block.
-
Select the Skip Anti-spam if sender's IP in: check box, and set the IP address list. Separate multiple entries with semicolons (;).
-
Select the Skip Anti-spam if subject contains: check box, and set the subject list. Separate multiple entries with semicolons (;).
-
-
Select Insert the stamp as a subject prefix, and then type the stamp if you want to add eye-catching notices or keywords in the subject header.
-
Enable Approved Senders and Blocked Senders, and then specify the senders for these lists to help minimize false positives.
-
Select the Approved Senders check box to configure email addresses/domains that you trust.Type the email addresses/domains that you want ScanMail to exempt from blocking and then click Add or click an address/domains from the list or click an address/domains from the list and click Remove.

WARNING
Experience caution in configuring Approved Senders list. ScanMail will NOT send messages received from the email addresses/domains configured in the Approved Senders list to Trend Micro Anti-spam engine. Therefore, no action will be taken on such messages by Anti-spam engine to reduce false positives. -
Select the Blocked Senders check box to configure email addresses/domains that you always want to tag as spam.Type the email addresses/domains that you want ScanMail to block and then click Add or click an address/domain from the list and click Remove.
WARNING
Experience caution in configuring Blocked Senders list. ScanMail will ALWAYS consider messages received from the email addresses/domains configured in the Blocked Senders list as spam, and takes configured action against these messages WITHOUT sending these messages to Trend Micro Anti-spam engine. This is done to catch spam from known sources.

Note
Enabling the Approved Senders and Blocked Senders lists and customizing the senders that belong to each list helps reduce false-positives. See Spam Filtering (Suite Edition or Suite Edition with Data Loss Prevention only) for details on how ScanMail applies the Trend Micro rules and user-defined lists.Note
The approved sender, blocked sender, and approved URL lists are stored in the same database (smlists.nsf). Each of the lists can be managed in the database. See Managing the Filter Lists for details on how to manage the lists. -
-
Save the spam filter settings by clicking:
-
OK on the upper-right corner of the Anti-spam Configuration screen, and then clicking Save & Close (Notes console interface), or
-
Save (Web interface)
-
Anti-spam filtering with EUQ enabled:
-
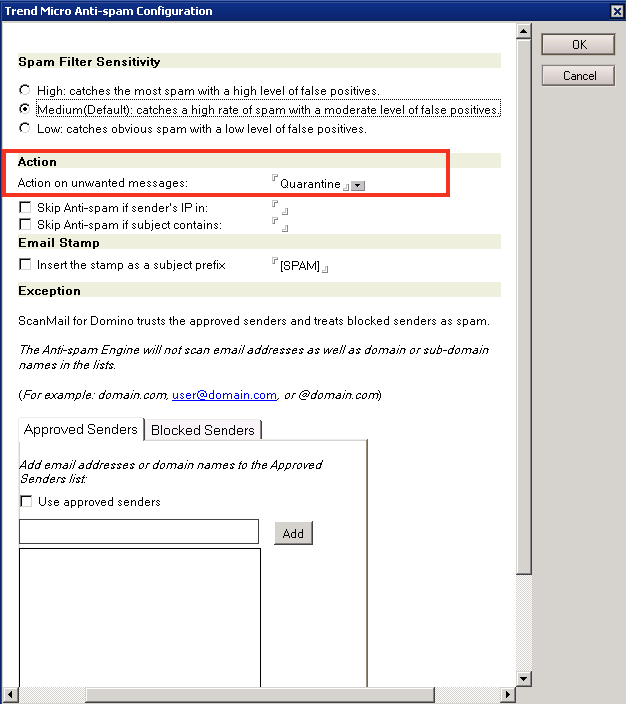
From the Mail Scan tab, select Enable Trend Micro Anti-spam and click Configure. The Trend Micro Anti-spam Configuration screen appears.
-
Under the Actionsection, choose Quarantine as the action on unwanted messages.
-
Click OK.
-
Select Allow spam mails but move them to the receiver's Junk folder.