Procedure
- Click the Information Server, domain, or a Normal Server on the domain browser tree.
- Do one of the following to bring about the configuration pane for Scan Now
operation:
-
Click on the side bar.
-
Click from the main menu.

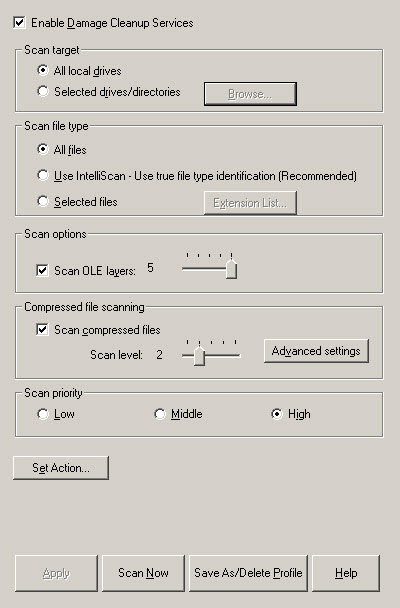
Scan Now Configuration window -
- Set Enable Damage Cleanup Service check box to enable the service. Clear it to disable the service.
- Under Scan target, choose one of the following:
-
All local drives: Scans all drives in a server
-
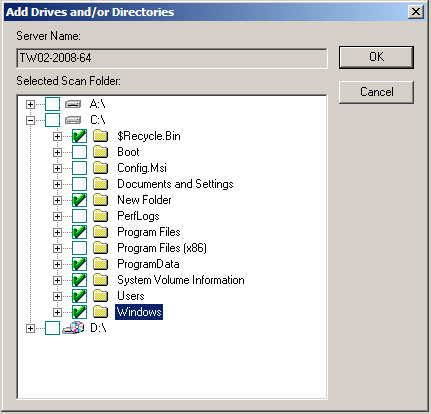
Selected drives/directories: Scans specific drives or directories on a serverClick Browse. The Add Drives and/or Directories window appears. Select the check box(es) for the drives or directories you want to scan, then click OK to close the window.

Add Drives and/or Directories window
-
- Under Scan file type, choose one of the following:
-
All files: Scans all file types
-
Use IntelliScan: Scans files using true file type identificationSee IntelliScan.
-
Selected files: Scans only specified filesClick Extension List to define the file types that you want to scan. Refer to Selecting File Types to Scan.
-
- Under Scan options, select Scan OLE layers. Move the Scan OLE layers slider to set the number of OLE layers. ServerProtect can scan up to five layers.
- Under Compressed file scanning, select the
Scan compressed files check box. Move the
Scan level slider to set the number of compressed
layers that you want to scan. For information on advanced settings, refer to the
Compressed file scan topic in the online help.

Note
If you choose to scan selected file types in step 4, make sure you include the extensions of compressed files in the extension list. - Under Scan priority, click Low, Middle, or High. A high scan priority consumes more CPU resources, but can complete scan jobs faster.
- Click Set Action to configure how ServerProtect acts on infected files. See Defining Actions Against Viruses.
- Click Apply to save the changes or click Save As Profile to recall the configuration settings at a later time.

