

Learn how to connect your AWS account to Cloud Accounts if you cannot use the stack template.
Some AWS accounts do not allow the use of stack templates to deploy resources within
the cloud environment. This is usually due to security policies which prevent the
automatic creation of IAM policies and roles required by the deployment script
within the stack template.
To connect an AWS account manually, leverage the API resources on the Automation Center. Deployment using this method enables the following features and permissions:
-
Core Features and Cyber Risk Exposure Management: The core set of features and permissions required to connect your AWS account.
-
Container Protection for Amazon ECS (optional): This feature set allows Container Security to connect and deploy components to your AWS account to protect your containers and container images in Elastic Container Service (ECS) environments.
Important
|
Step 1: Generate and download the stack template
Generate a stack template either from the TrendAI Vision One™ console or by calling an API.
Procedure
- Generate and download the stack template:
-
Access the TrendAI Vision One™ console and create the template.
-
In the TrendAI Vision One™ console, go to
-
Click Add Account.
-
On the Deployment Type screen, select CloudFormation and Single AWS Account.
-
Click Next.
-
Specify the Account name, Description, and select the AWS region for deployment.
-
If you have more than one Server & Workload Protection Manager instance, select the instance to associate with the connected account and click Next.
-
Click Next without configuring the Features and Permissions screen.
-
Click Download and Review Template.

Note
The Account Name and Description fields are not exported to the review template. You can provide these parameters when calling the Add AWS account API. -
-
Call an API to retrieve the template.
-
Locate the Generate AWS CloudFormation template API on the automation center.
-
Locate the
query_paramsstrings. -
For
awsRegion, provide the AWS region where you want to deploy the stack template and Core Features. The default region is based on your TrendAI Vision One™ region. -
For
featuresandfeatureAwsREgions, leave the parameters blank. -
Save your changes and call the API.The API returns the following:
-
templateUrl: The URL to download the template. -
visionOneOidcProviderUrl: A required parameter for deploying the template. -
createStackUrl: URL of the AWS CloudFormation console pointing to the CloudFormation template of TrendAI Vision One™.
-
-
Download the template.
-
-
Step 2: Add TrendAI Vision One™ as an identity provider
Use the Identity and Access Management (IAM) service in the AWS console to grant TrendAI Vision One™ access to your AWS account.
- Access the AWS console.
- Add TrendAI Vision One™ as an identity provider.
- In the AWS console, open the Identity and Access Management (IAM) service.
- Go to .
- Click Add provider.
The Add an Identity provider screen opens.
- In the Configure provider section, select OpenID Connect.
- For provider URL, type or paste the Provider URL.
-
If you used the API to call the template, copy and paste the
visionOneOidcProviderUrlparameter the API returned. -
If you downloaded the template, type cloudaccounts-{region}.xdr.trendmicro.com where
{region}is your TrendAI Vision One™ region (us, eu, au, sg, in,orjp)For example, if your TrendAI Vision One™ region is the United States, yourvisionOneOidcProviderUrlis cloudaccounts-us.xdr.trendmicro.com
-
- For Audience input arn:aws:iam::${AWSAccountId}:root.
Replace
${AWSAccountId}with your AWS account ID.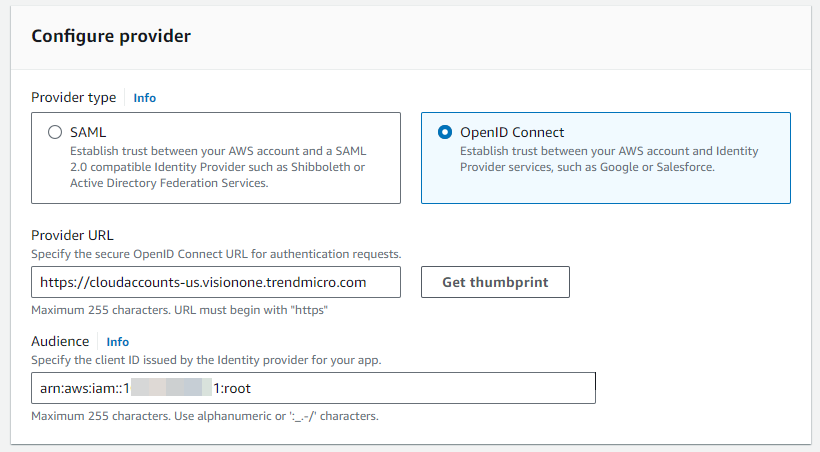
- Click Get thumbprint.
- Click Add provider.
The provider is added to the Identity providers list.
- Click the name for the provider you created.
The provider details screen opens.
- Copy the provider ARN for use when creating the Role in a later step.
- Locate the Thumbprints section and click Manage.
- Delete the thumbprint generated when creating the provider and paste the following
thumbprints.
Click Add thumbprint to add each new line.
-
9e99a48a9960b14926bb7f3b02e22da2b0ab7280 -
9565AD13689C2C4B4F018BE31767084D197F2692 -
8CF427FD790C3AD166068DE81E57EFBB932272D4 -
F21C12F46CDB6B2E16F09F9419CDFF328437B2D7

-
- Click Save changes.
Step 3: Add the TrendAI Vision One™ policies
Add TrendAI Vision One™ policies to the Identity and Access Management (IAM) service to define access permissions.
To view and copy the policies, see AWS policies in JSON format.
ImportantFor each policy, make sure to keep the second line of the code
"Version": "2012-10-17". Deleting the line might cause the policy to not work correctly. |
Procedure
- In the Identity and Access Management service, go to .
- Create the
VisionOnePolicyPart1policy:- Click Create policy.
- For Policy editor, select JSON.
- Copy and replace the
Statementparameter using the same parameter fromVisionOnePolicyPart1in your downloaded template file.You can also click this link to view and copy the JSON code directly. - Click Next.
- For Policy name, type VisionOnePolicyPart1.
- Click Create policy.The
VisionOnePolicyPart1policy is created and the Policies screen appears.
- Create the
VisionOnePolicyPart2policy:- Click Create policy.
- For Policy editor, select JSON. You can also click this link to view and copy the JSON code directly.
- Click Next.
- For Policy name, type VisionOnePolicyPart2.
- Click Create policy.The
VisionOnePolicyPart2policy is created and the Policies screen appears.
- Create the
VisionOnePolicyPart3policy:- Click Create policy.
- For Policy editor, select JSON. You can also click this link to view and copy the JSON code directly.
- Click Next.
- For Policy name, type VisionOnePolicyPart3.
- Click Create policy.The
VisionOnePolicyPart3policy is created and the Policies screen appears.
- Create the
VisionOneFeaturesPolicypolicy:- Click Create policy.
- For Policy editor, select JSON. You can also click this link to view and copy the JSON code directly.

Important
You must replace all placeholder instances of<AWS-Account-ID>with your AWS account ID. - Click Next.
- For Policy name, type VisionOneFeaturesPolicy.
- Click Create policy.The
VisionOneFeaturesPolicypolicy is created and the Policies screen appears.
Step 4: Deploy Container Security using Terraform (optional)
In this optional step, use Terraform to deploy Container Security to your AWS account
to protect your Amazon ECS containers and container images.
This method allows you to enable Container Security on your AWS account without having
to access the TrendAI Vision One™ console. If you choose not to enable Container Security using Terraform, you can
enable it on the AWS account in TrendAI Vision One™ after the account has been connected. For more information, see Protect Amazon ECS clusters using an existing AWS account.
Procedure
- Access the AWS console.
- Download the template package to your environment using the following command:
curl https://vcs-cloudaccounts-us-east-1-484917860638.s3.us-east-1.amazonaws.com/templates/aws/terraform/ContainerSecurityEcsTemplate.zip --output container-security-ecs-template.zip - Extract the template using the following command:
unzip -o container-security-terraform-package.zip -d container-security-terraform-packageNote
You must have permission to unzip files in your environment. - Access the extracted folder using the following command:
cd container-security-terraform-package - Copy the terraform.tfvars.example to terraform.tfvars using the following command:
cp terraform.tfvars.example terraform.tfvars - Modify variables in the
terraform.tfvarsfile based on your required configuration:- Set the vision_one_endpoint_parameter_value to match your TrendAI Vision One™ region using the following endpoint values:
-
Middle East and Africa: https://api.mea.xdr.trendmicro.com/external/v2/direct/vcs/external/vcs
- From the CloudFormation template you downloaded in step 1, find the
VisionOneBootstrapTokenand copy its value to thevision_one_bootstrap_tokenvariable in yourterraform.tfvarsfile. - Set the other variables as needed. For example, use stackset_regions to specify all the AWS regions Container Security should be installed in, or use common_tags to specify custom tags to apply to all resources.
- Set the vision_one_endpoint_parameter_value to match your TrendAI Vision One™ region using the following endpoint values:
- Deploy the Terraform template using the following commands:
terraform init
terraform plan
terraform apply
Note
You must have Terraform installed to complete this step.
Step 5: Add the TrendAI Vision One™ role
- Add the TrendAI Vision One™ role.
- In the Identity and Access Management service, go to .
- Click Create role.
- For Trusted entity type, select Custom trust policy.
The Custom trust policy JSON editor appears.
- Replace the placeholder code with the following JSON code:
{ "Version": "2012-10-17", "Statement": [ { "Effect": "Allow", "Principal": { "Federated": "${visionOneOIDCProvider}" }, "Action": [ "sts:AssumeRoleWithWebIdentity", "sts:SetSourceIdentity" ], "Condition": { "StringEquals": { "${visionOneOIDCProviderURL}:aud": "arn:aws:iam::${AWSAccountId}:root", "${visionOneOIDCProviderURL}:sub": [ "urn:visionone:identity:${visionOneRegion}:${visionOneAccountID}:account/${visionOneAccountID}" ] } } } ] } - Replace the strings for the following parameters:
ParameterDescriptionExample
"Federated"Replace"${visionOneOIDCProvider}"with the provider ARN for the provider you created in Step 2: Add TrendAI Vision One™ as an identity provider.For example, if your TrendAI Vision One™ region is the United States, the ARN follows the format "arn:aws:iam::1xxxxxxxxxx1:oidc-provider/cloudaccounts-us.xdr.trendmicro.com""StringEquals"Replace both instances of"${visionOneOIDCProviderURL}"with the value used when you created the provider in Step 2: Add TrendAI Vision One™ as an identity provider.For example, if your TrendAI Vision One™ region is the United States, use cloudaccounts-us.xdr.trendmicro.comFor the string"arn:aws:iam::${AWSAccountID}:root", replace${AWS::AccountID}with your AWS account ID.The string should follow the format "arn:aws:iam::1xxxxxxxxxx1:root"In the string starting with"urn:visionone:identity:...", replace the following parameters:-
${visionOneRegion}: Your TrendAI Vision One™ region (us, eu, au, sg, in,orjp) -
${visionOneAccountID}Your TrendAI Vision One™ business ID. Make sure to replace both instances.
If your TrendAI Vision One™ region is the United States, the string looks like "urn:visionone:identity:us:1#####1:account/1#####1" -
- Click Next.
- On the Add permissions screen, search for the policies you created and select all of them.
- Click Next.
- On the Name, review, and create screen, type VisionOneRole for the Role name.
- Under Step 3: Add tags, add the following tags.
KeyValueVisionOneFeaturesEnter one of the following values:
-
If you deployed Container Security in Step 4: Deploy Container Security using Terraform (optional), enter container-security
-
If you did not deploy Container Security, leave the value as VisionOneFeatures: Base.
VisionOneCloudFormationStackNameVision-One-Cloud-Account-ManagementVisionOneCloudFormationStackRegionInput the AWS region where you want to deploy the resources. For example, us-east-1. -
- Click Create role.
- Once creation completes, click on the role name for the role you created.
- In the role details screen, copy the ARN to use with the Add AWS account API in a later step.
Step 6: Connect the AWS account using the Add AWS account API
In this final step, you will provide parameter values and call the Add AWS account API to connect your AWS account to TrendAI Vision One™.
Procedure
- Access the API from the Automation Center, or copy the following code to customize:
import json import requests BASE_URL = "https://api.xdr.trendmicro.com" # Modify this to the correct endpoint for your region following https://automation.trendmicro.com/xdr/Guides/Regional-domains/ ACCOUNTS_PATH = "/beta/xdr/cam/awsAccounts" TOKEN = "API Keys" # Required inputs ROLE_ARN = "YOUR_ROLEARN" # e.g. arn:aws:iam::123456789012:role/VisionOneRole ACCOUNT_NAME = "YOUR_ACCOUNT_NAME" # Display name in Cloud Accounts DESCRIPTION = "YOUR_DESCRIPTION" # Optional description # Features: # Leave empty to skip features will not enable any # Example structure # FEATURES = [ # { # "id": "container-security", # "regions": ["us-east-1"] # } # ] FEATURES = [] # Leave empty to skip features (will not enable V1CS) # Optional connected security services (example placeholder) # CONNECTED_SECURITY_SERVICES = [ # { # "name": "workload", # "instanceIds": ["INSTANCE_ID_1"] # } # ] CONNECTED_SECURITY_SERVICES = [] # Server Workload Protection settings # User can enable any AWS commercial region listed in https://docs.aws.amazon.com/general/latest/gr/rande.html # (the US GovCloud regions in that list are not supported). # Example structure (must match the regions you enable for the workload service): # SERVER_WORKLOAD_PROTECTION_REGIONS = ["us-east-1", "eu-west-1"] SERVER_WORKLOAD_PROTECTION_REGIONS = [] # Required when enabling Workload Security via workload service # Timeouts / settings REQUEST_TIMEOUT = 30 headers = { "Authorization": f"Bearer {TOKEN}", "Content-Type": "application/json;charset=utf-8", } # Base body (mirrors original script structure) body = { "roleArn": ROLE_ARN, "name": ACCOUNT_NAME, "description": DESCRIPTION, } if FEATURES: body["features"] = FEATURES if CONNECTED_SECURITY_SERVICES: body["connectedSecurityServices"] = CONNECTED_SECURITY_SERVICES def workload_service_selected(services): """Return True when workload service is present with at least one instance ID.""" for service in services: service_name = str(service.get("name", "")).strip().lower() instance_ids = service.get("instanceIds") or service.get("InstanceIDs") if service_name == "workload" and instance_ids: return True return False workload_selected = workload_service_selected(CONNECTED_SECURITY_SERVICES) if SERVER_WORKLOAD_PROTECTION_REGIONS: if not workload_selected: raise SystemExit( "SERVER_WORKLOAD_PROTECTION_REGIONS can only be specified when the workload connected security service is provided." ) body["serverWorkloadProtectionRegions"] = SERVER_WORKLOAD_PROTECTION_REGIONS elif workload_selected: raise SystemExit( "SERVER_WORKLOAD_PROTECTION_REGIONS must include at least one AWS region when Workload Security features are enabled." ) def list_accounts(): """Return list of existing AWS accounts or None if request fails.""" try: resp = requests.get(f"{BASE_URL}{ACCOUNTS_PATH}", headers=headers, timeout=REQUEST_TIMEOUT) if resp.status_code // 100 == 2: data = resp.json() if isinstance(data, dict) and "items" in data: return data.get("items", []) if isinstance(data, list): return data return None except Exception: return None def find_existing(accounts, role_arn, name): """Find existing account by roleArn or name; returns account dict or None.""" if not accounts: return None for acct in accounts: if acct.get("roleArn") == role_arn or acct.get("name") == name: return acct return None def _print_request(method: str, url: str, payload: dict): """Standardized pre-request logging to mimic legacy verbose output.""" print(f"Request URL: {url}") print(f"Request Headers: {headers}") if payload is not None: try: print("Request Body:") print(json.dumps(payload, indent=2)) except Exception: print(f"Request Body (raw): {payload}") def add_account(payload): url = f"{BASE_URL}{ACCOUNTS_PATH}" _print_request("POST", url, payload) return requests.post( url, headers=headers, params={}, json=payload, timeout=REQUEST_TIMEOUT, ) def patch_account(account_id, payload): url = f"{BASE_URL}{ACCOUNTS_PATH}/{account_id}" _print_request("PATCH", url, payload) return requests.patch( url, headers=headers, params={}, json=payload, timeout=REQUEST_TIMEOUT, ) def main(): print("Starting AWS account onboarding (idempotent)...") response = None accounts = list_accounts() if accounts is not None: existing = find_existing(accounts, ROLE_ARN, ACCOUNT_NAME) if existing and existing.get("id"): acct_id = existing["id"] print(f"Existing account found (id={acct_id}). Sending PATCH...") try: response = patch_account(acct_id, body) except Exception as e: print(f"PATCH failed ({e}); falling back to POST") response = add_account(body) else: print("No matching account found. Sending POST...") response = add_account(body) else: print("List call failed or returned nothing. Sending POST (original behavior)...") response = add_account(body) # Output diagnostics print("Status:", response.status_code) for k, v in response.headers.items(): print(f"{k}: {v}") print() ctype = response.headers.get("Content-Type", "") if "application/json" in ctype: try: print(json.dumps(response.json(), indent=4)) except Exception: print(response.text) else: print(response.text) if not (response.status_code // 100 == 2): raise SystemExit("Request failed. See output above.") if __name__ == "main" or __name__ == "__main__": main() - Provide the values for the following parameters in the API code:
-
ParameterValue
ROLE_ARNThe ARN for the role you created in Step 5: Add the TrendAI Vision One™ role.ACCOUNT_NAMEThe name of the account as it appears in the Cloud Accounts app.The name must be unique within the Cloud Accounts app.DESCRIPTIONThe description of the account as it appears in the Cloud Accounts app.FEATURESDo one of the following:-
If you did not enable Container Security in Step 4: Deploy Container Security using Terraform (optional), leave this value blank.
-
To enable Container Security, provide the following values:
-
"id": "container-security" -
"regions": ["us-east-1", "another region"]. Add all the regions where you want to enable Container Security..
-
TOKENThe value displayed when you create an API key in Server & Workload Protection. For more information, see Create an API Key using the Server & Workload Protection console.Note
The token is shown only once when creating an API key. If you can't confirm it, create a new key for verification.CONNECTED_SECURITY_SERVICESIf you have provisioned at least one Server & Workload Protection instance, you must provide the the following parameters for CONNECTED_SECURITY_SERVICES:-
"name": "workload" -
Instance ID: The Instance ID for the Server & Workload Protection instance you want to associate with your connected AWS accountYou can find the Instance ID in the TrendAI Vision One™ console by going to .Important
You can only associate one Server & Workload Protection instance with an AWS account connection.
-
- Call the Add AWS account API. The API returns a list of existing connected AWS accounts, and does one of the
following:
-
If an AWS account with a matching
ROLE_ARNorACCOUNT_NAMEexists, then the API patches the account to update the name and description, and enables Container Security if you provided the required values for theFEATURESparameter. -
If no matching AWS accounts are returned, the Cloud Accounts app in TrendAI Vision One™ connects to your AWS account. You can verify the connection in the Cloud Accounts app, or by calling the Get Connected Accounts API.
-
Next steps
View the AWS account in TrendAI Vision One™ by going to . Optionally, enable additional security features on the account on the AWS Stack update tab in Cloud Account Settings.Upgrade Container Security for ECS to v2
Upgrade an existing Container Security for ECS v1.x.x deployment to v2 using Terraform.
Before you begin
-
You must have installed the previous version of Container Security v1.x.x using the Terraform installation steps.
-
You must have the generated Terraform state files (
terraform.tfstate) for the installation you want to upgrade. The upgrade fails without this file.
If you previously deployed Container Security for ECS using Terraform, you can upgrade
to v2 by downloading the new template and running it in the same directory as your
existing
terraform.tfstate file. The upgrade process updates the deployed resources to the latest version.Procedure
- Download the latest CloudFormation template from .You need the
VisionOneBootstrapTokenvalue from this template for the upgrade. - Replace the
VisionOneFeaturesPolicywith the updated policy.In the Identity and Access Management service, find the existingVisionOneFeaturesPolicyand replace its JSON content with the updated version. For the updated policy JSON, see AWS policies in JSON format.Important
You must replace all placeholder instances of<AWS-Account-ID>with your AWS account ID. - Download the new Terraform template using the following command:
curl https://vcs-cloudaccounts-us-east-1-484917860638.s3.us-east-1.amazonaws.com/templates/aws/terraform/ContainerSecurityEcsTemplate.zip --output container-security-ecs-template.zip - Extract the template into the same folder as the
terraform.tfstatefrom your previous installation using the following command:unzip -o container-security-terraform-package.zip -d container-security-terraform-package - Access the extracted folder using the following command:
cd container-security-terraform-package - Copy the
terraform.tfvars.exampletoterraform.tfvarsusing the following command:cp terraform.tfvars.example terraform.tfvarsNote
You can back up the existingterraform.tfvarsfile to reuse some of the existing configuration. - Modify variables in the
terraform.tfvarsfile based on your required configuration:- Set the vision_one_endpoint_parameter_value to match your TrendAI Vision One™ region using the following endpoint values:
-
Middle East and Africa: https://api.mea.xdr.trendmicro.com/external/v2/direct/vcs/external/vcs
- From the CloudFormation template you downloaded in step 1, find the
VisionOneBootstrapTokenand copy its value to thevision_one_bootstrap_tokenvariable in yourterraform.tfvarsfile. - Set the other variables as needed. For example, use stackset_regions to specify all the AWS regions Container Security should be installed in, or use common_tags to specify custom tags to apply to all resources.
- Set the vision_one_endpoint_parameter_value to match your TrendAI Vision One™ region using the following endpoint values:
- Deploy the Terraform template using the following commands:
terraform init
terraform plan
terraform apply
Note
You must have Terraform installed to complete this step. - Verify that the upgrade was successful.Verify that the account is connected through the Cloud Accounts page on TrendAI Vision One™, and check the template version installed on the page.
Next steps
After a successful upgrade, you can enable the runtime security and vulnerability
features on the Container Security page.
AWS policies in JSON format
The AWS IAM policies required to allow Cloud Accounts to connect to your AWS account provided in JSON code blocks.
The following JSON code blocks are required when manually connecting your AWS account
to the TrendAI Vision One™ Cloud Accounts app. You can find these code blocks within the stack template file
if you download from Cloud Accounts or use and API to call the template. The policies
are not unique to your AWS account or TrendAI Vision One™ account. For more information about using the code, see Connect an AWS account manually.
Use the links to jump to the policy code you require:
-
Policy 1:
VisionOnePolicyPart1 -
Policy 2:
VisionOnePolicyPart2 -
Policy 3:
VisionOnePolicyPart3 -
Policy 4:
VisionOneFeaturesPolicy
Policy 1:
VisionOnePolicyPart1{
"Version": "2012-10-17",
"Statement": [
{
"Action": [
"access-analyzer:ListAnalyzers",
"access-analyzer:ListFindings",
"acm:DescribeCertificate",
"acm:ListCertificates",
"acm:ListTagsForCertificate",
"apigateway:GET",
"appflow:DescribeFlow",
"appflow:ListFlows",
"application-autoscaling:DescribeScalableTargets",
"application-autoscaling:DescribeScalingActivities",
"application-autoscaling:DescribeScalingPolicies",
"application-autoscaling:DescribeScheduledActions",
"athena:GetQueryExecution",
"athena:ListQueryExecutions",
"athena:ListTagsForResource",
"autoscaling:DescribeAccountLimits",
"autoscaling:DescribeAutoScalingGroups",
"autoscaling:DescribeAutoScalingInstances",
"autoscaling:DescribeLaunchConfigurations",
"autoscaling:DescribeLoadBalancerTargetGroups",
"autoscaling:DescribeLoadBalancers",
"autoscaling:DescribeNotificationConfigurations",
"autoscaling:DescribeTags",
"backup:DescribeBackupVault",
"backup:GetBackupVaultAccessPolicy",
"backup:ListBackupVaults",
"ce:GetAnomalies",
"ce:GetAnomalyMonitors",
"cloudformation:DescribeAccountLimits",
"cloudformation:DescribeStackDriftDetectionStatus",
"cloudformation:DescribeStackEvents",
"cloudformation:DescribeStackResources",
"cloudformation:DescribeStacks",
"cloudformation:DetectStackDrift",
"cloudformation:GetStackPolicy",
"cloudformation:GetTemplate",
"cloudformation:ListStackInstances",
"cloudformation:ListStackResources",
"cloudformation:ListStacks",
"cloudfront:GetDistribution",
"cloudfront:ListDistributions",
"cloudfront:ListTagsForResource",
"cloudtrail:DescribeTrails",
"cloudtrail:GetEventSelectors",
"cloudtrail:GetTrailStatus",
"cloudtrail:ListTags",
"cloudwatch:DescribeAlarms",
"cloudwatch:DescribeAlarmsForMetric",
"cloudwatch:GetMetricStatistics",
"cloudwatch:ListMetrics",
"comprehend:ListDocumentClassificationJobs",
"comprehend:ListDominantLanguageDetectionJobs",
"comprehend:ListEntitiesDetectionJobs",
"comprehend:ListKeyPhrasesDetectionJobs",
"comprehend:ListSentimentDetectionJobs",
"comprehend:ListTopicsDetectionJobs",
"compute-optimizer:GetAutoScalingGroupRecommendations",
"compute-optimizer:GetEC2InstanceRecommendations",
"config:DescribeComplianceByConfigRule",
"config:DescribeConfigRules",
"config:DescribeConfigurationRecorderStatus",
"config:DescribeConfigurationRecorders",
"config:DescribeDeliveryChannelStatus",
"config:DescribeDeliveryChannels",
"config:GetComplianceDetailsByConfigRule",
"config:GetResourceConfigHistory",
"config:SelectResourceConfig",
"dax:DescribeClusters",
"dax:ListTags",
"dms:DescribeReplicationInstances",
"dms:ListTagsForResource",
"ds:DescribeDirectories",
"ds:ListTagsForResource",
"dynamodb:DescribeContinuousBackups",
"dynamodb:DescribeLimits",
"dynamodb:DescribeTable",
"dynamodb:ListBackups",
"dynamodb:ListTables",
"dynamodb:ListTagsOfResource",
"ec2:DescribeAccountAttributes",
"ec2:DescribeAddresses",
"ec2:DescribeAvailabilityZones",
"ec2:DescribeEgressOnlyInternetGateways",
"ec2:DescribeFlowLogs",
"ec2:DescribeImages",
"ec2:DescribeInstanceAttribute",
"ec2:DescribeInstanceStatus",
"ec2:DescribeInstances",
"ec2:DescribeInternetGateways",
"ec2:DescribeKeyPairs",
"ec2:DescribeManagedPrefixLists",
"ec2:DescribeNatGateways",
"ec2:DescribeNetworkAcls",
"ec2:DescribeNetworkInterfaces",
"ec2:DescribeRegions",
"ec2:DescribeReservedInstances",
"ec2:DescribeRouteTables",
"ec2:DescribeSecurityGroupReferences",
"ec2:DescribeSecurityGroups",
"ec2:DescribeSnapshotAttribute",
"ec2:DescribeSnapshots",
"ec2:DescribeSubnets",
"ec2:DescribeTags",
"ec2:DescribeTransitGatewayPeeringAttachments",
"ec2:DescribeTransitGatewayRouteTables",
"ec2:DescribeTransitGateways",
"ec2:DescribeVolumes",
"ec2:DescribeVpcAttribute",
"ec2:DescribeVpcEndpoints",
"ec2:DescribeVpcPeeringConnections",
"ec2:DescribeVpcs",
"ec2:DescribeVpnConnections",
"ec2:DescribeVpnGateways",
"ec2:GetEbsEncryptionByDefault",
"ec2:SearchTransitGatewayRoutes",
"ecr:DescribeImages",
"ecr:DescribeRepositories",
"ecr:GetLifecyclePolicy",
"ecr:GetRepositoryPolicy",
"ecs:DescribeClusters",
"ecs:DescribeContainerInstances",
"ecs:DescribeServices",
"ecs:DescribeTaskDefinition",
"ecs:DescribeTasks",
"ecs:ListClusters",
"ecs:ListContainerInstances",
"ecs:ListServices",
"ecs:ListTagsForResource",
"ecs:ListTaskDefinitions",
"ecs:ListTasks",
"eks:DescribeCluster",
"eks:ListClusters",
"elasticache:DescribeCacheClusters",
"elasticache:DescribeReplicationGroups",
"elasticache:DescribeReservedCacheNodes",
"elasticache:ListTagsForResource",
"elasticbeanstalk:DescribeConfigurationSettings",
"elasticbeanstalk:DescribeEnvironments",
"elasticfilesystem:DescribeFileSystems",
"elasticfilesystem:DescribeTags",
"elasticloadbalancing:DescribeListeners",
"elasticloadbalancing:DescribeLoadBalancerAttributes",
"elasticloadbalancing:DescribeLoadBalancerPolicies",
"elasticloadbalancing:DescribeLoadBalancers",
"elasticloadbalancing:DescribeRules",
"elasticloadbalancing:DescribeTags",
"elasticloadbalancing:DescribeTargetGroups",
"elasticloadbalancing:DescribeTargetHealth",
"elasticmapreduce:DescribeCluster",
"elasticmapreduce:ListClusters",
"elasticmapreduce:ListInstances",
"es:DescribeElasticsearchDomain",
"es:DescribeElasticsearchDomainConfig",
"es:DescribeElasticsearchDomains",
"es:DescribeElasticsearchInstanceTypeLimits",
"es:DescribeReservedElasticsearchInstanceOfferings",
"es:DescribeReservedElasticsearchInstances",
"es:ListDomainNames",
"es:ListElasticsearchInstanceTypes",
"es:ListElasticsearchVersions",
"es:ListTags",
"events:DescribeEventBus",
"events:ListRules",
"firehose:DescribeDeliveryStream",
"firehose:ListDeliveryStreams",
"firehose:ListTagsForDeliveryStream",
"glue:GetDataCatalogEncryptionSettings",
"glue:GetDatabases",
"glue:GetSecurityConfiguration",
"glue:GetSecurityConfigurations",
"guardduty:GetDetector",
"guardduty:GetFindings",
"guardduty:ListDetectors",
"guardduty:ListFindings",
"health:DescribeAffectedEntities",
"health:DescribeEventDetails",
"health:DescribeEvents",
"iam:GenerateCredentialReport",
"iam:GetAccessKeyLastUsed",
"iam:GetAccountAuthorizationDetails",
"iam:GetAccountPasswordPolicy",
"iam:GetAccountSummary",
"iam:GetCredentialReport",
"iam:GetGroup",
"iam:GetGroupPolicy",
"iam:GetLoginProfile",
"iam:GetOpenIDConnectProvider"
],
"Resource": [
"*"
],
"Effect": "Allow"
}
]
}
Policy 2:
VisionOnePolicyPart2{
"Version": "2012-10-17",
"Statement": [
{
"Action": [
"iam:GetPolicy",
"iam:GetPolicyVersion",
"iam:GetRole",
"iam:GetRolePolicy",
"iam:GetSAMLProvider",
"iam:GetServerCertificate",
"iam:GetUser",
"iam:GetUserPolicy",
"iam:ListAccessKeys",
"iam:ListAccountAliases",
"iam:ListAttachedGroupPolicies",
"iam:ListAttachedRolePolicies",
"iam:ListAttachedUserPolicies",
"iam:ListEntitiesForPolicy",
"iam:ListGroupPolicies",
"iam:ListGroups",
"iam:ListInstanceProfiles",
"iam:ListInstanceProfilesForRole",
"iam:ListMFADevices",
"iam:ListOpenIDConnectProviders",
"iam:ListPolicies",
"iam:ListPolicyTags",
"iam:ListPolicyVersions",
"iam:ListRolePolicies",
"iam:ListRoleTags",
"iam:ListRoles",
"iam:ListSAMLProviders",
"iam:ListSSHPublicKeys",
"iam:ListServerCertificates",
"iam:ListUserPolicies",
"iam:ListUserTags",
"iam:ListUsers",
"iam:ListVirtualMFADevices",
"inspector:DescribeAssessmentRuns",
"inspector:DescribeAssessmentTargets",
"inspector:DescribeAssessmentTemplates",
"inspector:DescribeExclusions",
"inspector:DescribeFindings",
"inspector:DescribeResourceGroups",
"inspector:ListAssessmentRuns",
"inspector:ListAssessmentTargets",
"inspector:ListAssessmentTemplates",
"inspector:ListExclusions",
"inspector:ListFindings",
"inspector:PreviewAgents",
"kafka:DescribeCluster",
"kafka:ListClusters",
"kafka:ListNodes",
"kinesis:DescribeStream",
"kinesis:ListStreams",
"kinesis:ListTagsForStream",
"kms:DescribeKey",
"kms:GetKeyPolicy",
"kms:GetKeyRotationStatus",
"kms:ListAliases",
"kms:ListGrants",
"kms:ListKeyPolicies",
"kms:ListKeys",
"kms:ListResourceTags",
"lambda:GetAccountSettings",
"lambda:GetFunctionConfiguration",
"lambda:GetPolicy",
"lambda:ListEventSourceMappings",
"lambda:ListFunctionUrlConfigs",
"lambda:ListFunctions",
"lambda:ListLayers",
"lambda:ListTags",
"logs:DescribeLogGroups",
"logs:DescribeLogStreams",
"logs:DescribeMetricFilters",
"macie2:GetClassificationExportConfiguration",
"macie2:GetFindingStatistics",
"macie2:ListClassificationJobs",
"mq:DescribeBroker",
"mq:ListBrokers",
"organizations:DescribeAccount",
"organizations:DescribeCreateAccountStatus",
"organizations:DescribeHandshake",
"organizations:DescribeOrganization",
"organizations:DescribeOrganizationalUnit",
"organizations:DescribePolicy",
"organizations:ListAWSServiceAccessForOrganization",
"organizations:ListAccounts",
"organizations:ListAccountsForParent",
"organizations:ListChildren",
"organizations:ListCreateAccountStatus",
"organizations:ListHandshakesForAccount",
"organizations:ListHandshakesForOrganization",
"organizations:ListOrganizationalUnitsForParent",
"organizations:ListParents",
"organizations:ListPolicies",
"organizations:ListPoliciesForTarget",
"organizations:ListRoots",
"organizations:ListTargetsForPolicy",
"rds:DescribeAccountAttributes",
"rds:DescribeDBClusters",
"rds:DescribeDBInstances",
"rds:DescribeDBParameterGroups",
"rds:DescribeDBParameters",
"rds:DescribeDBSecurityGroups",
"rds:DescribeDBSnapshotAttributes",
"rds:DescribeDBSnapshots",
"rds:DescribeEventSubscriptions",
"rds:DescribeEvents",
"rds:DescribeReservedDBInstances",
"rds:ListTagsForResource",
"redshift:DescribeClusterParameterGroups",
"redshift:DescribeClusterParameters",
"redshift:DescribeClusters",
"redshift:DescribeLoggingStatus",
"redshift:DescribeReservedNodes",
"redshift:DescribeTags",
"route53:GetDNSSEC",
"route53:GetGeoLocation",
"route53:ListHostedZones",
"route53:ListResourceRecordSets",
"route53:ListTagsForResource",
"route53domains:GetDomainDetail",
"route53domains:ListDomains",
"route53domains:ListTagsForDomain",
"s3:GetAccelerateConfiguration",
"s3:GetAccountPublicAccessBlock",
"s3:GetBucketAcl",
"s3:GetBucketLocation",
"s3:GetBucketLogging",
"s3:GetBucketObjectLockConfiguration",
"s3:GetBucketPolicy",
"s3:GetBucketPolicyStatus",
"s3:GetBucketPublicAccessBlock",
"s3:GetBucketTagging",
"s3:GetBucketVersioning",
"s3:GetBucketWebsite",
"s3:GetEncryptionConfiguration",
"s3:GetLifecycleConfiguration",
"s3:ListAllMyBuckets",
"s3:ListBucket",
"sagemaker:DescribeNotebookInstance",
"sagemaker:ListNotebookInstances",
"sagemaker:ListTags",
"secretsmanager:DescribeSecret",
"secretsmanager:ListSecrets",
"securityhub:DescribeHub",
"securityhub:GetEnabledStandards",
"securityhub:GetFindings",
"securityhub:GetInsightResults",
"securityhub:GetInsights",
"securityhub:GetMasterAccount",
"securityhub:GetMembers",
"securityhub:ListEnabledProductsForImport",
"securityhub:ListInvitations",
"securityhub:ListMembers",
"servicequotas:ListServiceQuotas",
"ses:GetIdentityDkimAttributes",
"ses:GetIdentityPolicies",
"ses:GetIdentityVerificationAttributes",
"ses:ListIdentities",
"ses:ListIdentityPolicies",
"shield:DescribeSubscription",
"sns:GetTopicAttributes",
"sns:ListSubscriptionsByTopic",
"sns:ListTagsForResource",
"sns:ListTopics",
"sqs:GetQueueAttributes",
"sqs:ListQueueTags",
"sqs:ListQueues",
"ssm:AddTagsToResource",
"ssm:DeleteParameter",
"ssm:DescribeInstanceInformation",
"ssm:DescribeParameters",
"ssm:DescribeSessions",
"ssm:GetParameters",
"ssm:PutParameter",
"ssm:RemoveTagsFromResource",
"storagegateway:DescribeNFSFileShares",
"storagegateway:DescribeSMBFileShares",
"storagegateway:DescribeTapes",
"storagegateway:ListFileShares",
"storagegateway:ListTagsForResource",
"storagegateway:ListTapes",
"support:DescribeSeverityLevels",
"support:DescribeTrustedAdvisorCheckRefreshStatuses",
"support:DescribeTrustedAdvisorCheckResult",
"support:DescribeTrustedAdvisorChecks",
"support:RefreshTrustedAdvisorCheck",
"tag:GetResources",
"tag:GetTagKeys",
"tag:GetTagValues",
"transfer:DescribeServer",
"transfer:ListServers",
"waf:GetWebACL",
"waf:ListWebACLs",
"wafv2:ListWebACLs",
"wellarchitected:GetWorkload",
"wellarchitected:ListWorkloads",
"workspaces:DescribeTags",
"workspaces:DescribeWorkspaceBundles",
"workspaces:DescribeWorkspaceDirectories",
"workspaces:DescribeWorkspaces",
"workspaces:DescribeWorkspacesConnectionStatus",
"xray:GetEncryptionConfig"
],
"Effect": "Allow",
"Resource": [
"*"
]
}
]
}
Policy 3:
VisionOnePolicyPart3{
"Version": "2012-10-17",
"Statement": [
{
"Action": [
"sqs:ListQueueTags",
"sqs:ListQueues",
"ssm:DescribeInstanceInformation",
"ssm:DescribeParameters",
"ssm:DescribeSessions",
"ssm:GetParameter",
"ssm:GetParameters",
"ssm:GetParametersByPath",
"ssm:PutParameter",
"storagegateway:DescribeNFSFileShares",
"storagegateway:DescribeSMBFileShares",
"storagegateway:DescribeTapes",
"storagegateway:ListFileShares",
"storagegateway:ListTagsForResource",
"storagegateway:ListTapes",
"support:DescribeSeverityLevels",
"support:DescribeTrustedAdvisorCheckRefreshStatuses",
"support:DescribeTrustedAdvisorCheckResult",
"support:DescribeTrustedAdvisorChecks",
"support:RefreshTrustedAdvisorCheck",
"tag:GetResources",
"tag:GetTagKeys",
"tag:GetTagValues",
"transfer:DescribeServer",
"transfer:ListServers",
"waf:GetWebACL",
"waf:ListWebACLs",
"wafv2:GetWebACL",
"wafv2:ListWebACLs",
"wellarchitected:GetWorkload",
"wellarchitected:ListWorkloads",
"workspaces:DescribeTags",
"workspaces:DescribeWorkspaceBundles",
"workspaces:DescribeWorkspaceDirectories",
"workspaces:DescribeWorkspaces",
"workspaces:DescribeWorkspacesConnectionStatus",
"xray:GetEncryptionConfig"
],
"Resource": [
"*"
],
"Effect": "Allow"
}
]
}
Policy 4:
VisionOneFeaturesPolicy
ImportantYou must replace all placeholder instances of
<AWS-Account-ID> with your AWS account ID. |
{
  "Version": "2012-10-17",
  "Statement": [
    {
      "Action": [
        "lambda:ListTags"
      ],
      "Effect": "Allow",
      "Resource": [
        "*"
      ]
    },
    {
      "Action": [
        "sqs:SendMessage"
      ],
      "Effect": "Allow",
      "Resource": [
        "arn:aws:sqs:*:<Aws-Account-ID>:StackSet-V1CSStackSet-*"
      ]
    },
    {
      "Action": [
        "ecs:DescribeServices",
        "ecs:DeleteService",
        "ecs:UpdateService",
        "ecs:CreateService",
        "ecs:TagResource",
        "ecs:UntagResource"
      ],
      "Effect": "Allow",
      "Resource": [
        "arn:aws:ecs:*:<Aws-Account-ID>:service/*/trendmicro-scout"
      ]
    },
    {
      "Action": [
        "ssm:PutParameter",
        "ssm:DeleteParameters",
        "ssm:AddTagsToResource",
        "ssm:RemoveTagsFromResource"
      ],
      "Effect": "Allow",
      "Resource": [
        "arn:aws:ssm:*:<Aws-Account-ID>:parameter/V1CS/*"
      ]
    },
    {
      "Action": [
        "iam:PassRole"
      ],
      "Effect": "Allow",
      "Resource": [
        "arn:aws:iam::aws:policy/service-role/AmazonECSTaskExecutionRolePolicy",
        "arn:aws:iam::<Aws-Account-ID>:role/StackSet-V1CSStackSet-*-ExecutionRole-*",
        "arn:aws:iam::<Aws-Account-ID>:role/StackSet-V1CSStackSet-*-TaskRole-*"
      ]
    },
    {
      "Action": [
        "ecs:StopTask"
      ],
      "Effect": "Allow",
      "Resource": [
        "arn:aws:ecs:*:<Aws-Account-ID>:task/*"
      ]
    },
    {
      "Action": [
        "sqs:SendMessage"
      ],
      "Effect": "Allow",
      "Resource": [
        "arn:aws:sqs:*:<Aws-Account-ID>:trendmicro-container-security-ecs-mitigation-queue"
      ]
    }
  ]
}