

IMSVA 9.1 supports upgrading only from IMSVA 9.0 and migrates existing configuration
and policy data during the upgrade.
The IMSVA installation process formats your existing system
to install IMSVA. The installation procedure is
basically the same for both a Bare Metal and a VMware ESX virtual machine platform.
The Bare Metal installation boots off of the IMSVA installation DVD to begin the procedure
and the VMware installation requires the creation of a virtual machine before
installation.
WARNINGAny existing data or partitions are erased during the installation process. Back up
any existing
data on the system (if any) before installing IMSVA.
|
Procedure
- Start the IMSVA installation.For system requirements, see System Requirements.
-
On a Bare Metal Server
-
Make sure the Bare Metal server supports CentOS 6.4 x86_64.
-
Insert the IMSVA Installation DVD into the DVD drive of the desired server.
-
Power on the Bare Metal server.
-
-
On a VMware ESX Virtual Machine
-
Create a virtual machine on your VMware ESX server.
-
Start the virtual machine.
-
Insert the IMSVA Installation DVD into the virtual DVD drive with any one of the following methods.
-
Insert the IMSVA Installation DVD into the physical DVD drive of the ESX server, and then connect the virtual DVD drive of the virtual machine to the physical DVD drive.
-
Connect the virtual DVD drive of the virtual machine to the
IMSVA-9.1-xxxx-x86_64.isofile. TheIMSVA-9.1-xxxx-x86_64.isofile is available at:
-
-
Restart the virtual machine by clicking on the VMware web console.
-
For both a VMware ESX Virtual Machine and a Bare Metal Server installation, a page appears displaying the IMSVA 9.1 Setup Wizard with the following options:-
Fresh Install or version upgrade: Select this option to install IMSVA onto the new hardware or virtual machine or upgrade the existing IMSVA.
-
System recovery: Select this option to fix operating system errors and recover administrative passwords.
-
System memory test: Select this option to perform memory diagnostic tests.
-
Exit installation: Select this option to exit the installation process and to boot from the local disk.
-
- Select Fresh install or version upgrade. The License Agreement page appears.
- Click Accept to continue. A keyboard language selection screen appears.
- Select the keyboard language for the system, and then click
Next.A screen appears for you to select your installation type.
- Select Fresh Install, and then click
Next.A screen appears for you to select the drive used for installation.
- Select the drive, and then click Next.A warning dialog box appears.
- Click Yes to proceed. The IMSVA installation program scans your hardware and software to determine if the minimum requirements have been met and displays the results. If the hardware or software contains any components that do not meet the minimum requirements, the installation program highlights those components and the installation stops.
- Make sure the hardware and software information is correct, and then click
Next.The network devices configuration screen appears.
Network Device Configuration
Configuration ParameterDescriptionHost nameType in the applicable FQDN for this IMSVA host.IPv4 addressType the IMSVA management IP address.NetmaskType the subnet mask of the specified IPv4 address.GatewayType the applicable IP address as the gateway for this IMSVA installation.Primary DNSType the applicable IP address as the primary DNS server for this IMSVA installation.Secondary DNSType the applicable IP address as the secondary DNS server for this IMSVA installation. - Provide all the information to install IMSVA, and then
click Next. The time zone configuration screen appears.
- Specify the IMSVA server's time and clock settings
- Select the location of the IMSVA server.
- Specify whether the server's system clock uses UTC or not by selecting or clearing the System clock uses UTC check box.
- Click Next. The account settings screen appears.
- Specify passwords for the root and enable accounts.IMSVA uses two different levels of administrator accounts to secure the system.The password must be a minimum of 6 characters and a maximum of 32 characters.

Tip
For the best security, create a highly unique password only known to you. You can use both upper and lower case alphabetic characters, numerals, and any special characters found on your keyboard to create your passwords.-
Root Account: Used to gain access to the operating system shell and has all rights to the server. This is the most powerful user on the system.
-
Enable Account: Used to gain access to the command line interface's privilege mode. This account has all rights to execute any CLI command.
-
- Select a database from the following:
-
Internal PostgreSQL database: This is the default database used.
-
External PostgreSQL database: If you select this option, provide external database information as required.
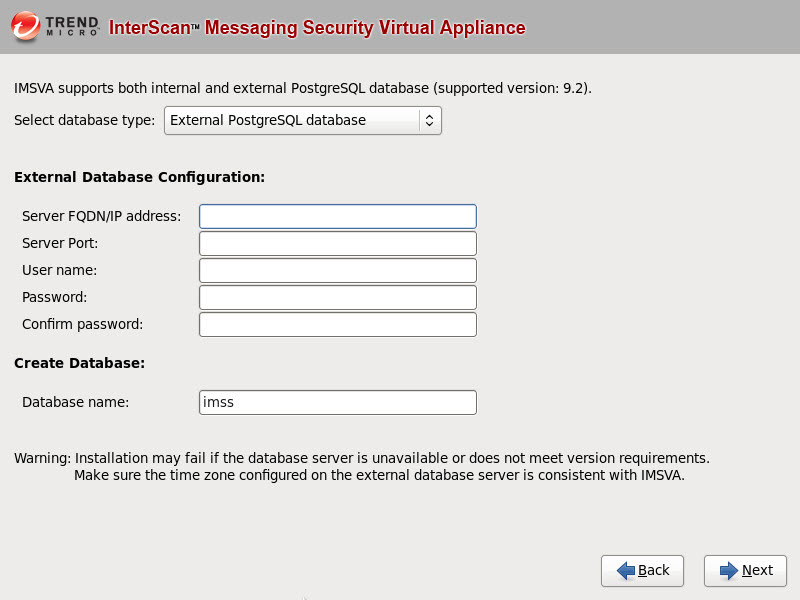

Note
To use the external database, do the following:-
Make sure the account used to install the IMSVA admin database has the superuser role.
-
Manually change the maximum number of database connections to 600:
vi /var/lib/pgsql/9.2/data/postgresql.confmax_connection = 600 (default 100)restart DB service (service postgresql-9.2 restart OR systemctl restart postgresql) -
Make sure that IMSVA and the external database server use the same timezone and time settings; otherwise, some unexpected issues may happen.
-
- Click Next. A screen appears, showing a summary of your configuration settings.
- Verify settings, and then click Next.A dialog box appears, asking you whether to continue the installation.

Important
Selecting Continue erases any data on the hard disk partition and formats the hard disk. If you have data on the hard disk that you would like to keep, cancel the installation and back up the information before proceeding. - Click Continue. A screen appears that provides the formatting status of the local drive for the IMSVA installation. When formatting completes, the IMSVA installation begins.Once the installation completes, a summary screen appears. The installation log saves to the
/var/app_data/installlogfile for reference. - Click Restart to restart the system.
-
Bare Metal installation:The DVD automatically ejects. Remove the DVD from the drive to prevent reinstallation.
-
Virtual machine installation:Trend Micro recommends disconnecting the DVD-ROM device from the virtual machine now that IMSVA is installed.
After IMSVA reboots, the initial CLI login screen appears. -
- Log on through either the CLI or IMSVA management console
to launch IMSVA.
Tip
Log on to the CLI shell to perform additional configuration, troubleshooting, or housekeeping tasks.