Views:
  1. On the Deep Discovery Director (Internal Network Analytics Version) management console, go to Threat Intelligence > Sharing Settings > Auxiliary Products/Services.

    The Auxiliary Products/Services screen appears.

  2. Select Distribute objects to auxiliary products/services.
  3. Select Check Point Open Platform for Security (OPSEC).
  4. Click Legal Statement.

    The Legal Statement dialog appears.

  5. Read and accept the Legal Statement.
    Important:

    To enable integration with this auxiliary product/service, you must accept the Legal Statement.

  6. Select a connection type.
    Note:

    Ensure that your network configuration allows Deep Discovery Director (Internal Network Analytics Version) to connect to the Check Point appliance.

    Deep Discovery Director (Internal Network Analytics Version) may connect to the Check Point appliance through the secured connection port or clear connection port that is configured on the Check Point appliance. Deep Discovery Director (Internal Network Analytics Version) also pulls the certificate from the Check Point appliance through port 18210.

  7. Type the server address.
    Note:

    The server address must be the IPv4 address or resolvable host name of the auxiliary product/service.

  8. Type the port.
    Note:

    This port must be the same port that is configured on the security gateway. For details, see Preconfiguring a Security Gateway.

  9. If you selected Secured connection, type the OPSEC application name and SIC one-time password.

    For more details, see Configuring a Secured Connection.

    Note:

    If the one-time password is reset on the Check Point appliance, the new one-time password must be different than the previous one-time password.

  10. (Optional) Click Test Connection.
  11. On your Check Point firewall appliance, preconfigure a security gateway. For details see Preconfiguring a Security Gateway.
  12. On the Check Point SmartConsole, do the following to configure your Check Point appliance for deploying suspicious objects and C&C callback addresses from Deep Discovery Director (Internal Network Analytics Version):
    1. On the left pane, click Security Policies.
    2. On the Standard tab, under Access Control, click Policy.
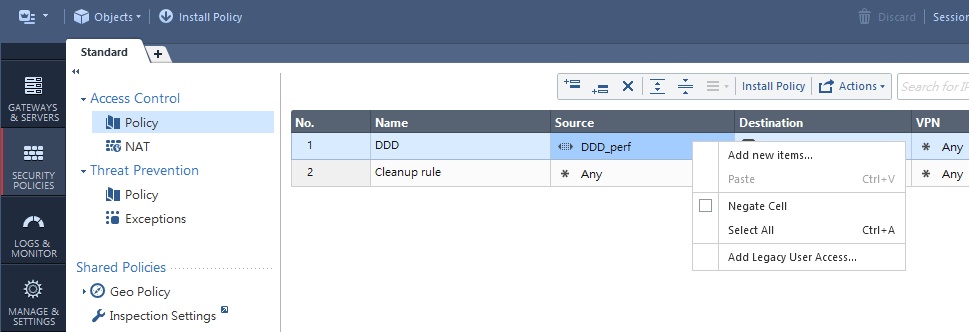
    3. To add a rule, click the Add rule above icon.
    4. Right-click the source and select Add new items....
    5. Click the New icon, and select Address Ranges > Address Range....

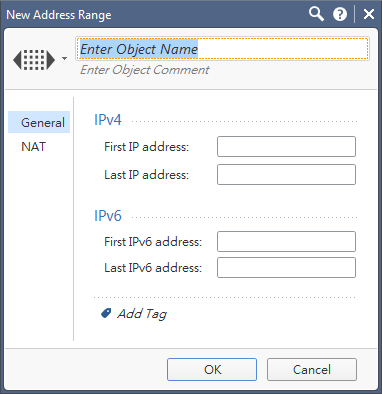
      The New Address Range window appears.

    6. Type DDD as name.
    7. In First IP address, type the Deep Discovery Director (Internal Network Analytics Version) IP address.
    8. In Last IP address, type the Deep Discovery Director (Internal Network Analytics Version) IP address.
    9. Click OK.

      An item named DDD should be created and automatically selected as the source.

    10. Right-click the destination and select your CheckPoint appliance.
    11. Right-click the action and select Accept.
    12. Click Install Policy.

      The Check Point SmartConsole will prompt you to publish your changes before installing the policy.

    13. Click Publish & Install.

      The Install Policy dialog appears.

    14. Click Install.

      The Check Point appliance is enabled to receive suspicious objects and C&C callback addresses from Deep Discovery Director (Internal Network Analytics Version).

  13. On the Deep Discovery Director (Internal Network Analytics Version) management console, configure the following criteria to send suspicious object and C&C callback address information from Deep Discovery Director (Internal Network Analytics Version) to this inline product/service:
    • Object type:

      • C&C Callback Address

        • IPv4 address

      • Suspicious Object

        • IPv4 address

    • Risk level:

      • High only

      • High and medium

      • High, medium, and low

  14. Under Advanced Settings, click one of the following actions:
    • Reject: Packets will be rejected and a notification sent to the communicating peer that the packet has been rejected.

    • Drop: Packets will be dropped without sending the communicating peer a notification.

    • Notify: A notification about the defined activity will be sent but the activity will not be blocked.

  15. Select the frequency at which object information should be distributed.
  16. Click Save.

    The Distribute Now option appears.

  17. (Optional) Click Distribute Now to distribute suspicious objects and C&C callback addresses to Check Point immediately.
  18. To view suspicious objects and C&C callback addresses distributed by Deep Discovery Director (Internal Network Analytics Version) on the Check Point SmartConsole, do the following:
    1. On the left pane, click Logs & Monitor.
    2. Create a new tab by clicking the icon.
    3. On the new tab, click Tunnel & User Monitoring.

      The SmartView Monitor screen appears.

    4. On the SmartView Monitor screen, click Launch Menu icon, and then select Tools > Suspicious Activity Rules....

      The Enforced Suspicious Activity Rules dialog appears.

    5. At Show On, select your Check Point appliance.
    6. Click Refresh.

    Suspicious objects and C&C callback addresses distributed by Deep Discovery Director (Internal Network Analytics Version) are displayed.