

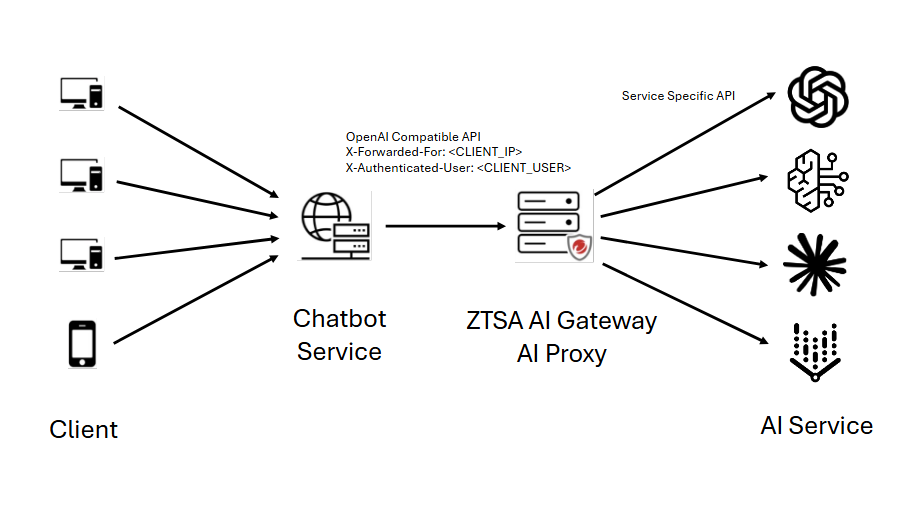
AI proxy is a reverse proxy that allows you to use multiple Large Language Model (LLM) services with different API protocols.
You may host an AI application service that interacts with several self-hosted and
open LLMs, which have different protocols/models. You can add on-premises gateway
as AI proxy between your private AI application and those multiple LLM profiles to
secure your private AI application or LLMs you hosted by the AI secure access rule
with advanced content inspection.
AI proxy mode allows you to create and apply AI secure access and rate limiting rules
specifically for the protected private generative AI services. The on-premises gateway
receives requests to your private generative AI service and can apply the advanced
content filtering, prevent prompt injection, and stop potential denial-of-service
attacks with rate limiting rules. The inspected requests can be relayed to individual LLM services upon the given
LLM profiles on that on-premises gateway, after LLM services returns responses to
AI proxy where can apply content filtering again before it returns responses back
to your private generative AI application, then to endpoints or end-user
You can set the access control based on the user by using the X-Authenticated-User
option. By default, the X-Authenticated-User option is not enabled and an on-premises
gateway in AI proxy mode can only apply IP-based AI secure access rules.
To use this option, an X-Authenticated-User header needs to be inserted by a downstream
app that is deployed in front of the on-premises gateway. The value of this X-Authenticated-User
is the end-user's UPN info. This UPN must be associated with the user/group used to
create the user-based AI secure access rule. The format of header is:
X-Authenticated-User: example@domain.com
If this option is enabled, but the downstream app does not insert the header into
the forwarding traffic, the on-premises gateway applies any user or IP-based AI secure
access rule for such traffic.
Important
|
Create the LLM profiles 
Before you can add the AI proxy to your gateways, you need to create a profile for
each LLM that you are going to interact with.
Procedure
- Go to and either deploy a new on-premises gateway or click the edit icon (
 ) corresponding to an existing on-premises gateway.
 - In the Gateways tab, select AI proxy from the Settings menu. The LLM profiles page opens.
- Click Create profile.
- Enter the name of the profile.
- Provide a description of the profile. Although not necessary, this can be useful, especially if you have several versions of the LLM.
- Select the LLM provider.
- Configure the settings for the LLM.
- Click Save.
- Repeat steps 3 to 8 for each profile that you want to add.
Add the AI proxy to an on-premises gateway
Once you have created your LLM profiles, you can create your AI proxy and add it to
the gateways.
Procedure
- On the , click the edit icon () for the gateway you want to use the AI proxy.
- In Advanced Settings, select AI proxy as the Service mode. The default HTTP listening port is 8088.
- If desired, enable HTTPS listening.The default HTTPS listening port is 8443.For HTTPS requests, choose to use the default SSL certificate or provide a custom certificate with private key and passphrase.
- Enter the Protected app name.
- If desired, you can use X-Authenticated Users.

Note
This requires an AI Service rule. For more information, see Create an AI secure access rule. - Click Manage profiles.
- Select the LLM profiles that you want to apply in the AI proxy.
- Click Apply.
- If desired, you can test the connectivity of the profiles by clicking the connectivity icon. However, the connectivity of the selected profiles, which have not been tested, is automatically tested when you click Save.
- Click Save.The gateway is saved, and the Service mode is AI proxy.