

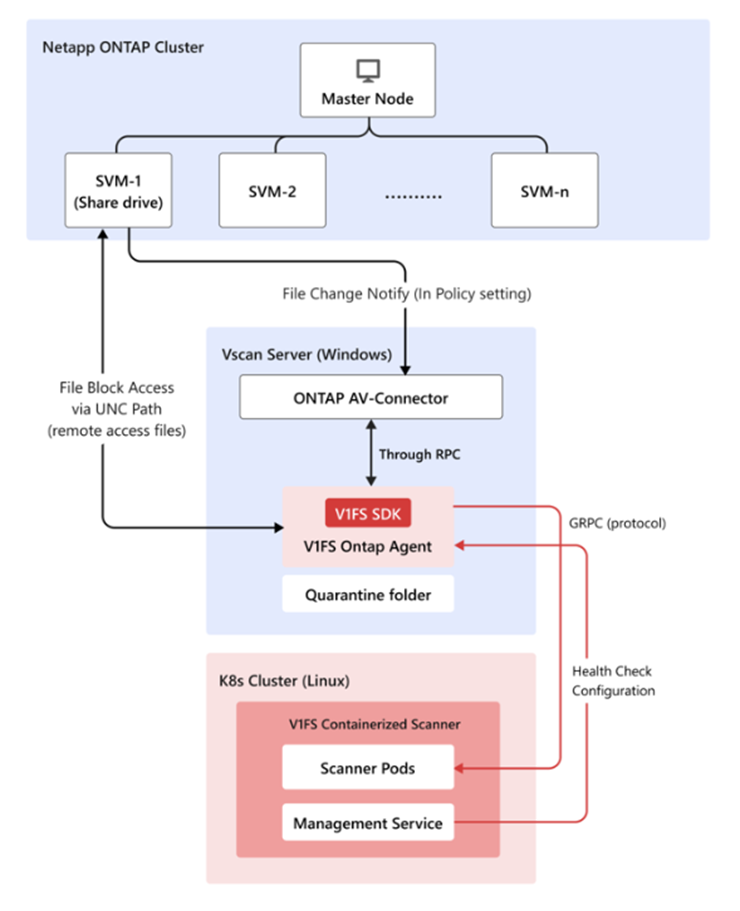
TrendAI Vision One™ File Security Containerized Scanner can be used in conjunction with NetApp's ONTAP
to scan files that use RPC-based protocols.
Prerequisites 
You require the following:
-
Functioning ONTAP cluster with SVMs configured.
-
Windows Vscan server.
-
Kubernetes cluster with the scanner service. Ensure that the Ontapp agent management is enabled with the appropriate feature flag. For more information, see Deploy a Containerized Scanner.
-
Network connectivity between all components.
Configure NetApp ONTAP
Procedure
- Enable Vscan on the ONTAP Management console:
- Create the scanner pool:
vserver vscan scanner-pool create -vserver <svm_name> -scanner-pool <pool_name> -hostnames <vscan_server_hostname> -privileged-users <domain\user>
For more information, see vserver vscan scanner-pool create. - Apply a policy to the scanner pool:
vserver vscan scanner-pool apply-policy -vserver <svm_name> -scanner-pool <pool_name> -scanner-policy primary
For more information, see vserver vscan scanner-pool apply-policy. - Enable Vscan on the SVM:
vserver vscan enable -vserver <svm_name>
- Create the scanner pool:
- Install the NetApp ONTAP AV-Connector:
- Download the NetApp ONTAP AV-Connector from NetApp's website.
- Install the connector on your Windows Vscan server.
- Configure the connector with:
- ONTAP Management LIF or Data LIF (SVMs) IP address
- Appropriate credentials for ONTAP access
Configure the Containerized Scanner for ONTAP agent support
:
Procedure
- Enable the ontap-agent plugin for Management Service with the
values.yamlfile.visiononeFilesecurity: management: plugins: - name: ontap-agent enabled: true configMapName: ontap-agent-config securitySecretName: ontap-agent-security jwtSecretName: ontap-agent-jwt - Configure your Database storage.
-
The chart can run the Management Service with or without the bundled PostgreSQL database:
-
Default (
dbEnabled: false) – no PostgreSQL objects (StatefulSet, PVC, Service, Secret, StorageClass) are created. Use this only for stateless tests or when another team deploys and wires up a database outside this chart -
Embedded database (
dbEnabled: true) – Helm deploys the PostgreSQL StatefulSet, exposes it through an internalClusterIPService, and provisions persistent storage for you.
-
-
EKS clusters typically already have an EBS-backed StorageClass such as
gp3. Reuse it by turning off the bundled hostPath StorageClass and pointing the PVC atgp3visiononeFilesecurity: management: dbEnabled: true databaseContainer: storageClass: create: false # reuse an existing EBS StorageClass persistence: storageClassName: gp3 # any EBS-backed StorageClass name works size: 100GiWhere:databaseContainer.storageClass.create: falseskips creating a new StorageClass. It reuses an existing StorageClass (EBS gp3, NFS, Ceph, etc.) referenced bydatabaseContainer.persistence.storageClassName. -
To use AWS EBS for your storage, you need to ensure that:
-
AWS EBS CSI driver is installed and healthy (
kubectl get storageclassshows anebs.csi.aws.comprovisioner) -
IAM role for the CSI driver has the standard EBS permissions
-
Desired StorageClass (
gp3,gp2, etc.) already exists; create if needed -
Namespace has permission to create PVCs/PVsFor more information, see the AWS EKS Storage Setup Guide.
-
-
- Expose the Scanner Service and Management Service with Ingress (for example AWS EKS
Deployment)
- Configure the Shared Host (Recommended):The scanner and management services can share the same hostname to reduce infrastructure costs and simplify DNS management. When sharing a host:
-
Scanner service handles all traffic to the root path (
/) -
Management service handles WebSocket traffic to
/ontappath -
The ingress controller prioritizes the longer
/ontappath when routing requests

Note
The key requirements for the shared host are:-
Both ingresses must use the same
group.nameannotation (AWS ALB) to share a single load balancer -
Management service must use
backend-protocol: HTTP1(not HTTP2) for WebSocket upgrade compatibility
-
- Edit the
values.yamlfile for the Scanner Service:scanner: ... ingress: enabled: true className: "alb" annotations: "alb.ingress.kubernetes.io/backend-protocol-version": "GRPC" "alb.ingress.kubernetes.io/group.name": "<lb-group-name>" "alb.ingress.kubernetes.io/scheme": "internet-facing" "alb.ingress.kubernetes.io/certificate-arn": "<certificate-arn>" "alb.ingress.kubernetes.io/target-type": "ip" hosts: - host: "<custom-domain-name>" paths: - path: / pathType: Prefix tls: [] - Edit the
values.yamlfile for the Management Service:managementService: ingress: enabled: true className: "alb" annotations: "alb.ingress.kubernetes.io/backend-protocol-version": "HTTP1" "alb.ingress.kubernetes.io/group.name": "<lb-group-name>" "alb.ingress.kubernetes.io/scheme": "internet-facing" "alb.ingress.kubernetes.io/certificate-arn": "<certificate-arn>" "alb.ingress.kubernetes.io/target-type": "ip" hosts: - host: "<custom-domain-name>" paths: - path: /ontap pathType: Prefix tls: [] - Upgrade with the customized values.yml file.
helm upgrade my-release visionone-filesecurity/visionone-filesecurity -f values.yaml -n visionone-filesecurity
- Configure the DNS though Route53:
-
Check the ALB DNS name:
kubectl get ingress -n visionone-filesecurity
-
Create a new record:
- Name: <custom-domain-name>
- Type: A (Alias) for ALB
- Value/Target: The ALB DNS name
-
- Test the endpoint for Scanner Service and Management Service on Vscan Server
- For the Management Service:
-
Use websocat to test the websocket (expected error message for unauthorized(401), since we just test the connection without auth token)
websocat --exit-on-eof wss://<custom-domain-name>/ontap
-
- Use TMFS-CLI to test the scan (you do not need the API Key to scan with the Containerized Scanner.)
- For the Management Service:
- Configure the Shared Host (Recommended):
- Generate the onboarding token for the Ontapp agent in the Management Service:
- Access the Management Service within your Containerized Scanner Kubernetes cluster.
kubectl exec -it <management service pod> -n <namespace> -- bash
- Create an agent slot for the Ontapp agent:
clish agent create --name <agent-name>
- Generate an Onboarding Token for Ontapp Agent Authentication.
clish agent onboarding-token issue --instance <agent-name>
- Access the Management Service within your Containerized Scanner Kubernetes cluster.
- Install the Ontapp agent:
- Download the Ontapp agent installer(msi).
- Install on the Windows Vscan server.
- Configure the Ontapp agent with:
-
Generated Onboarding Token
-
Scanner Service endpoint
-
Management Service endpoint
-
- Configure the Ontapp agent with the Management Service:
- Access the Management Service within your Containerized Scanner Kubernetes cluster.
- Check the agent connection status:
clish agent show --instance <agent-name>
- Configure the privilege user credentials (username/password) for the Ontapp agent.
clish agent credential modify --instance
    <agent-name>
Verify the deployment
Procedure
- Check the Vscan status on the ONTAP Management console:
vserver vscan connection-status show-all - Check Ontapp agent connection in Management Service
- Test file scanning by creating test files with EICAR signatures to verify if they get blocked.
Deployment FAQ
What do I do if the agent connection state shows Disconnected(N) on Management Service
CLI ?
Troubleshooting
-
Verify network connectivity - Ensure the Vscan server can reach the Management Service in the Containerized Scanner cluster
-
Check agent logs - If network connectivity is stable, review the agent logs in Windows Event Log for additional troubleshooting information
-
Disconnection during agent installation:
-
Search the logs for
Failed to connect using onboard tokenand review the error message -
If the error indicates an expired token, issue a new onboarding token and reinstall the agent
-
-
Disconnection after the agent has been running:
-
Search the logs for
Failed to connect using device tokenand review the error message -
If the error indicates an expired token, proceed with agent re-onboarding (see below)
-
How do I re-onboard an agent?
-
Stop the Ontap agent service (v1fs-ontap-agent) on Vscan server
-
Re-onboard the agent and issue a new onboarding token via Management Service CLI:
clish agent re-onboard --instance <agent-name> -
Modify the
config.yamlfile in the Ontap agent installation folder (default:C:\Program Files\v1fs-ontap-agent\) -
Remove the device_token key and its value
-
Add the onboarding_token key with the newly issued token:
onboarding_token: eyJh...... -
Start the Ontap agent service (v1fs-ontap-agent)
-
Verify the agent connection status using the Management Service CLI
-
After the agent connects successfully, re-enter credentials using:
clish agent credential modify --instance <agent-name>