

Profiles allow your organization to store and manage rule settings in reusable
templates (e.g. rule settings for a specific environment type, security level, or
application). You can apply a profile to one or more Cloud
Accounts and also apply multiple profiles to an account to achieve the
desired outcome for your rule settings.
Content
- Cloud Risk Management default
- Organisation profile
- Custom Profile
- How Compliance scan runs Rules
- Create a Profile
- Configure rules within Profile
- Apply Profile
- Recommended usage of Profiles and rule exceptions maintenance
NoteRefer to Cloud Risk Management's Public API for API support on Profiles.
|
When you sign up with Cloud Risk Management, the Cloud Risk Management Default and
Organisation Profiles are available to you as default profiles when
an organisation is created for you. These profiles are automatically linked to all
your new and existing accounts.
Cloud Risk Management default
Consists of all Rules in their default settings and cannot be configured within
conformity.
Downloading the default profile
Click on the Download button to keep this profile as a reference for all
default rule settings. Although this profile consists of all the rules, not all of
them are configured by default. You will need to configure the un-configured rules
before uploading the default profile. Hence we recommend you copy rule settings from
the default profile and apply to new or existing profiles.
Viewing the default profile rule settings
Since the Cloud Risk Management default profile is
read-only, you can only view and not configure any rule settings in this profile.
However, you can copy individual rule settings in their default state and paste them
into a profile if required.
- Click on View rule settings
- Pick a rule and click on View. The View rule settings pop-up window opens with a JSON format of the selected rule setting.
- Click on the Copy to clipboard button and paste it to another profile as required.
Organisation Profile
By default, an Organisation profile has the same rule settings as a Cloud Risk Management profile, but you can
configure the rules within Cloud Risk Management.
Once you configure rules in an Organisation profile, all your current and newly added
accounts will inherit the updated rule settings.
Configuring an Organisation Profile
You have the following options to configure an Organisation profile:
- Copy from a profile: allows you to copy an existing profile’s
settings into the organisation profile.
- Click on Copy from a profile.
- From the Copy from a profile pop-up window, select a profile from the profile you wish to copy the settings from. Please note that any changes to the Organisation profile will be reflected in all your current and newly added accounts in your Organisation.
- Click Next.
- Click on Yes, proceed to confirm your selection. Your Organisation profile Rule configuration is now copied from your selected profile. All the new Rule settings are displayed on the Organisation profile home page.
- Update Rule Settings: allows you to configure Rules for the default Organisation profile as per your requirements. Please note that any Rules configured at an organisation profile will be applied to all the accounts.
- Upload: allows you to create a new organisation profile by uploading a profile to Cloud Risk Management.
- Download: allows you to download the Organisation profile in a JSON format.
- Reset all settings: allows you to set the Organisation profile to its default settings and removes all rule configurations.
Custom Profile
A user created Profile is referred to as a custom profile within Cloud Risk Management.
How Compliance scan runs Rules?
- Compliance scan runs rules at the Account level first.
- If the rule/s is not configured at the Account level, then it will run checks at the Organisation Profile level.
- If a rule has not been configured either at an Account level or the Organisation Profile level, Compliance scan will run checks at the Cloud Risk Management default level.
Create a Profile
-
Click on Profiles from the top navigation panel.
-
Under Custom profiles, click on **+ Create Profile.
-
Select the method of profile creation.
- Create new
- Enter New Profile name and New Profile description.
- Select an account from the Use existing configurations from an account drop-down to copy profile configurations already applied to existing accounts.
- Create new using downloaded Profile
- Click Browse to select a downloaded profile.
- Enter New Profile name, New Profile description. The Profile rule configurations automatically get copied over from the selected profile.
- !!! note ""
- Use unique profile names for better identification.
- Add instructions for your team regarding profile usage and the accounts to apply to.
- Create new
Profile management
Once you have created a profile, you can access it from the left-hand navigation.
From the Manage Profiles page, you can:
- Edit the profile name and description
- Update rule settings
- Download
- Upload
- Apply the selected profile to your account(s)
- Delete the profile
NoteDeleting a profile cannot be undone. You can download the profile and save it as
a backup copy before deleting.
|
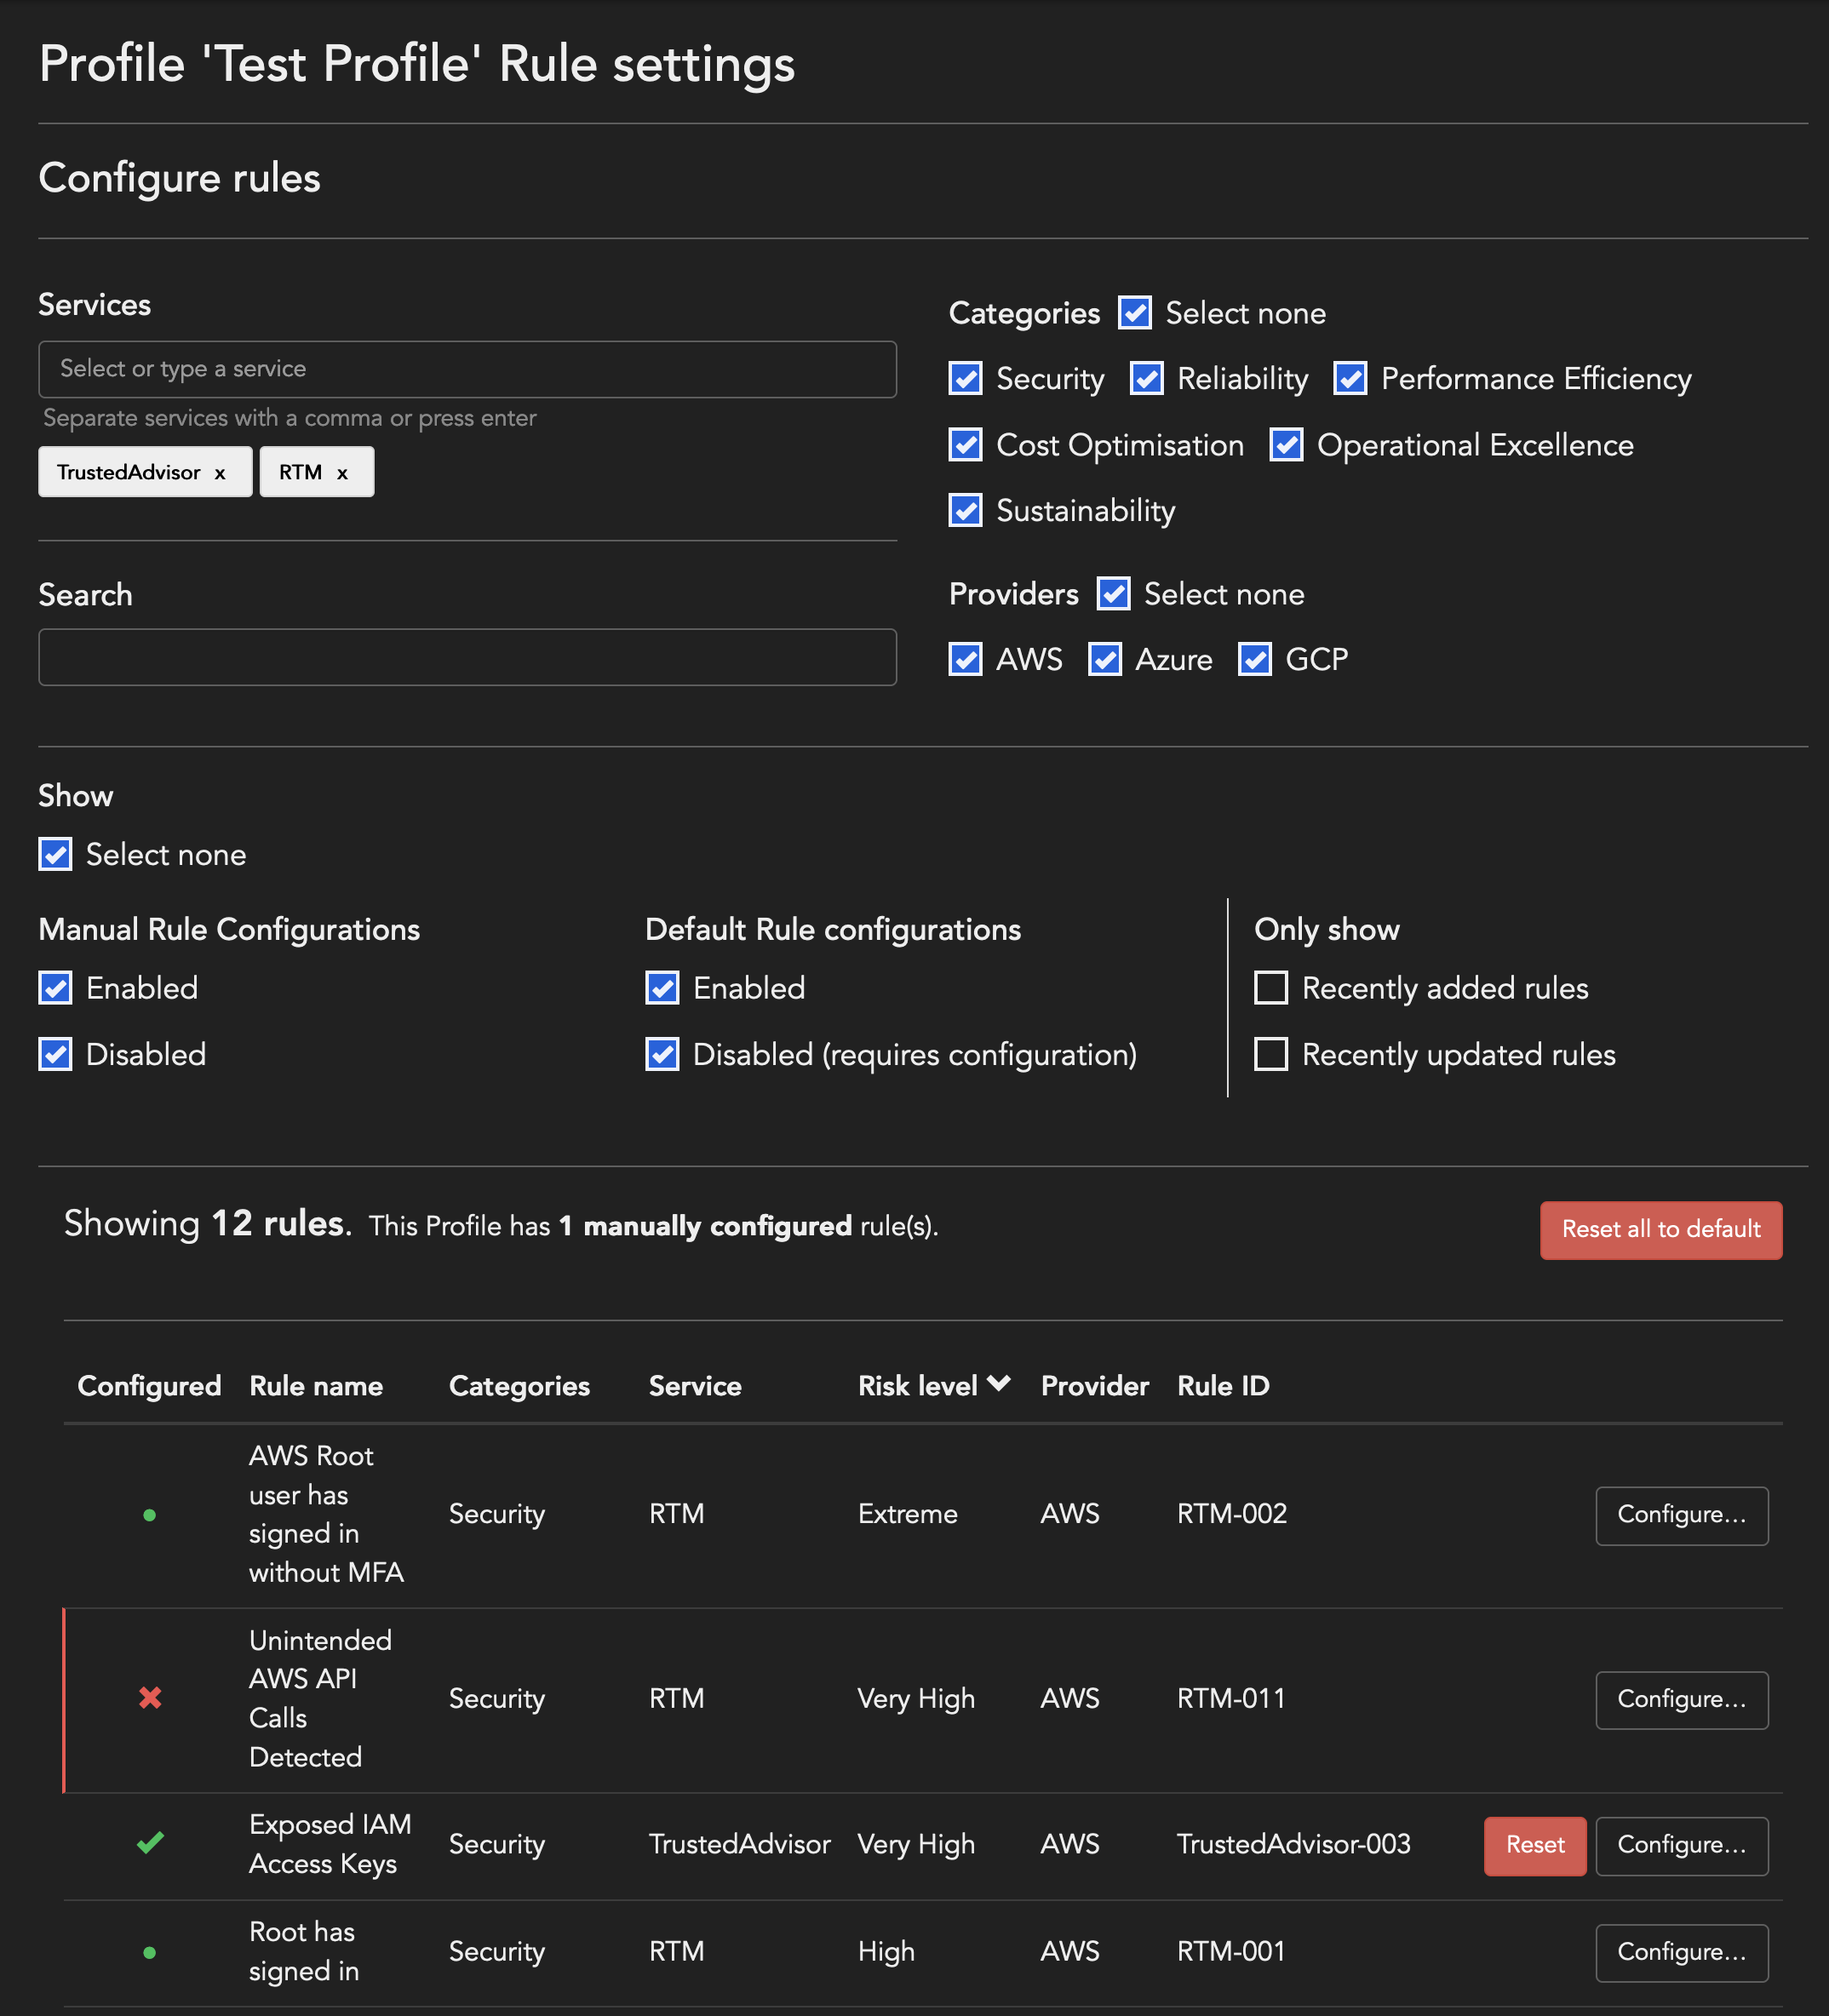
Profile rule configurations
- Click on Update rule settings.
- Filter rules as per your requirements, for example you can filter by Services, Rule ID, Categories, Active rules, Non-active rules, new or updated rules.
- You can configure every rule within a profile as per your requirements.
Resetting Profile rules
- Reset: returns a selected rule within a profile to its default settings.
- Reset all to default: returns all profile rules to their default settings.
NoteDisabled rules are considered as configured rules i.e. you are configuring to
disable the rule. Resetting all rules to default will reset your disabled rules
as well.
|
|
Rule Icon
|
Status
|
 |
Un-configured rule. Click on Configure to enable and
apply rule settings.
|
 |
Rule with default settings. Click on Configure to
apply rule settings.
|
 |
Manually configured rule. Click on Configure to
update settings or Reset to default.
|
Download Profile
You can download profile settings in JSON format and used the downloaded profile
while creating a new
profile or managing an existing profile.
Upload Profile
You can upload a downloaded JSON file to replace the selected profile's
configurations i.e. profile name, description, and rule settings.
- Click on Upload.
- Browse to select the downloaded profile.
- Select one of the replacement options:
- Replace settings only
- Replace settings, name and description.
- Click Next.
- Review the warning before clicking on Proceed.
Apply Profile to Account
You can apply a profile to desired account(s) either from the Profile or from Rule
Settings within an account.
-
Click on Apply to
-
Select account(s) from the list or search for it using name, environment, or account tags.
-
Enter Notes and click on Next .Include exceptionsBefore you click on the Next button, make sure that you review the “Include exceptions” option checked by default. This option allows you to handle your exceptions using Profiles without maintaining them on an account-level.Keep “Include exceptions” checked if you wish to overwrite the current account exceptions with those in the merged profile. Or you can uncheck to retain existing account exceptions when the profile is merged.You can use Profiles as a source of truth to manage an account’s settings like exceptions and rule configurations without affecting the basic rule configuration in an account.
-
Review the summary
- You can Download the account's existing rule settings as a backup
- Apply profile, or
- Go Back to the overwrite options.
Replace
This overwrite option allows you to overwrite all existing account settings and
replace them with the profile's settings being applied.
Merge, use profile
This overwrite options allows you to use the new profile settings along with the
existing account settings. If there are any conflicts during the merge, the profile
settings are applied by default.
Merge, use account
This overwrite options allows you to use the new profile settings with the existing
account settings. If there are any conflicts during the merge, the account settings
are applied by default.
Recommended usage of Profiles and rule exceptions maintenance:
The “Include exceptions” feature allows users to handle their exceptions solely using
Profiles without maintaining any on an account-level. This is achieved by:
- Creating a new profile and configuring rules with baseline exceptions.
- Applying the profile to the account/s with “Merge, use profile” and the “Include exceptions” box checked for the accounts that should inherit their exception resources and tags from a profile.
- Whenever exceptions require updating, only the profile needs to be modified and can be subsequently applied to the account/s.
Example of Account Management with Profiles
For example, you can create two profiles named “Exceptions” and “Settings” to manage
exceptions and rule configurations for an account called “Live Production
Account”:
- Exceptions - basic profile with default exceptions
- Settings - with configured rule settings. (“Enabled”, “Risk level” or “Settings” fields) You do not need to update any “exceptions” on this profile as they should be stored in the “Exceptions” profile you created.
1. First apply the “Exceptions” profile to the “Live Production Account”
using the “Merge, use profile” with the “include
exceptions” option checked.
2. Then apply the “Settings” profile to the same account using the
“Merge, use profile” option with the “include exceptions” option
unchecked.
3. Whenever you need to update exceptions for the “Live Production Account”, just
update the “Exceptions profile” and re-apply both the “Exceptions” and
“Settings” profile.
Similarly, update the “Settings” profile to update rule settings for the
same account and re-apply the “Settings” profile only.