

Event-based tasks let you monitor protected computers for specific events and perform
tasks based on certain conditions.
Create an event-based task
In Server & Workload Protection, click . The wizard that appears will guide you through the steps of creating a new task.
You will be prompted for different information depending on the type of task.
Edit or stop an existing event-based task
To change the properties for an existing event-based task, go to click . Select the event-based task from the list and click Properties.
Events that you can monitor
- Computer Created (by System): A computer being added to the manager during synchronization with an Active Directory or Cloud Provider account.
- **Computer Moved (by System):**A virtual machine being moved from one vApp to another within the same ESXi, or a virtual machine on an ESXi being move from one datacenter to another or from one ESXi to another (including from an unmanaged ESXi server to a managed ESXi server running a virtual appliance.)
- Agent-Initiated Activation: An agent is activated using agent-initiated activation.
- IP Address Changed: A computer has begun using a different IP.
Conditions
You can require specific match conditions to be met in order for a task to be carried
out. For example, you might require an AWS 'tag' of
ProductionSystem to be present in an Amazon EC2 instance in order for the Activate Computer action (see Actions, below) to occur on it.When adding conditions:
- Click the "plus" button to add multiple conditions. In a multi-condition setup, ALL conditions must be met for the action to be carried out.
- Use Java regular expression syntax (regex). Some examples of how to use regex are provided in the table below. For details on regex, seehttps://docs.oracle.com/javase/6/docs/api/java/util/regex/Pattern.html.
List of conditions and descriptions of each
-
Cloud Instance Image ID: AWS cloud instance AMI ID.

Note
This match condition is only available for AWS cloud instances. -
Cloud Instance Metadata: The metadata being matched corresponds to AWS tags, Azure tags, or GCP labels that have been added to your AWS, Azure, or GCP instances.
Note
This match condition is only available for AWS instances, Azure VMs, and GCP VMs added to the manager through [Add AWS Account, Add Azure Account, or Add GCP Account]. Metadata currently associated with a computer is displayed on the Overview page in its editor window. To define the conditions to match for, you must provide two pieces of information: the metadata key and the metadata value. For example, to match a computer that has a metadata key named "AlphaFunction" that has a value of "DServer", you would enter "AlphaFunction" and "DServer" (without the quotes). If you wanted to match more than one possible condition, you could use regular expressions and enter "AlphaFunction" and ".*Server", or "AlphaFunction" and "D.*". -
Cloud Instance Security Group Name: The security group the cloud instance applies to.
Note
This match condition is only available for AWS cloud instances. -
Cloud Account Name: The "Display Name" field in the Cloud Account properties window.
-
Cloud Vendor: The cloud environment vendor of the instance. This condition is used to match on instances from a specific cloud vendor.
Note
Cloud Vendor only works if you added your cloud instances to the manager through [Add AWS Account , Add Azure Account, or Add GCP Account]. -
Computer Name: The "Hostname" field in the computer properties window.
-
GCP Network Tag: Network tags that have been added to GCP VMs.
Note
If the GCP VM has multiple GCP network tags, and a match is found on any one of them, the VM is considered as matched. -
Platform: The operating system of the computer.
Java regex examples
|
To match:
|
Use this:
|
|
any string (but not nothing)
|
.+
|
|
empty string (no text)
|
^$
|
|
Folder Alpha
|
Folder\ Alpha
|
|
FIN-1234
|
FIN-\d+ or FIN-.*
|
|
RD-ABCD
|
RD-\w+ or RD-.*
|
|
AB or ABC or ABCCCCCCCCCC
|
ABC*
|
|
Microsoft Windows 2003 or Windows XP
|
.*Windows.*
|
|
Red Hat 7 or Some_Linux123
|
.*Red.*|.*Linux.*|
|
NoteDepending on the source of the new computer, some fields may not be available. For
example, "Platform" would not be available for computers added as a result of the
synchronization with an Active Directory.
|
Actions
The following actions can be taken depending on which of the above events is
detected:
- Activate Computer: Server & Workload Protection protection is activated on the
computer.
- Delay activation by (minutes): Activation is delayed by a specified number of minutes.
- **Deactivate Computer:**Server & Workload Protection protection is deactivated on the computer.
- Assign Policy: The new computer is automatically assigned a policy. (The computer must be activated first.)
- Assign Relay Group: The new computer is automatically assigned a relay group from which to receive security updates.
- Assign to Computer Group: The computer is placed in one of the computer groups on the Computers page.
Order of execution
When using event based tasks, you should create and use conditions that are unique
to each task. This is because when identical conditions are encountered, Server & Workload Protection will process them in a specific order, and this order does not take into account
the number of conditions within a task to rank said tasks against each other.
For example, if the server01.example.com computer on a Windows Server 2012 platform encountered the following event-based tasks:
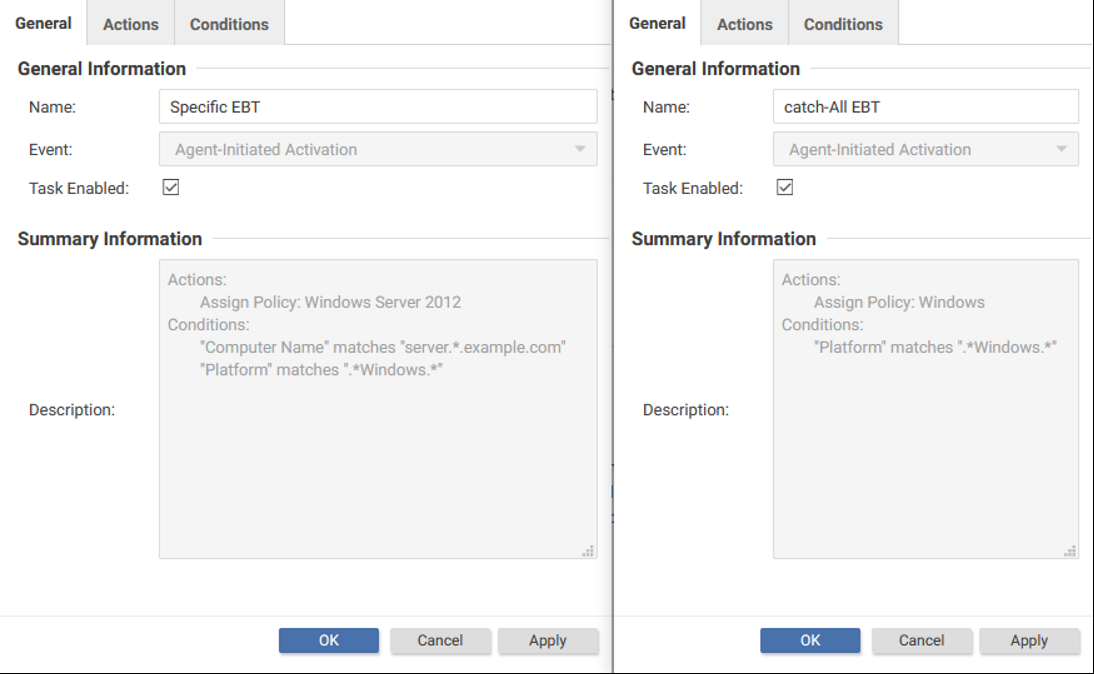
The event-based task with more conditions is not automatically executed first. Instead,
the "Platform" condition is matched twice, and the event-based tasks are executed
based on the name of the task.
To avoid unexpected results, use a specific naming convention for your event-based
tasks, such as CamelCase.
Temporarily disable an event-based task
To prevent an existing event-based task from running, right-click it and then click
Disable . For example, you may want to temporarily disable an event-based task while you
perform certain administrative duties during which you don't want any activity to
occur.
To re-enable an event-based task, right-click it and then click Enable.