

Use an Amazon Machine Image (AMI) to deploy a Virtual Network Sensor to your cloud environment.
If your security environment uses a hybrid deployment, or you do not have VMware or
Microsoft Hyper-V in your environment, you can leverage your Amazon Web Services
(AWS) accounts to deploy a Virtual Network Sensor using Amazon Machine Images
(AMI).
NoteThe steps contained in these instructions are valid as of January 2024.
|
Before you begin, make sure you have completed the following tasks:
-
Choose or create a VPC for the Virtual Network Sensor instance.
-
Choose or create the subnets for the Virtual Network Sensor data port and management port.Trend Micro recommends using different subnets for the data and management ports. For more information on how to set up a VPC and subnet, refer to the Amazon documentation.
-
Create security groups for the data port and management port.
Procedure
- In the Trend Vision One console, go to .
- Click Deploy Virtual Network Sensor.The Virtual Network Sensor Deployment panel appears.
- Select Amazon Web Services for the platform.
- Set the Admin password and confirm the password.The password must contain the following:
-
12 to 32 characters
-
Both uppercase and lowercase characters
-
At least one number (0-9)
-
At least one special character: ~!`@#$%^&*()/_+=[]{}-\|<>',.?:;" or space

Note
This step is used to set the default admin password to access the Virtual Network Sensor command line interface after deployment. -
- Select the Connection method.
-
Direct connection: the Virtual Network Sensor connects to Trend Vision One directly. Make sure the Virtual Network Sensor is able to connect to the internet when using this configuration.
-
Connect using a custom proxy: the Virtual Network Sensor connects to Trend Vision One through a third-party proxy. After choosing this method, configure the following fields:
-
Proxy address: Specify the IP address of the proxy.
-
Proxy port: Specify the connecting port of the proxy.
-
Proxy server requires authentication: (Optional) Select if the proxy requires authentication credentials.
-
User name: Specify the user name for the proxy credentials.
-
Password: (Optional) Specify the password for the proxy credentials.
-
-
-
Connect using a Service Gateway as proxy: the Virtual Network Sensor connects to Trend Vision One through a Service Gateway. Select a Service Gateway to use for this method.

Important
The Virtual Network Sensor must be able to connect to a Service Gateway with the Forward Proxy Service configured and enabled. For more information, see Manage services in Service Gateway.
-
- Select Amazon Machine Image (AMI) for the Deployment method.
- Click Download Token to download the token file.The token file contains important information for the Virtual Network Sensor including the configured admin password and information that allows the Virtual Network Sensor to connect and on-board with Network Inventory automatically.After downloading, you can click Go to AWS Marketplace to access the Virtual Network Sensor AMI in a new tab, where you can launch the instance directly from the marketplace. The following steps provide a guide to accessing the Virtual Network Sensor AMI through the EC2 console.
- In a new tab in the same browser session, sign in to the AWS Management Console.
- Locate the EC2 service and click the link to access the EC2 dashboard.
- In the top navigation bar, select the Region for your instance.
Note
The region can be set to any region you require the Virtual Network Sensor to be deployed. If you are unsure which region to select, use the default region for your AWS account. - Click Launch instance, then select Launch instance.The Launch an instance screen appears.
- In the Names and tags section, provide a name or add tags to the instance.

Tip
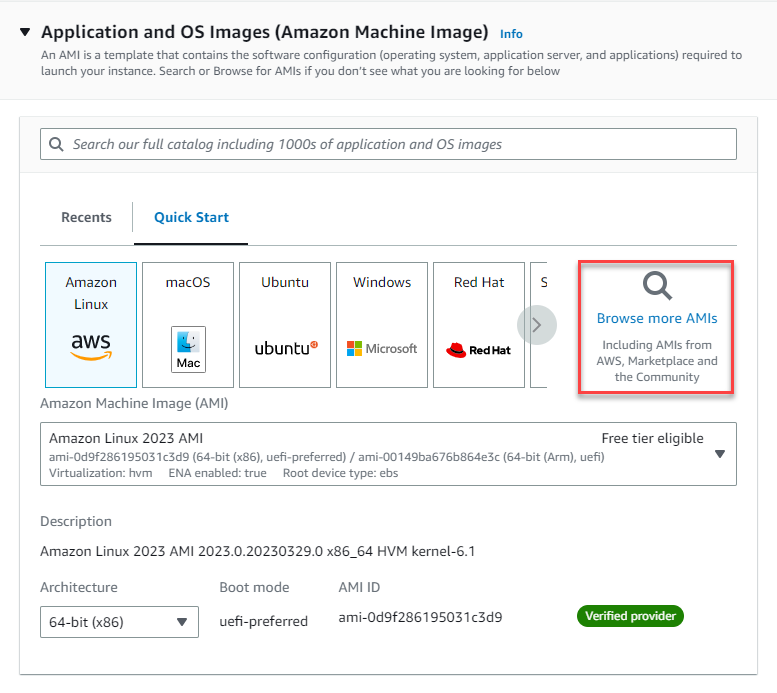
Adding tags helps with managing instances by providing a way to track ownership or locate resources associated with deployed instances. - In the Application and OS Images (Amazon Machine Image) section, find and select the Virtual Network Sensor AMI.
- In the Application and OS Images (Amazon Machine Image) section, click Browse more AMIs.
- In the Choose an Amazon Machine Image (AMI) screen, select AWS Marketplace AMIs under the search bar.
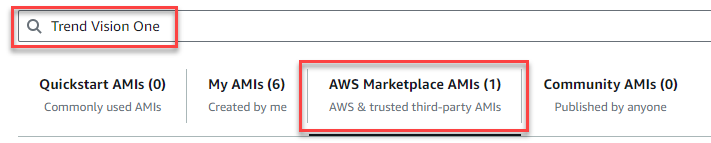
- Search for Trend Vision One.
- Find Trend Vision One™ XDR for Networks (BYOL) and click Select.
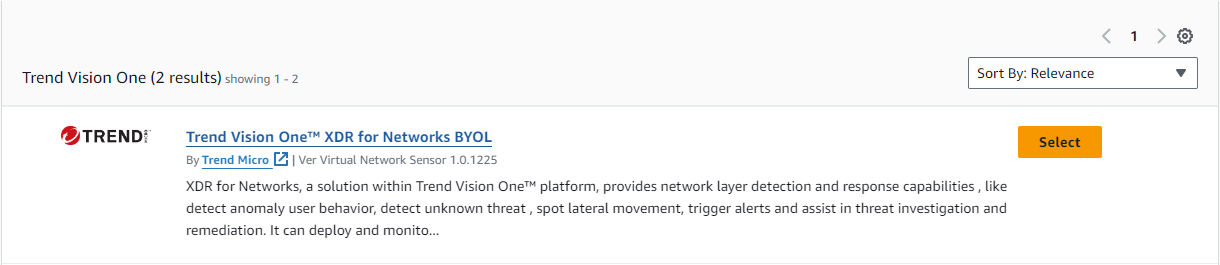
- Review the details and click Subscribe.
- In the Application and OS Images (Amazon Machine Image) section, click Browse more AMIs.
- In the Instance Type section, select an instance type supported by Virtual Network Sensor that meets the
specifications for your deployment.For more information about the resources required for different network throughput, see Virtual Network Sensor system requirements.
- In the Key pair (login) section, select Proceed without a key pair.
- In the Network settings section, click Edit and configure the settings.
- Configure the network deployment settings.
-
Select the VPC to use for the instance.
-
Select a Subnet to use for the Virtual Network Sensor data port.
-
Set the Auto-assign Public IP to Disable.
Important
Do not selectNo preference
for the subnet. -
- Under Firewall (security groups), select Select existing security group.
- Do not select any Common security groups.
- Expand the Advanced network configuration section.
Important
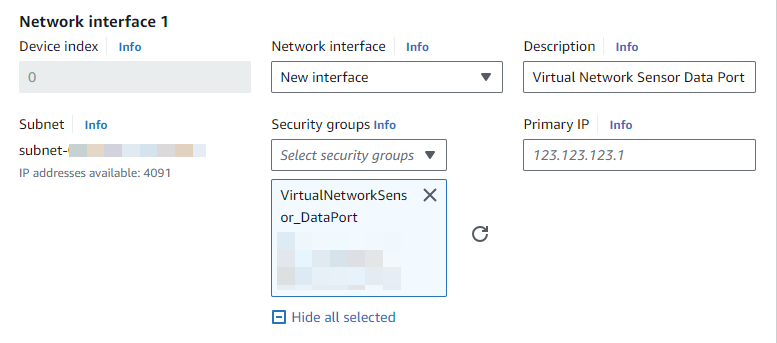
To comply with the AWS environment, the Virtual Network Sensor uses Port 1 (eth1) for the management port, and Port 0 (eth0) for the data port.For the following steps, Port 0 is Network interface 1, and Port 1 is Network interface 2. - Configure Network interface 1 for the data port.
-
Description: Provide a description for the interface.Adding a clear description such as Virtual Network Sensor Data Port makes it easier to locate when configuring your AWS network settings after deployment.
-
Subnet: The subnet you selected previously for the data port.
-
Security groups: Select the security group for the data port.
-
Primary IP: Specify an IP address available on the subnet, or leave blank to have AWS automatically assign the IP address.
-
- Click Add network interface.
- Configure Network interface 2 for the maintenance port.
-
Description: Provide a description for the interface.Adding a clear description such as Virtual Network Sensor Management Port makes it easier to locate when configuring your AWS network settings after deployment.
-
Subnet: Select the subnet for the maintenance port.
-
Security groups: Select the security group for the maintenance port.
-
Primary IP: Specify an IP address available on the subnet, or leave blank to have AWS automatically assign the IP address.
-
- Configure the network deployment settings.
- Use the Configure storage settings to specify the size of the root volume for your instance.Set the root volume size according to your throughput. For more information, see Virtual Network Sensor system requirements.Throughput (Mbps)Recommended Volume Size (GB)1005050010002000100500015010000200
- Expand the Advanced details section.
- Locate User data - optional and click Choose file.
- Select the token file you downloaded from Network Inventory.
- Review the settings in the Summary panel, click Launch instance, and wait for the launch to complete.Once you launch the instance, the Virtual Network Sensor begins installation. Installation may take a few minutes to complete. You can view the status of the instance in the EC2 console by going to .The Virtual Network Appliance is ready to connect and configure when the Instance state is Running and the Status check shows 2/2 checks passed.
- On the Instances screen, click the Virtual Network Sensor instance, go to the Networking tab, and record the private IPv4 address of the instance.You need this IP address when logging in to Virtual Network Sensor or verifying whether Network Sensor is connected to Network Inventory.