

RealtimeScan
This key enables/disables Real-time Scan.
The valid values are:
-
0 disable
-
1 scan incoming (write) files (default)
-
2 scan outgoing (read) files
-
3 scan both incoming and outgoing files
-
4 scan running files
-
5 scan running and incoming files
-
6 scan running and outgoing files
-
7 scan running, incoming, and outgoing files
RealtimeIncludeDirList, ScheduledIncludeDirList, ManualIncludeDirList
Use these keys to include specific directories in a scan. Type the full path of the
desired
directories, and then separate them with a colon (:). For example, to include the
tmp and etc directories in Real-time Scan type
the following:<P Name="RealtimeIncludeDirList" Value="/tmp:/etc"/>
NoteUse the null value to scan all directories.
|
RealtimeIntelliScan, ScheduledIntelliScan, ManualIntelliScan
Use this key to turn IntelliScan on or off from within the configuration file. The
values
are
0 = disable IntelliScan (default), 1 = enable
IntelliScan.ScheduledMapDriveExclusion, ManualMapDriveExclusion
Use this key to turn Map Drive Exclusion feature on or off within the configuration
file.
The values are
0 = disable Map Drive Exclusion, 1 = enable Map
Drive Exclusion.RealtimeIncludeExtList, ScheduledIncludeExtList, ManualIncludeExtList
Use these keys to add specific file types (identified by extension) in a scan. Use
a colon
(:) to separate different file types. You can use small and capital letters interchangeably
when typing the file types. For example, to include the BIN and RPM file types in
Real-time
Scan type the following:
<P Name="RealtimeIncludeExtList" Value="BIN:RPM"/>
NoteUse the null (default) value to scan all file types.
|
RealtimeIncludeTMExtList, ScheduledIncludeTMExtList, ManualIncludeTMExtList
Use these keys to select scanning of all file types, or scanning of file types by
extension
(for which Trend Micro recommends scanning).
The valid values are:
-
0 (default value) Scan all file types
-
1 Scan files with specified extensions
RealtimeExcludeDirList, ScheduledExcludeDirList, ManualExcludeDirList
Use these keys to exclude certain directories from scanning. Type the full path of
the
desired directories, and then separate them with a colon (:).
NoteIf the value is null, all directories will be part of the scan.
|
The default values are:
/dev:/proc:/var/spool/mail:/var/mail: /var/spool/mqueue: /var/spool/mqueue.iscan:
                     /opt/TrendMicro/SProtectLinux/SPLX.Quarantine:
                     /opt/TrendMicro/SProtectLinux/SPLX.Backup:
RealtimeExcludeFileList, ScheduledExcludeFileList, ManualExcludeFileList
Use these keys to exclude individual files from scanning. Type the full path of the
desired
files, and then separate them with a colon (:). For example, to exclude a file called
fm.txt
under the etc directory from Real-time Scan type the following:
<P Name="RealtimeExcludeFileList" Value="/etc/fm.txt"/>
NoteIf the value is null (default), all files will be part of the scan.
|
RealtimeExcludeExtList, ScheduledExcludeExtList, ManualExcludeExtList
Use these keys to exclude file types (identified by extension) from a scan. Use a
colon (:)
to separate the different file types. For example, to exclude the BIN and TXT file
types in
a Real-time Scan type the following:
<P Name="RealtimeExcludeExtList" Value="BIN:TXT"/>
NoteYou can use small and capital letters interchangeably when typing the file types.
|
RealtimeExcludeCommand
Use this key to exclude certain commands from scanning. Type the full name of the
processes, and then separate them with a colon (:).
For example, to exclude the vsapiapp and splxmain in the Real-time Scan process, type
the
following:
<P Name="RealtimeExcludeCommand" Value="vsapiapp:splxmain"/>RealtimeNotScanSize, OnDemandNotScanSize
Use these keys to set the Single file size (megabytes) limit for manual/schedule scan
and
real-time scan.
For example, to set the single file size limit for Real-time Scan, type the following:
<P Name=”OnDemandNotScanSize” Value=”10”/>After executing this command, all files over 10MB in size will not be scanned.
RealtimeCustomizedAction, ScheduledCustomizedAction, ManualCustomizedAction
These keys specify the default values for customized actions for specific types of
security
risks, as seen in the “Action When Security Risk Found” sections of the Real-time
Scan,
Scheduled Scan, and Manual Scan screens.
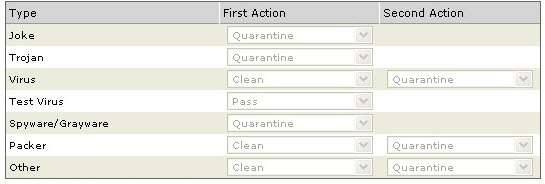
For viruses, packer and other threats, a second action can be specified.
The following values apply:
-
0 = Pass (take no action)
-
1 = Rename infected files by appending the extension specified by the
FileExtentionToRename key.
-
2 = Quarantine
-
3 = Clean
-
4 = Delete
Therefore, the default custom settings are as follows:
-
Joke = 2-0
-
Trojan = 2-0
-
Virus = 3-2
-
Test Virus = 0-0
-
Spyware = 2-0
-
Other = 3-2
-
Disable customized actions = 0
RealtimeAllTypesAction, ScheduledAllTypesAction, ManualAllTypesAction
These keys specify the default values for actions for all types of security risks,
as seen
in the “Action When Security Risk Found” sections of the Real-time Scan, Scheduled
Scan, and
Manual Scan screens.

For viruses and other threats only, a second action can be specified.
The following values apply:
-
0 = Pass (take no action)
-
1 = Rename infected files by appending the extension specified by the FileExtentionToRename key.
-
2 = Quarantine
-
3 = Clean
-
4 = Delete
Therefore, the default custom settings are as follows:
-
All Types = 3-2
-
Disable all types actions = 0
NoteWhen the RealtimeCustomizedAction, ScheduledCustomizedAction, ManualCustomizedAction,
RealtimeAllTypesAction, ScheduledAllTypesAction and ManualAllTypesAction keys are
set to
zero, ServerProtect automatically uses ActiveAction for Real-time Scan, Scheduled
Scan,
and Manual Scan.
|
RealTimeScanArchived, ScheduledScanArchived, ManualScanArchived
This key is not used.
RealtimeScanCompressed, ScheduledScanCompressed, ManualScanCompressed
Use these keys to enable/disable compressed file scanning. The valid values are:
-
0 disable scan of compressed files
-
1 enable scan of compressed files (default value)
RealtimeCompressionLayer, ScheduledCompressionLayer, ManualCompressionLayer
These keys determine the default number of compression layers ServerProtect scans.
The
valid values are 1 through 20, the default value for Real-time Scan is 1, for Scheduled
Scan
and Manual Scan the default is 5.
NoteUsing low values reduces the performance impact of scanning, however at the expense
of
less protection.
|
RealtimeCompressedFileSize, ScheduledCompressedFileSize, ManualCompressedFileSize
These keys determine the maximum original size (without compression or archiving)
of
compressed or archived files to scan. This value is in megabytes, the maximum value
is 2000,
and the default value for Scheduled Scan and Manual Scan is 60. The default value
for
Real-time Scan is 30. For example, if the RealtimeCompressedFileSize value is 40,
only
compressed files that are 40MB or smaller before compression will be scanned in real
time:
<P Name="RealtimeCompressedFileSize" Value="40"/>
NoteUsing small values can improve scan performance, but at the expense of less
protection.
|
RealtimeCleanSave, ScheduledCleanSave, ManualCleanSave
These keys enable/disable backing up files before a clean operation. The valid values
are:
-
0 disable file backup
-
1 enable file backup (default)
ScheduledNice, ManualNice
This key is used to set process scheduling priority. The default value is “0”. Valid
values
are:
-
-20 = highest
-
19 = lowest
DirToMove
This key shows the directory to which files will be moved when a virus is found and
the
AllTypesAction or CustomizedAction keys are set
to Quarantine. The default value is:/opt/TrendMicro/SProtectLinux/SPLX.QuarantineDirToSave
This key determines the directory where infected files are stored before a clean operation.
The default value is:
/opt/TrendMicro/SProtectLinux/SPLX.BackupFileExtensionToRename
The file extension that is appended to an infected file when the
AllTypesAction or CustomizedAction fields are
set to Rename. The default is vir.ActionForTimeout
This key is not currently in use.
VirusOutbreak
This key enables/disables sending a notification when there is a virus outbreak. The
valid
values are:
-
0 disable sending virus outbreak notifications
-
1 enable sending virus outbreak notifications (default value)
NoteServerProtect will not send any
alert notifications until the number of infected files reaches the number specified
in the
VirusOutbreakCount key. |
VirusOutbreakPeriod
This key sets the time interval, in minutes, between virus outbreak notifications.
The
valid values are: 5, 10, 30, 60, 120, and 240; the default value is 60. This key has
no
effect if the
VirusOutbreak key is disabled.VirusOutbreakCount
This key controls the number of infected files required for sending a virus outbreak
notification. The valid values are 1 through 1000, and the default value is 100. This
key
has no effect if the
VirusOutbreak key is disabled.AlertVirusInfection
This key controls whether ServerProtect sends an alert notification when it finds infected files on the
system. The valid values are:
-
0 disable sending an alert notification when ServerProtect finds an infected file
-
1 enable sending an alert notification when ServerProtect finds an infected file (default value)
AlertRealtimeConfigChange
This key controls whether ServerProtect sends an alert notification whenever you modify a Real-time Scan
configuration setting. The valid values are:
-
0 disable sending an alert notification whenever a Real-time Scan configuration setting changes
-
1 enable sending an alert notification whenever a Real-time Scan configuration setting changes (default value)
AlertServerProtectOn, AlertServerProtectOff
These keys set ServerProtect to send
an alert notification whenever the ServerProtect service stops or restarts. The valid values are:
-
0 disable sending an alert notification whenever splx service stops or restarts
-
1 enable sending an alert notification whenever splx service stops or restarts (default value)
AlertPatternOutOfDate
This key sets ServerProtect to send an alert notification whenever the pattern file
is
out-of-date. The valid values are:
-
0 disable sending an alert notification whenever the pattern file is out-of-date
-
1 enable sending an alert notification whenever the pattern file is out-of-date (default value)
AlertPatternOutOfDatePeriod
This key sets the frequency, in days, for checking whether the pattern file is up
to date.
The valid values are 1 though 1000, and the default value is 7. For example, to have
ServerProtect check whether the pattern
file is up to date once every 7 days, type the following:
<P Name="AlertPatternOutOfDatePeriod" Value="7"/>AlertPatternUpdateFail
This key controls whether ServerProtect sends an alert notification whenever the pattern file update is
not successful.
-
0 disable sending an alert notification whenever the pattern file update is not successful
-
1 enable sending an alert notification whenever the pattern file update is not successful (default value)
AlertActionFail
This key controls whether ServerProtect sends an alert notification if ServerProtect is unable to perform
specified action(s) on the detected malware.
-
0 disable sending an alert notification whenever ServerProtect is unable to perform specified action(s) on the detect malware
-
1 enable sending an alert notification whenever ServerProtect is unable to perform specified action(s) on the detect malware
Schedule
This key sets how often a scheduled scan runs. The valid values are:
-
0 no scheduled scan jobs (default)
-
2 scheduled scan jobs run once every day
-
3 scheduled scan jobs run once every week
-
4 scheduled scan jobs run once every month
ScheduledTime
This key shows when a scheduled scan runs based on the 24-hour clock. The default
value is
00:00:00 (midnight).
For example, to run a scheduled scan at 1:30 p.m. type the following:
<P Name="ScheduledTime" Value="13:30:00"/>ScheduledWDay
This key sets the day of week a scheduled scan runs when the value of the Schedule
key is 3
(once every week). The valid values are Monday, Tuesday, Wednesday, Thursday, Friday,
Saturday, Sunday, and the default value is null.
ScheduledMDay
This key sets the day of month a scheduled scan runs when the value of the Schedule
key is
4 (once every month). The valid values are numbers 1 through 31, and the default value
is
null.