To install ScanMail, perform the following steps:
-
Open Terminal. To navigate to installation program, do one of the following:
-
If you are installing from the Trend Micro Enterprise Protection CD, navigate to the SMD folder on the CD.
-
If you downloaded the software from the Trend Micro Web site, navigate to the relevant folder on your server.

Note
The installation file uses the/tmpfile system as temporary folder by default. However, you can change the temporary folder by setting the IATEMPDIR environment variable to a different directory on a partition with enough free disk space.To set the variable, enter one of the following commands at the UNIX command line prompt before running the installation:-
For Bourne shell (sh), Bourne-again shell (bash), Korn shell (ksh), and Z shell (zsh):
$ IATEMPDIR=/your/directory/with/free/space$ export IATEMPDIR -
For C shell (csh) and TC Shell (tcsh):
$ setenv IATEMPDIR /your/directory/with/free/space
-
-
Run the installation file (
SMD5SP1SetupAIX.bin) by typing the command:./SMD5SP1SetupAIX.bin -i consoleThe installer starts unpacking the file. After unpacking of installation file is complete, the Welcome screen appears.
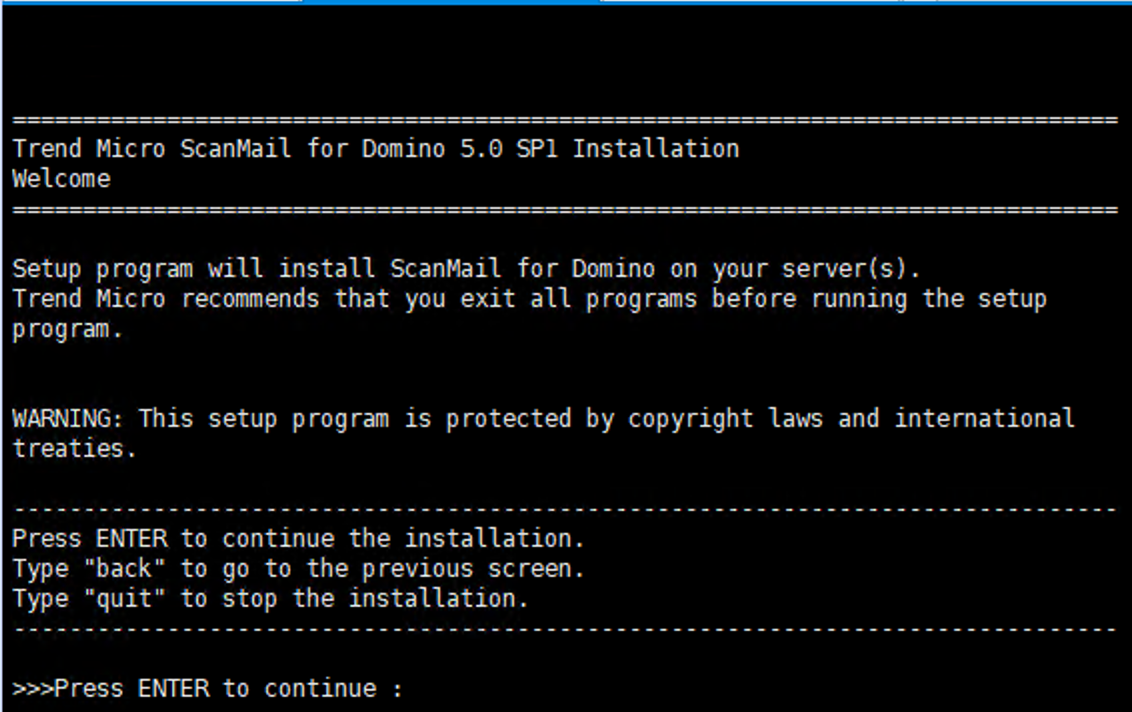 Press Enter to continue the installation. The License Agreement screen appears.
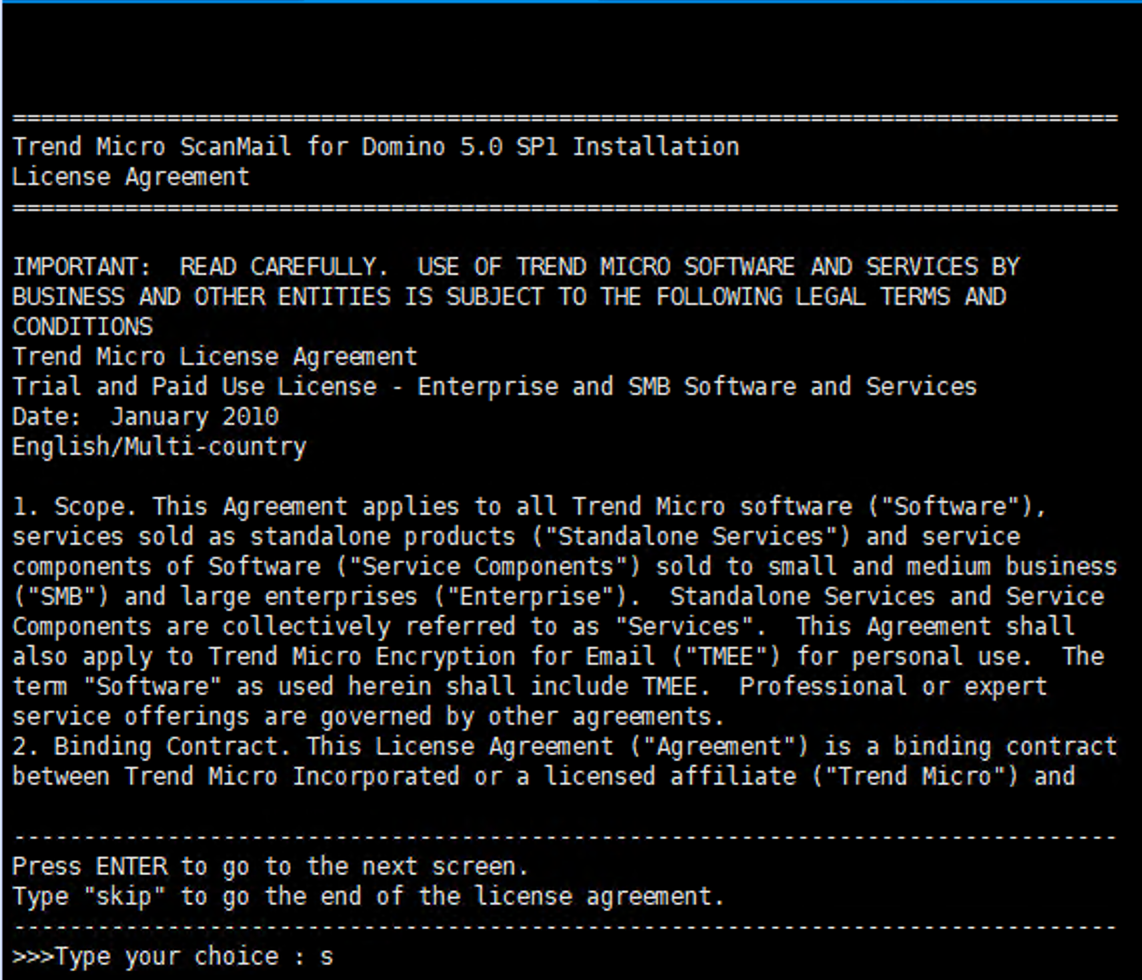
-
On the License Agreement screen, press Enter to continue scrolling to the next screen of License Agreement. If you want to move to the end of the agreement, type
skiporsand press Enter.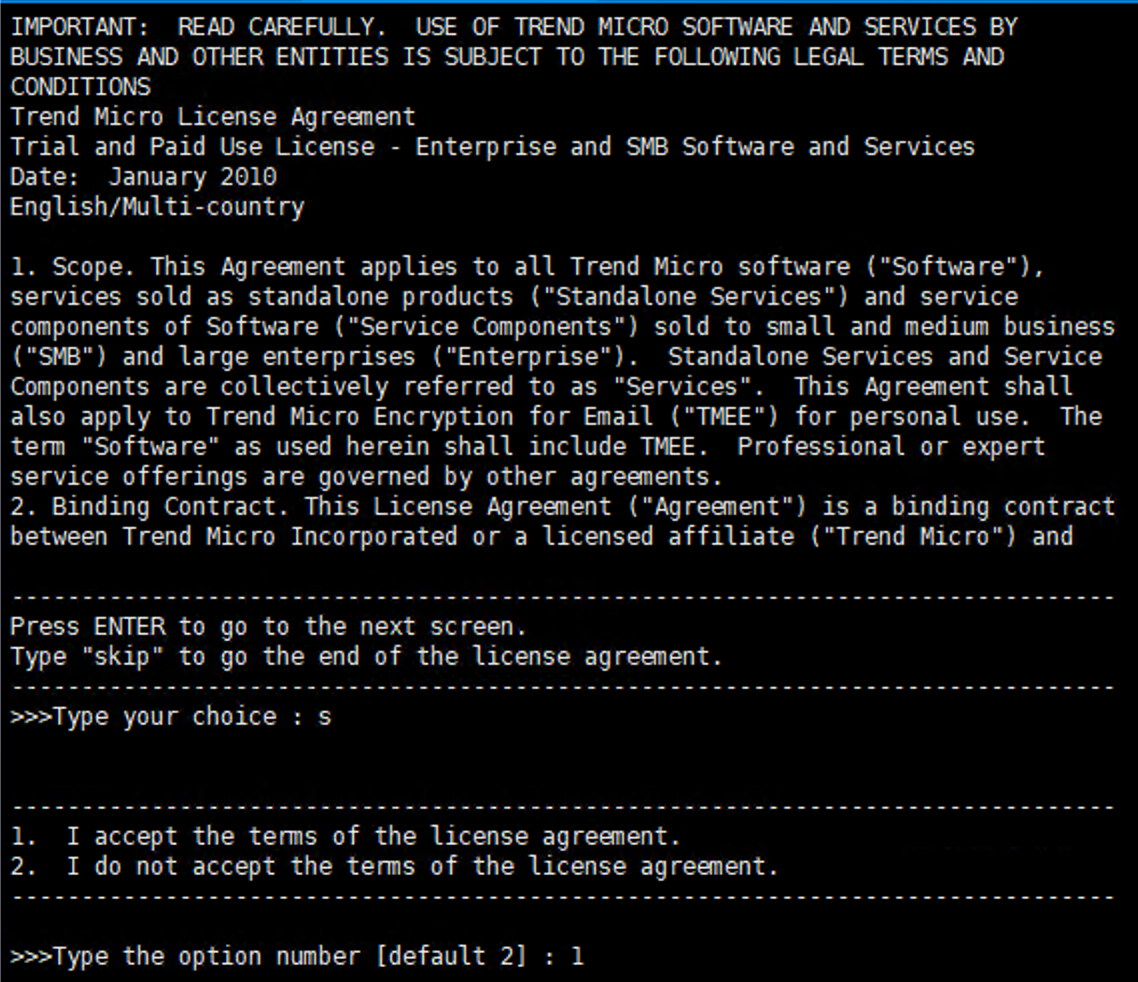
-
At the end of the License Agreement, Type
1if you agree and accept the terms of the license agreement. If you do not agree with the terms of the license, type2; the installation then stops after confirmation. -
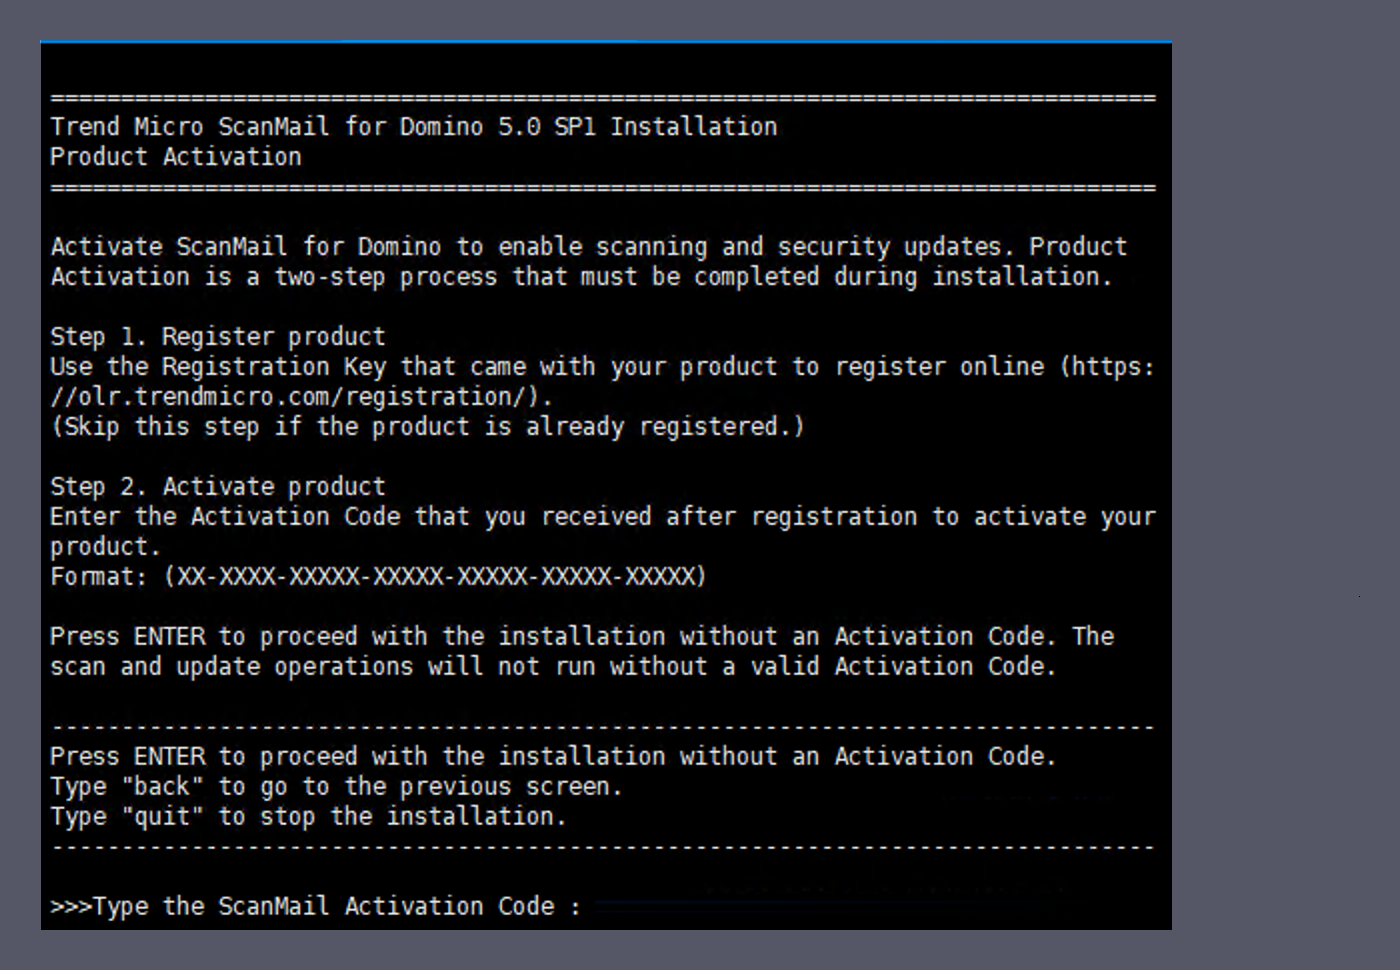
Press Enter. The Product Activation screen appears.
-
On the Product Activation screen shown above, you must type the correct ScanMail Activation Codeto activate ScanMail.
Note
Obtain the Activation Code to activate a ScanMail Evaluation, Standard, or Suite version for a new installation.Do one of the following:-
If you have not registered ScanMail:
-
Go the Trend Micro Product Registration Web site and follow the on-screen instructions to register your product. Register your product to ensure you are eligible to receive the latest security updates and other product and maintenance services.
-
After registration is complete, Trend Micro sends the ScanMail Activation Code (AC) to the email address you specified during registration. Use this Activation Code to activate ScanMail.
-
-
If you have an Activation Code:Type the Activation Code for ScanMail. To use the full functionality of ScanMail 5.0 SP1, you need to obtain a Standard or Suite Activation Code (see ScanMail Activation Code) and activate the software.
-
If you want to use the Configuration database to activate ScanMail later:Leave the Activation Code field blank. Setup installs ScanMail; however, the SMD scan or update task will not load. Activate SMD immediately after installation to protect your Domino environment (see ScanMail Activation Code).
Press Enter. -
-
If you chose to proceed without the Activation Code, the setup will prompt for the confirmation. Do one of the following:
-
To continue installing ScanMail without the Activation Code, type
yand press Enter. -
If you want to type Activation Code at this point of installation:
-
Type
nand press Enter. The setup will prompt for the Activation Code. -
Type the ScanMail Activation Code. and press Enter.
-
The Add or Remove Domino Server screen appears.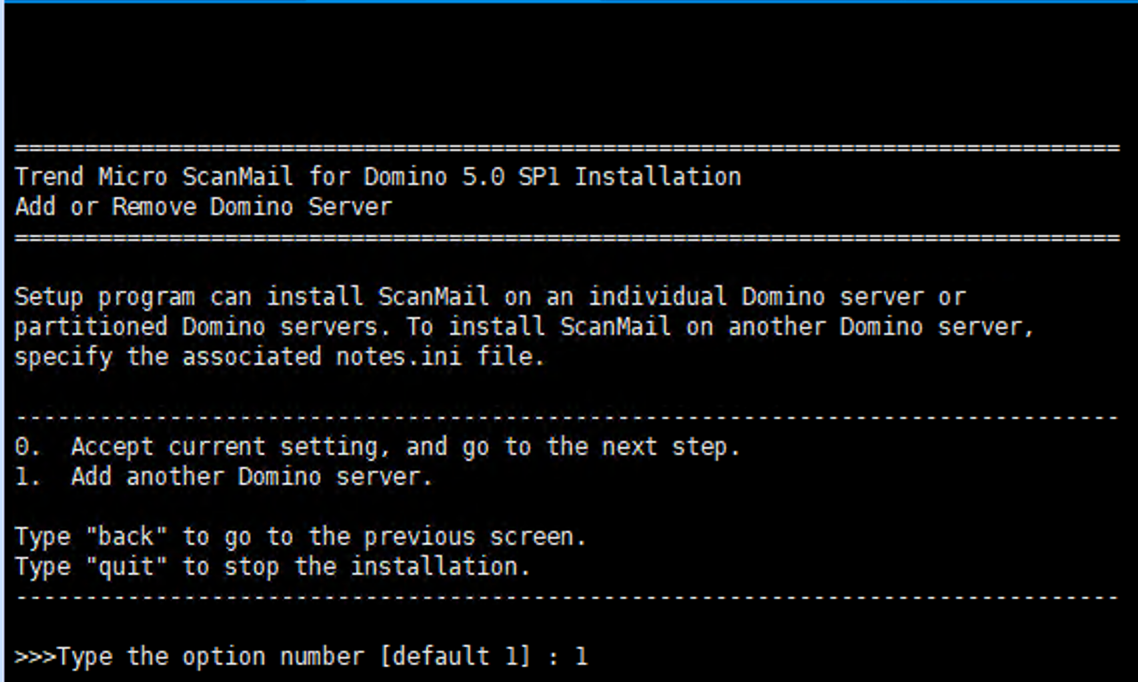
-
-
On the Add or Remove Domino Server screen shown above, type
1to addnotes.iniserver where you want to install SMD.Note
If you have a partitioned server, install ScanMail on the partitions you want to protect.Accept current setting, and go to the next step option start the installation of selected Domino server (notes.ini). If you have not selected at least onenotes.ini, Accept current setting, and go to the next step option would be ineffective. You must select at least one Domino server (notes.ini) before starting the installation process.-
Press Enter. Add Domino Server - Notes.ini Path [Step 1/5] screen appears. Type the path where
notes.inifile is located.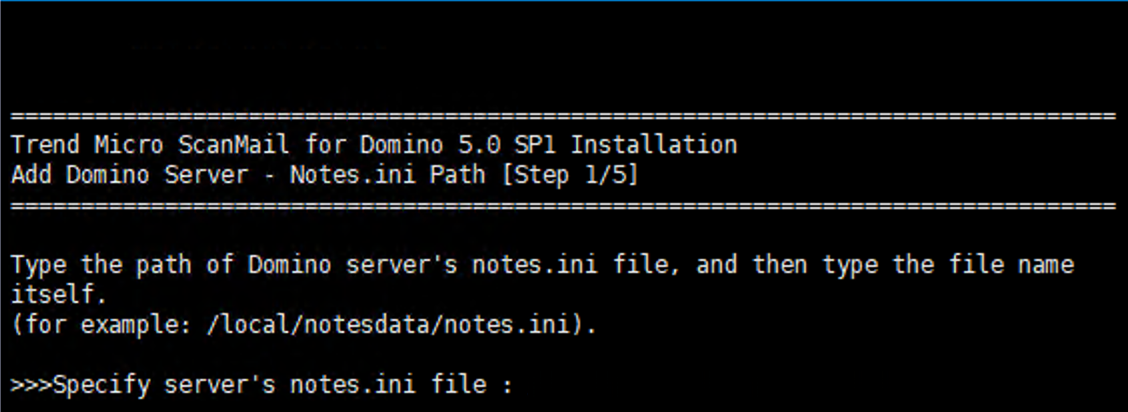
-
Press Enter. Add Domino Server - Replication Setting [Step 2/5] screen appears.
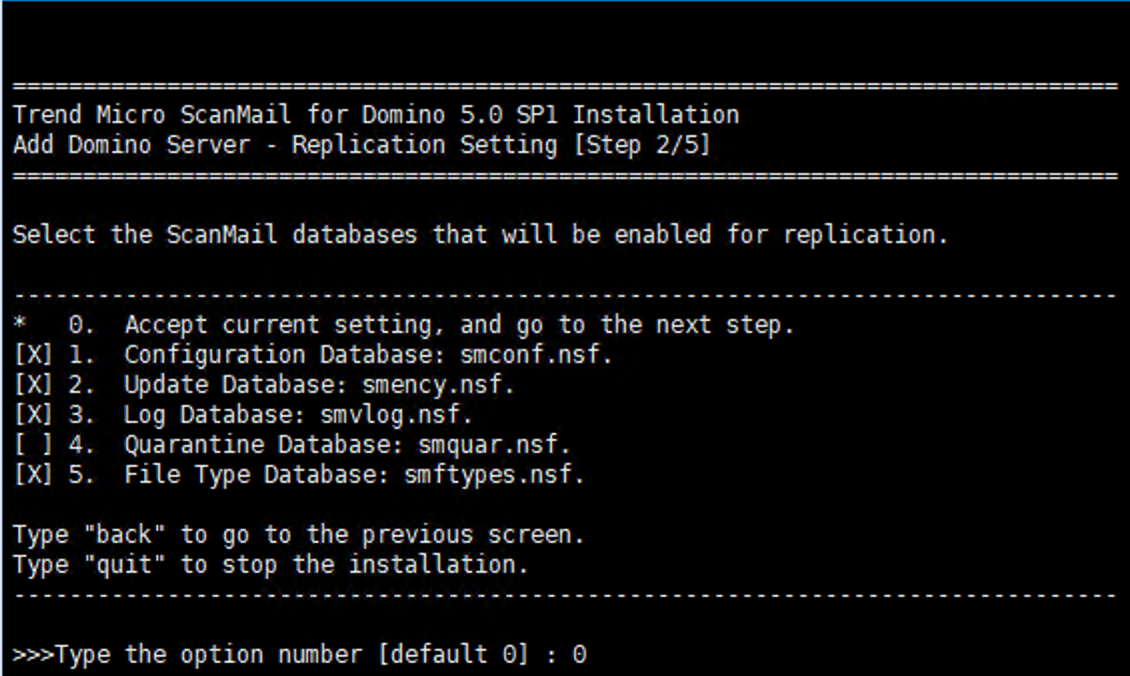 By default, Setup enables replicating all databases except the Quarantine Database. If you want to change the default settings, select or deselect the ScanMail databases you want Setup to replicate or ignore. To select or deselect ScanMail database, do the following:
-
Type the corresponding option number from
1~5(for example, if you want to select Quarantine Database, type4). -
Press Enter.

Tip
If you plan to install ScanMail on several servers and replicate databases, you may want to disable replication of the Configuration database on subsequent servers. Select one server as the primary or administrative server to replicate to all other servers.Note
Remember to schedule the replication of the Configuration database after installing ScanMail so that all servers receive the default policy.After making your selection, type0(zero) to accept setting, and proceed to next step. -
-
Press Enter. The Add Domino Server - ScanMail Management [Step 3/5] screen appears.
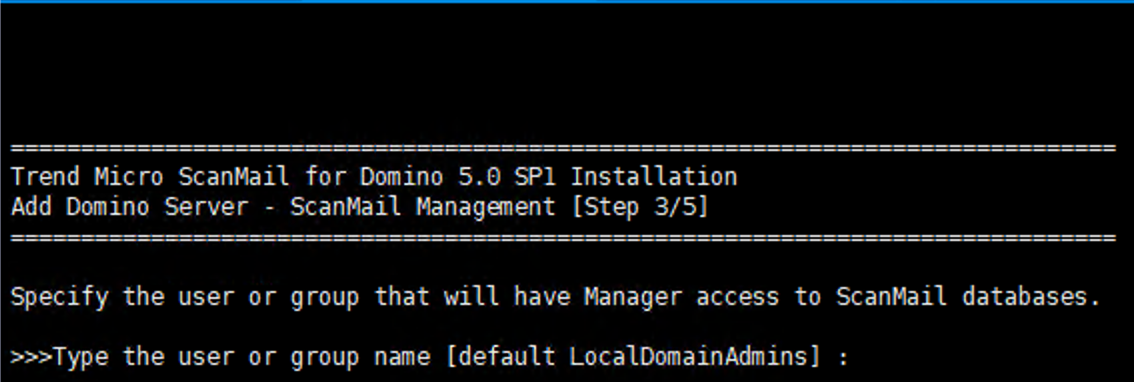 The default administrator group is "LocalDomainAdmins". If you want to specify another user or group for the administration tasks, type a single administrator account or group that will have Manager access to all ScanMail databases.
Note
If the account you specify does not exist, then create it when you complete the installation. Ensure that the account has administrator authority. -
Press Enter. The Add Domino Server - Signing Database[Step 4/5] screen appears.
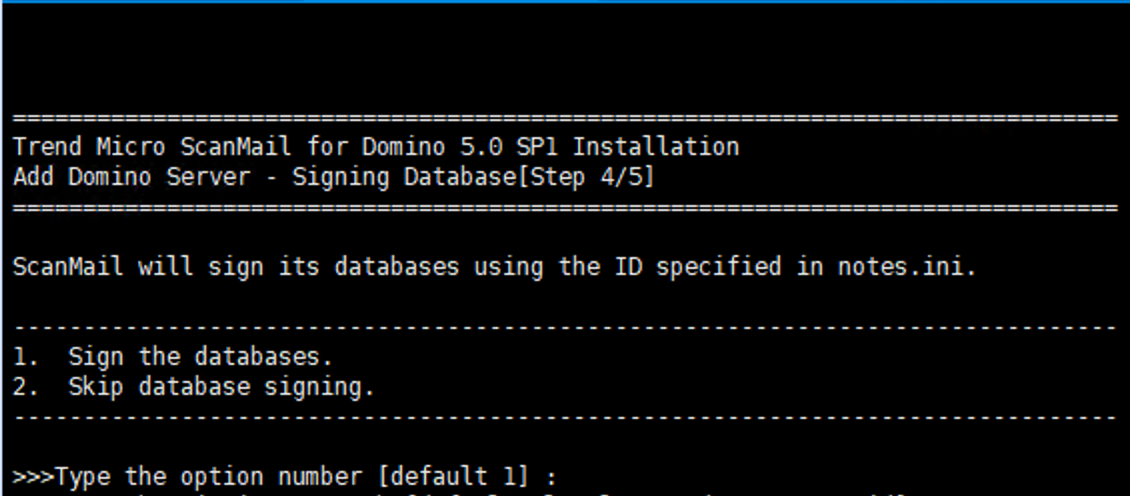 On the Add Domino Server - Signing Database[Step 4/5] screen shown above, do one of the following:
-
To sign all ScanMail databases with a single ID, type 1 and press Enter. The setup will prompt for the ID and password.
-
Type the ID (including full path) and press Enter.
-
Type the desired password and press Enter.
-
-
To skip signing the ScanMail databases, type 2 and press Enter. You can sign ScanMail databases manually after the installation.
-
-
After the Database Signing screen, the Add Domino Server - Install Path [Step 5/5] screen appears.
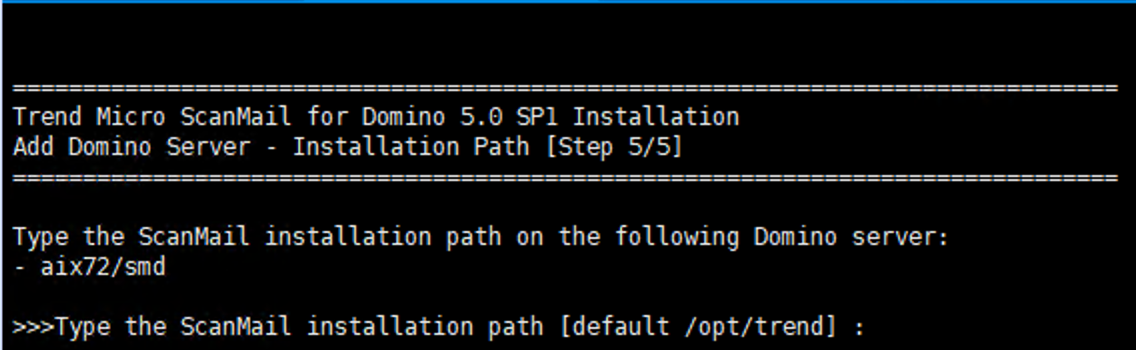 Type the installation path where you want the Setup to install the SMD. By default, Setup will install the SMD at
/opt/trend.Note
If SMD 5.0 SP1 for AIX has already been installed on one partition servers, the default installation path for the subsequent installation(s) will remain same and cannot be changed. -
After typing the installation path, press Enter. The selection of one Domino Server completes and the Add or Remove Domino Server screen appears again, displaying the list of selected Domino serve(s).
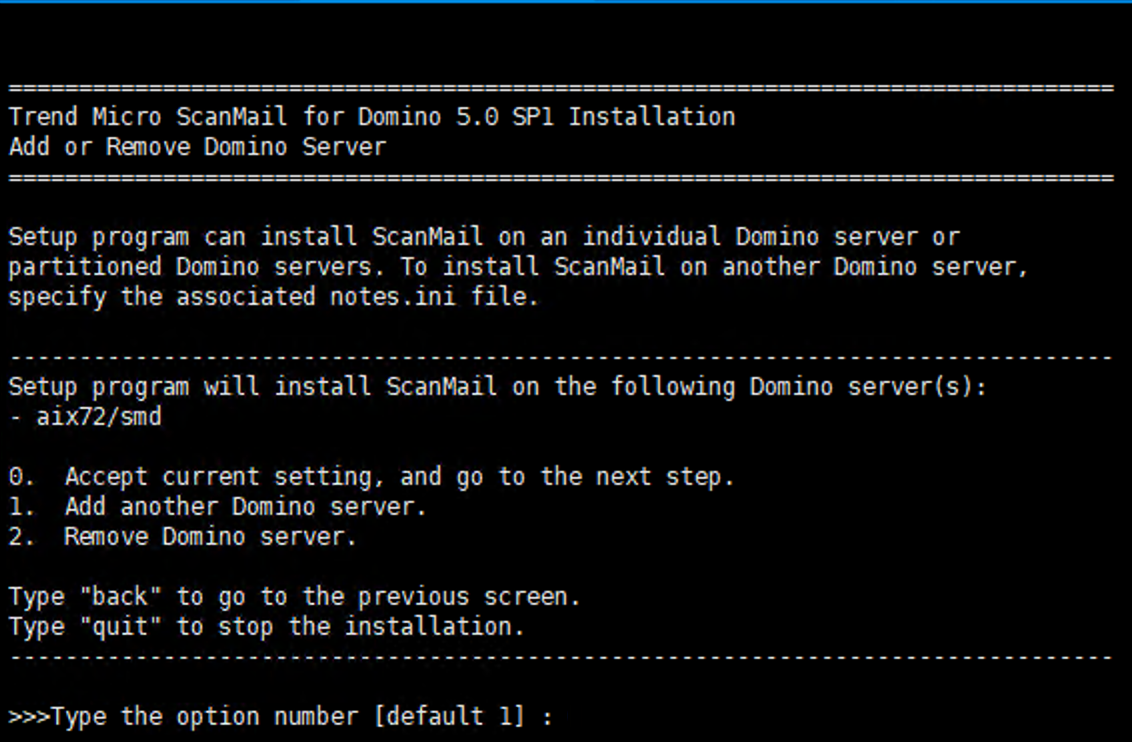 On the Add or Remove Domino Server screen shown above, select one the following:
-
Type
0(zero) to select current settings and start the installation of selected Domino server(s). -
Type
1to add another Domino server (notes.ini), and follow Substep a to Substep e of Step 8. -
Type
2to remove Domino server(s) previously selected.
-
-
-
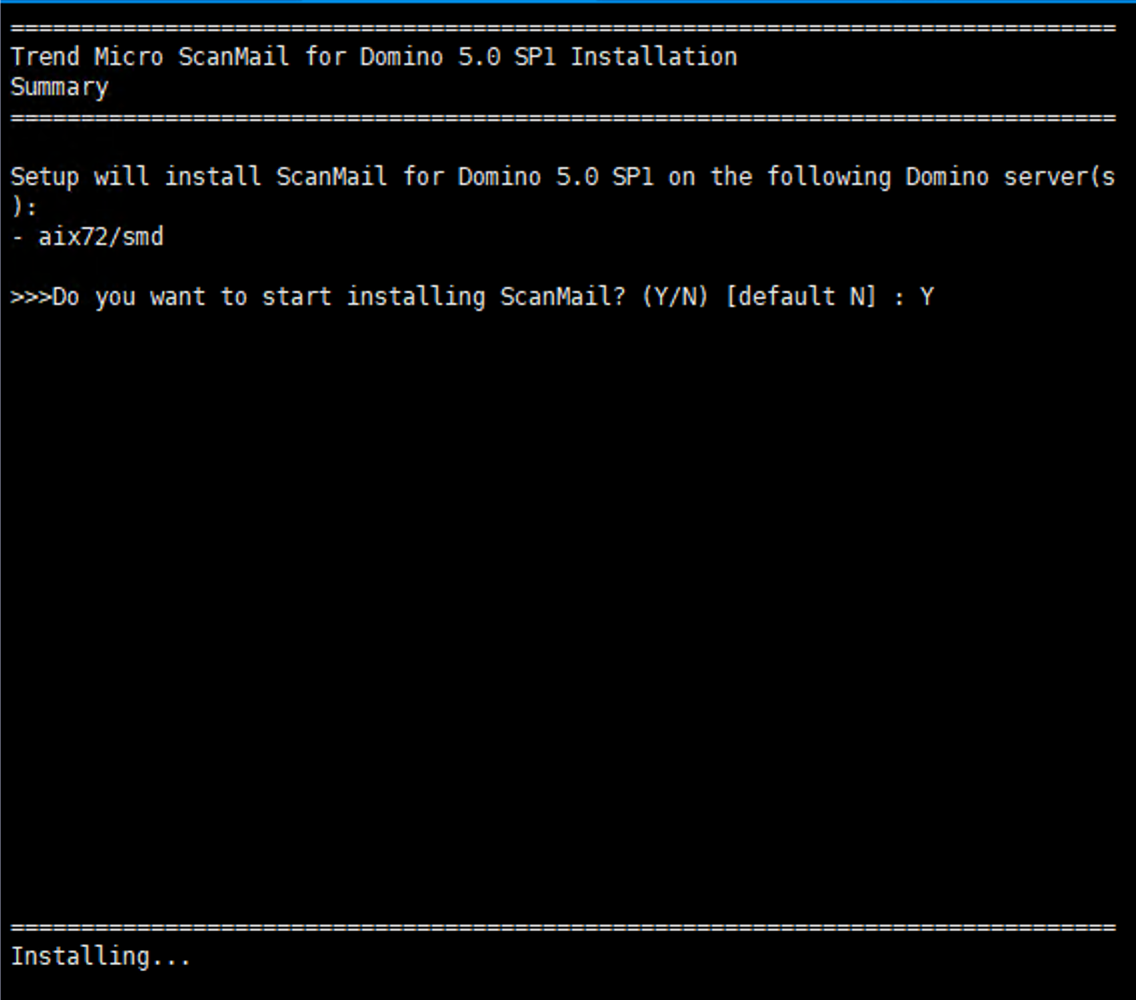
Press Enter. The Summary screen appears. Type
Yoryto start installing the selected Domino server(s).
-
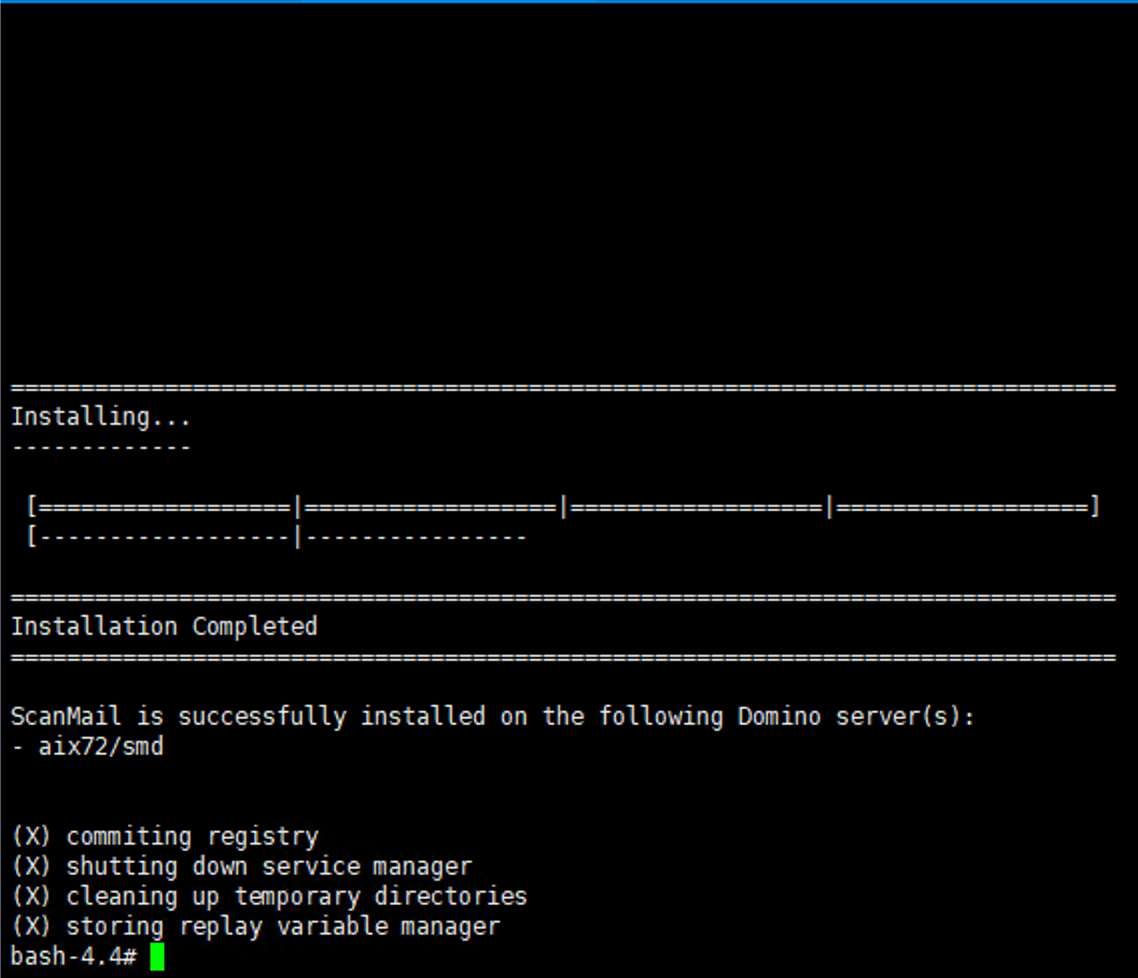
Press Enter. The installation begins.
 After the installation completes, the
Installation Completemessage displays on the screen.