

You can install Deep Discovery Inspector on:
-
VMware ESXi 7.0 or 8.0You must obtain a separate license for VMware ESXi. Your usage is subject to the terms and conditions outlined in the VMware license agreement specific to that product.
-
Microsoft Hyper-V on Windows Server 2019 or 2022
-
KVM
Procedure
- Download the Deep Discovery Inspector ISO from the Business Success Portal at https://success.trendmicro.com/dcx/s/license.
- Back up any pre-existing data on the target hard drive before installing Deep Discovery Inspector.The installation process formats and repartitions the hard drive and removes all existing data.

Tip
If you are reinstalling Deep Discovery Inspector, you can back up your current settings by going to in the Deep Discovery Inspector management console. - Create a virtual machine.For details, see Create a new virtual appliance.When installing Deep Discovery Inspector on a VMware ESXi server, disable the snapshot feature for the virtual appliance to preserve hard disk space.
- Configure the virtual machine to boot from the Deep Discovery Inspector ISO.
- Start the virtual machine.The installation screen appears.
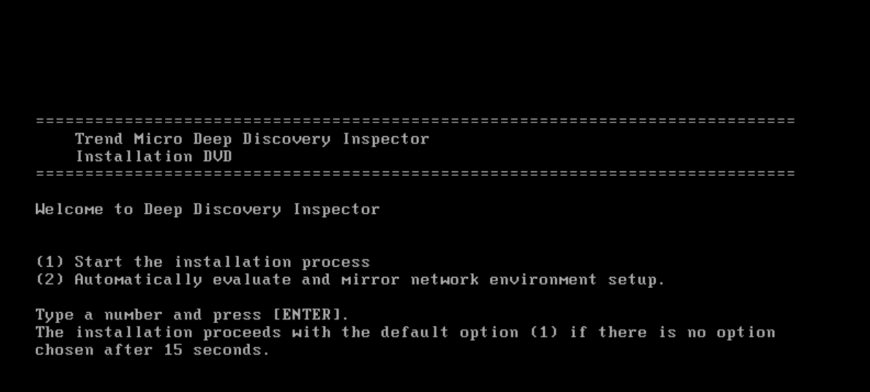
- Press ENTER.

Important
When installing Deep Discovery Inspector through a serial connection, type serial and press ENTERThe System Information screen appears.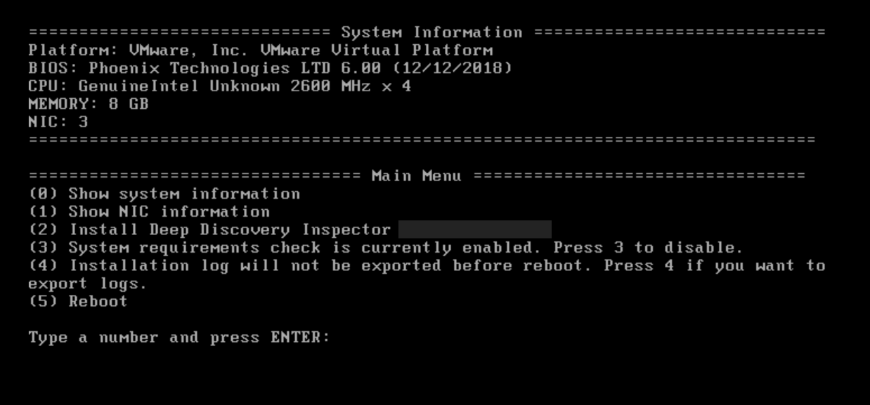
- For trial deployments, type 3 and press ENTER to skip the system requirements check.

Note
By default, the installer checks system requirements before installing Deep Discovery Inspector to confirm that the appliance has the necessary resources to run the product. - If you need to obtain installation logs for troubleshooting, type 4 and press ENTER.
- Start the installation by typing 2 and pressing ENTER.The Management Port Selection screen appears.Deep Discovery Inspector automatically detects the active link cards (indicated by Link UP) available for use as a management port.
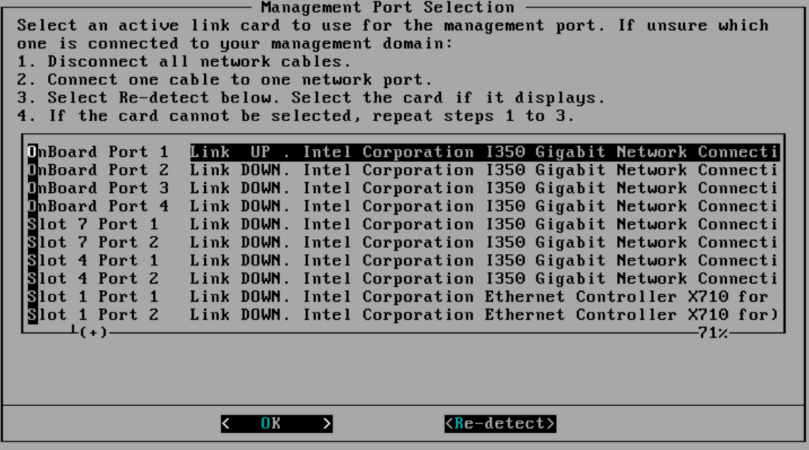
Management Port Selection - Verify that the network port status and the actual port status match.If a status conflict exists, select Re-detect and press ENTER.
- Check which active link card connects to the management domain by doing the steps listed on the Management Port Selection screen.
- Select an active link card and press ENTER.The installation continues and completes.
- If you enabled installation log export on the System Information screen, save the installation logs.
- Select a storage device and press ENTER.If your storage device is not listed, Go to Re-detect and press ENTER to refresh the list.
- When the installation log file name appears, press ENTER.Record the file name for future reference. The file name uses the following format:
install.log.YYYY-MM-DD-hh-mm-ssTip
Trend Micro recommends saving exported installation logs to sda11.
The system automatically restarts and the Preconfiguration Console appears. If used, the installation DVD ejects from the CD/DVD drive. - Select a storage device and press ENTER.
- (Optional) Remove the DVD to prevent reinstallation.
- Configure the Deep Discovery Inspector network settings.
-
Access the preconfiguration console and change the device settings.For details, see Preconfiguration.
-
Open the management console and change the appliance IP settings.For details, see the Get Started chapter of the Deep Discovery Inspector Administrator's Guide.
-
What to do next
See the Deep Discovery Inspector Administrator's Guide for details about configuring and administering Deep Discovery Inspector.