

Procedure
- Configure a load balancer and a listener.
- Open the Amazon EC2 console at https://console.aws.amazon.com/ec2/.
- On the navigation pane, under LOAD BALANCING, select Load Balancers.
- Select Create Load Balancer.
- For Network Load Balancer, select Create.
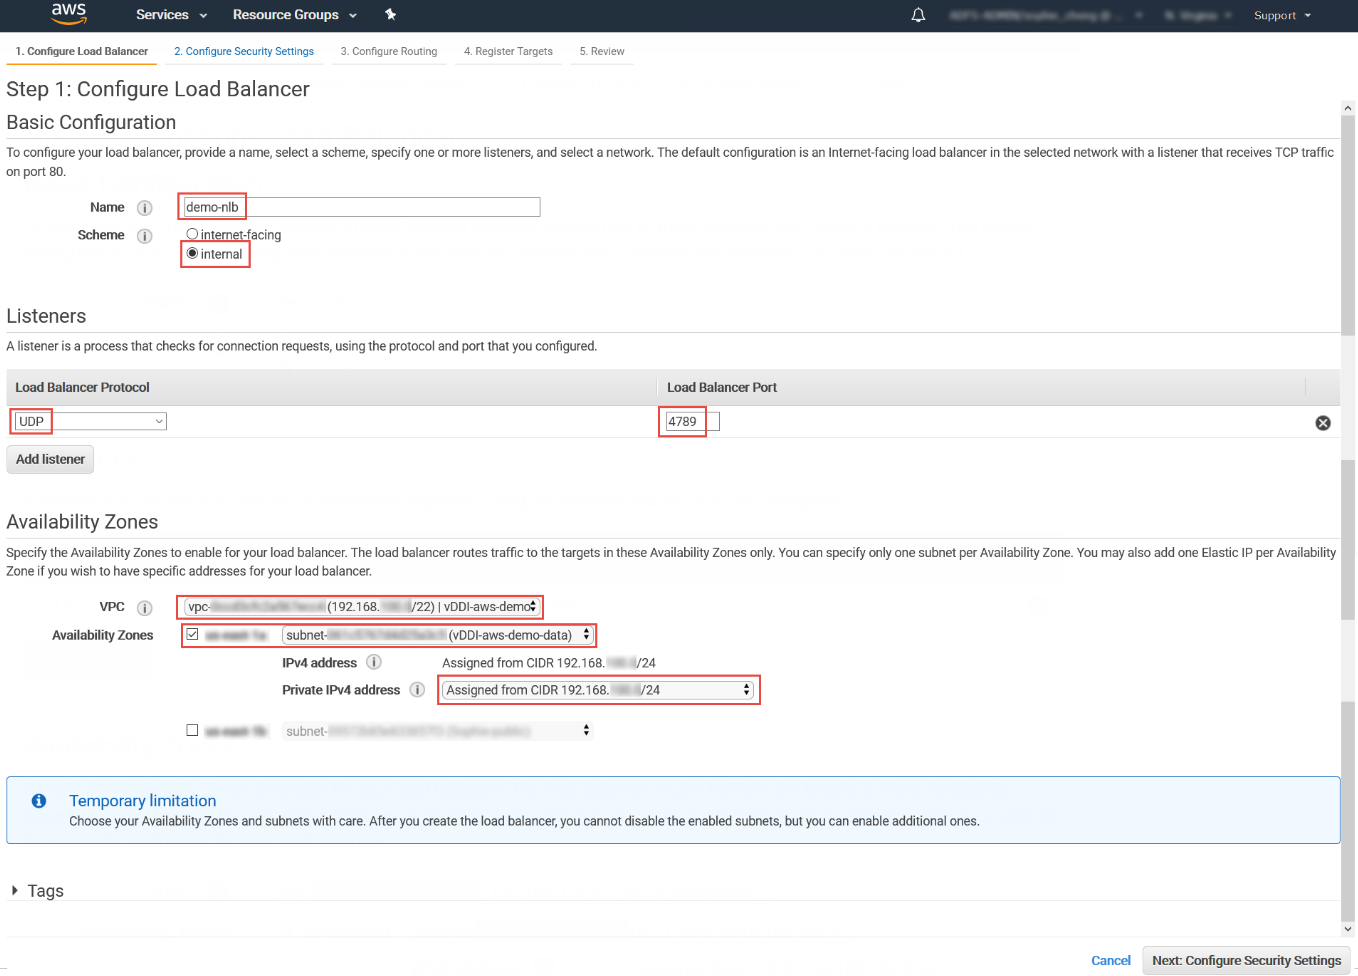
- For Name, type a name for your load
balancer.For example, type demo-nlb.
- For Scheme, select internal.
- For Listeners, modify protocol to UDP and type 4789 for the port to receive mirrored traffic.
- For Availability Zones, select the VPC that you
used for the Deep Discovery Inspector virtual appliance instance and select the
subnet for the data port 1 (known as eth0) subnet.

Note
If you enable multiple Availability Zones for your load balancer, ensure each target group has at least one target in each Availability Zone. Otherwise, the load balancer will not route traffic to Deep Discovery Inspector. For more details, see https://docs.aws.amazon.com/elasticloadbalancing/latest/network/introduction.html#network-load-balancer-components - For IPv4 address, you can select
Assigned from CIDR to have AWS assign the
address or select Enter IP from CIDR to specify
the address.
- Click Next: Configure Security Settings.
- Configure the security settings.
- No changes are necessary in the Configure Security Settings screen.
- Click Next: Configure Routing.
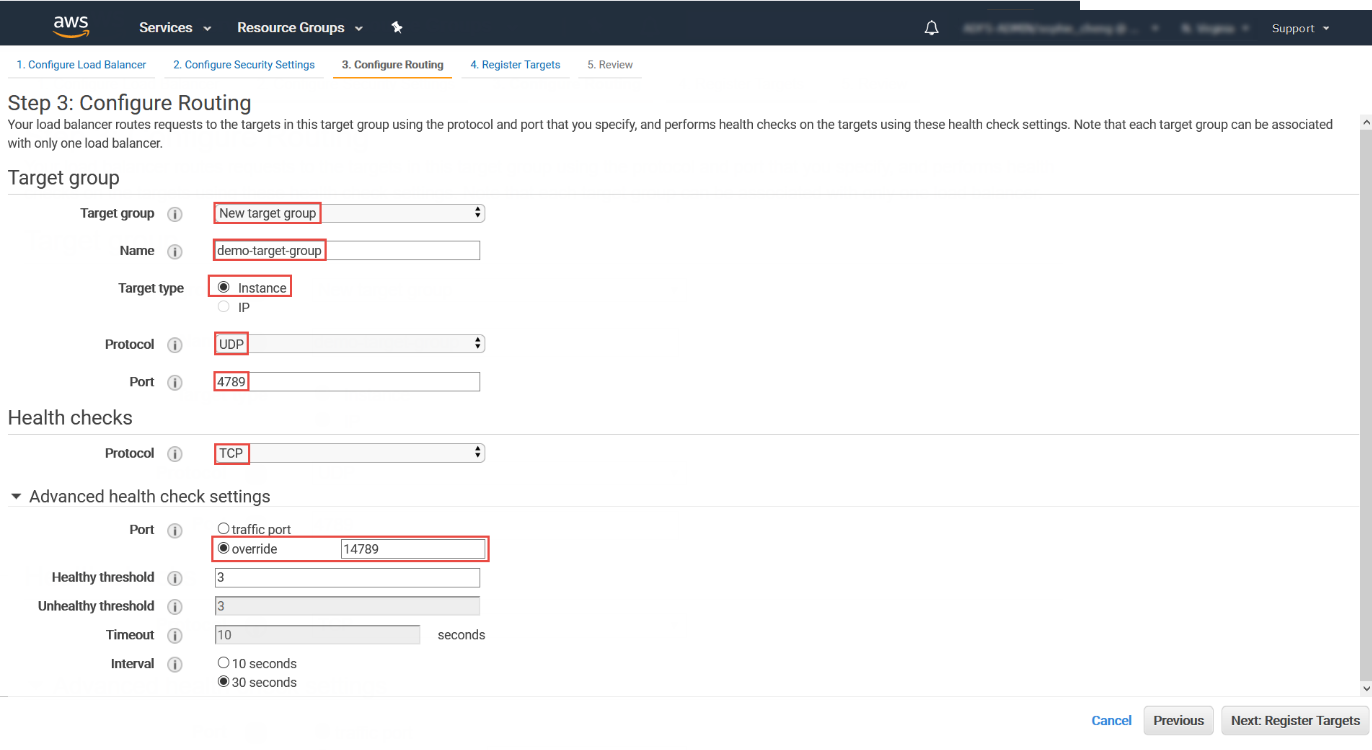
- Configure a target group.
- For Target group, keep the default, New target group.
- For Name, type a name for the target
group.For example, type demo-target-group.
- For Target type, select Instance.
- For Protocol, select UDP.
- For Port, type 4789.
- For Protocol under Health checks, select TCP.
- For Port under Advanced health check settings, select override and type 14789 for the port.
- Leave other settings as default.
- Click Next: Register Targets.
- Register targets with the target group.
- For Instances, select the Deep Discovery Inspector
virtual appliance.For example, select demo-ddi.
- Keep the default instance listener port and select Add to
registered.
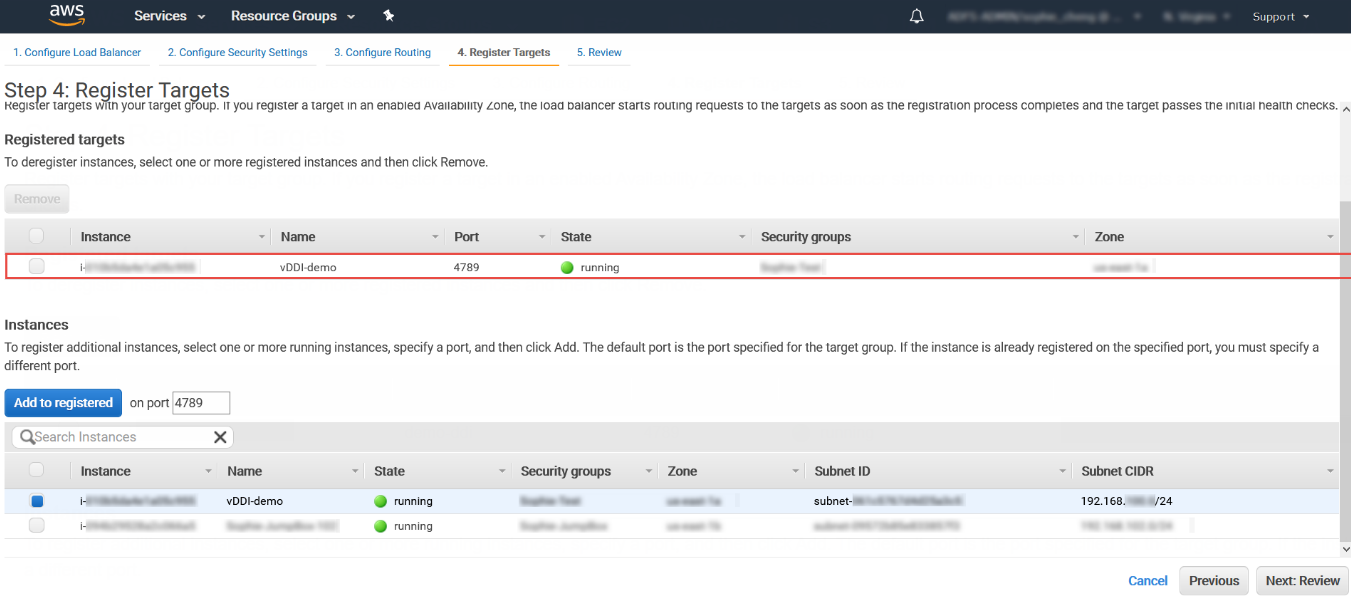
- Click Next: Review.The Review screen appears.
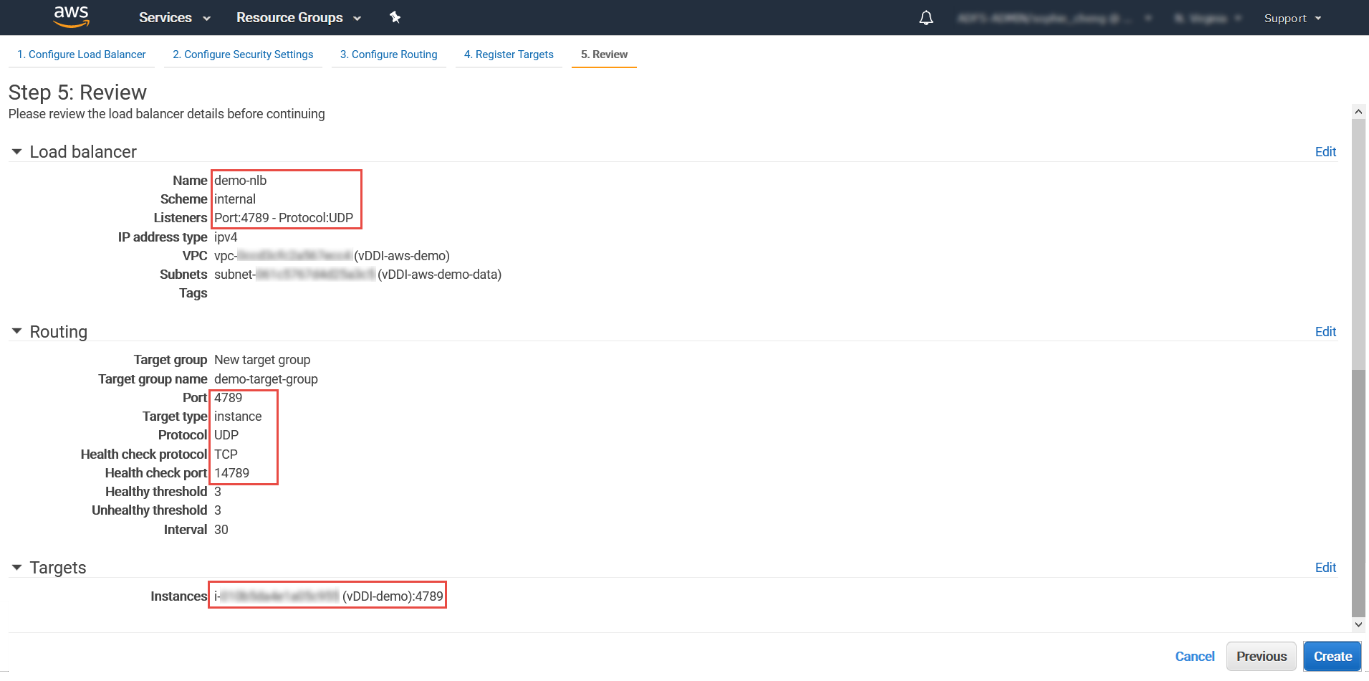
- For Instances, select the Deep Discovery Inspector
virtual appliance.
- Create the load balancer.
- On the Review screen, click Create.
- After the load balancer is created, click Close.
- On the navigation pane, under LOAD BALANCING, select Target Groups.
- Select the newly created target group.For example, select demo-target-group.
- Select Targets and verify that your instances
are ready.
Note
If the status of an instance is initial, it's probably because the instance is still in the process of being registered, or it has not passed the minimum number of health checks to be considered healthy. After the status of at least one instance is healthy, you can test your load balancer.If the Deep Discovery Inspector virtual appliance is launched after the NLB was created, use Register targets to add the Deep Discovery Inspector virtual appliance to the NLB target groups. For more details, see https://docs.aws.amazon.com/elasticloadbalancing/latest/network/target-group-register-targets.html.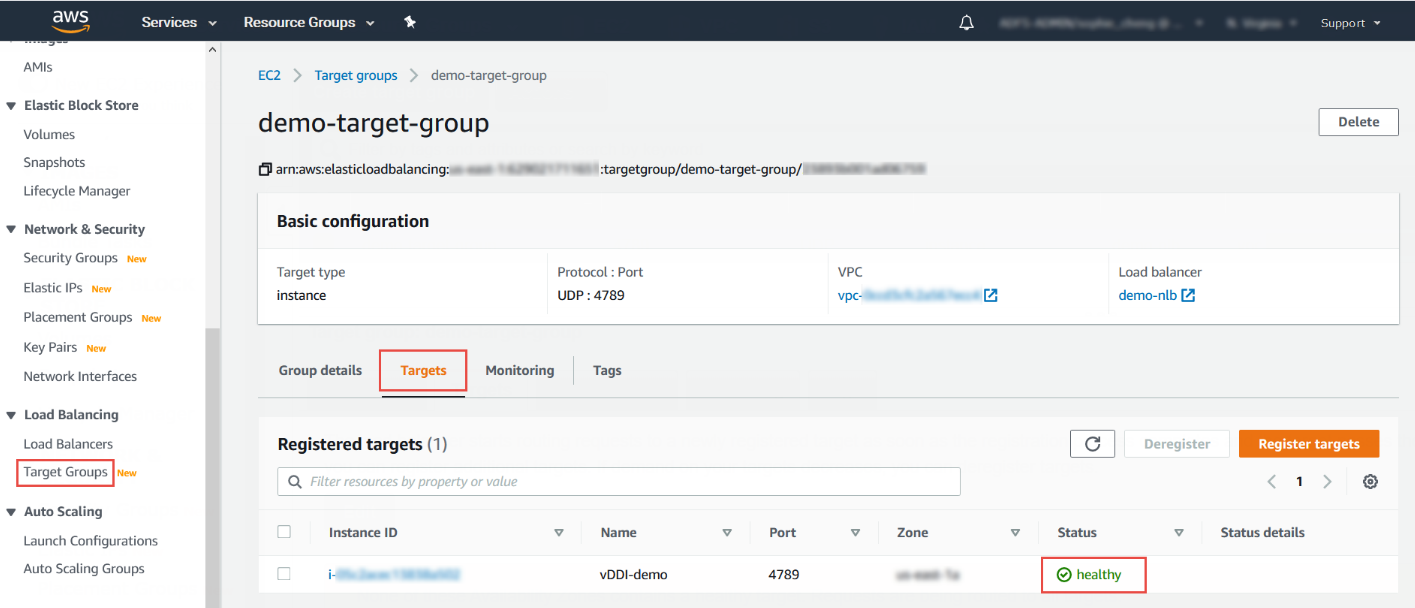
- Configure the traffic mirror filter.
- Open the Amazon VPC console at https://console.aws.amazon.com/vpc/.
- In the Region selector, select the AWS Region that you used when you created the VPCs.
- On the navigation pane, go to .
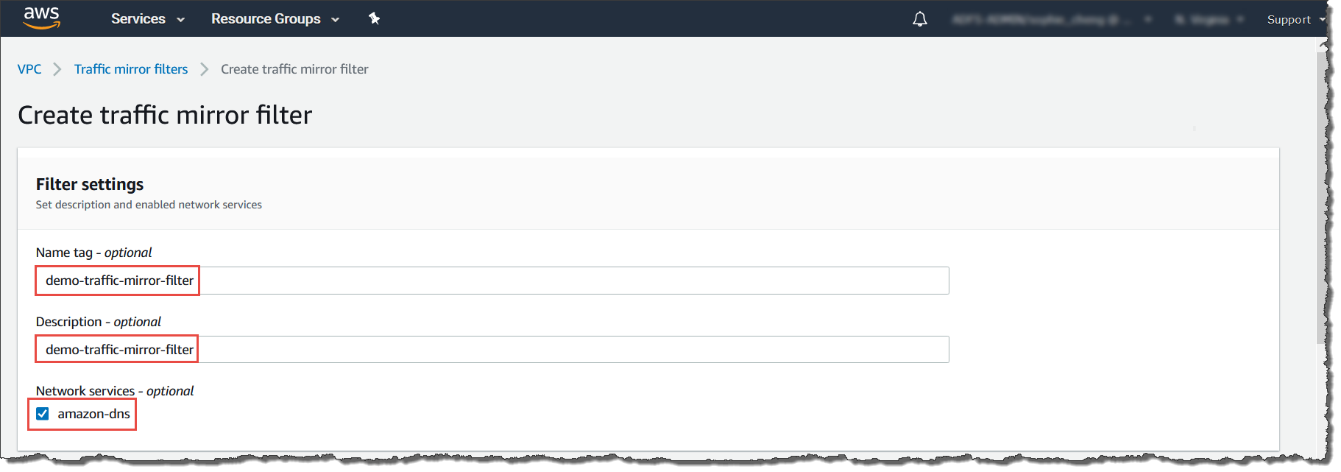
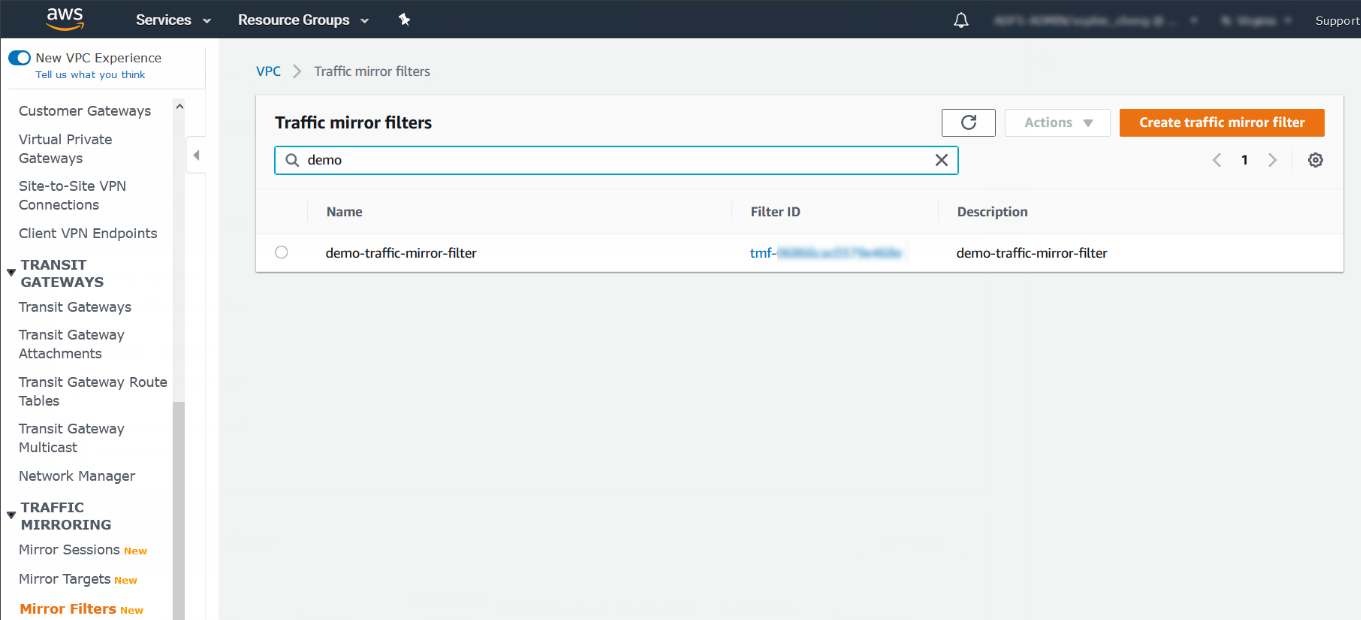
- Select Create traffic mirror filter.
- For Name tag, type a name for the traffic mirror
filter.For example, type demo-traffic-mirror-filter.
- (Optional) For Description, type a description
for the traffic mirror filter.For example, type demo-traffic-mirror-filter.
- (Optional) For Network services, select
amazon-dns.
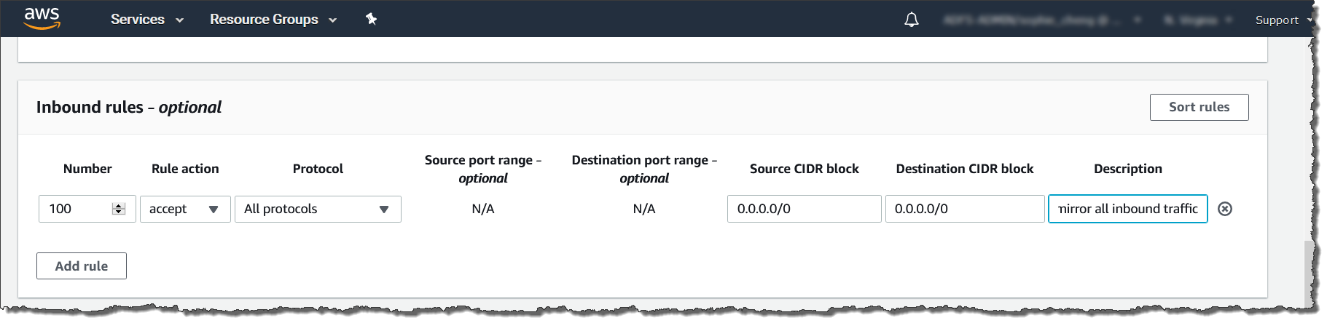
- Add inbound rules. Select , and then specify the following information about the
traffic mirror source inbound traffic:
-
Rule number: Type a priority to assign to the rule.
-
Rule action: Select an action to take for the packet.
-
Protocol: Select a L4 protocol to assign to the rule.
-
(Optional) Source port range: Type a source port range.
-
(Optional) Destination port range: Type a destination port range.
-
Source CIDR block: Type a source CIDR block.
-
Destination CIDR block: Type a destination CIDR block.
-
(Optional) Description: Type a description for the rule.
The following is an example of the values.-
Rule number: Use the default number
-
Rule action: Select accept
-
Protocol: Select All protocols
-
Source CIDR block: Type 0.0.0.0/0.
-
Destination CIDR block: Type 0.0.0.0/0.
-
Description: Type mirror all inbound traffic.
-
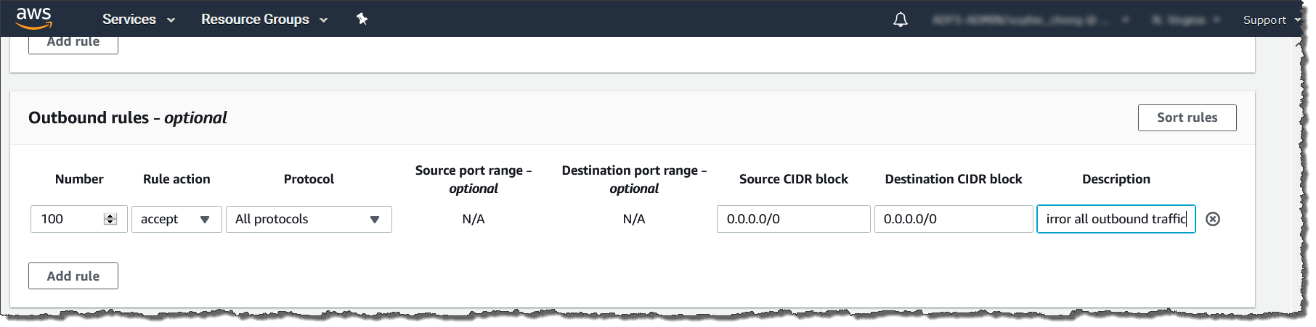
- Add outbound rules. Select , and then specify the following information about the
traffic mirror source outbound traffic:
-
Rule number: Type a priority to assign to the rule.
-
Rule action: Select an action to take for the packet.
-
Protocol: Select a L4 protocol to assign to the rule.
-
(Optional) Source port range: Type a source port range.
-
(Optional) Destination port range: Type a destination port range.
-
Source CIDR block: Type a source CIDR block.
-
Destination CIDR block: Type a destination CIDR block.
-
(Optional) Description: Type a description for the rule.
The following is an example of the values.-
Rule number: Use the default number
-
Rule action: Select accept
-
Protocol: Select All protocols
-
Source CIDR block: Type 0.0.0.0/0.
-
Destination CIDR block: Type 0.0.0.0/0.
-
Description: Type mirror all outbound traffic.
-
- Repeat the previous step for each inbound rule and outbound rule that you want to add.
- Click Create.
- Configure the traffic mirror target.
- Open the Amazon VPC console at https://console.aws.amazon.com/vpc/.
- In the Region selector, select the AWS Region that you used when you created the VPCs.
- On the navigation pane, go to .
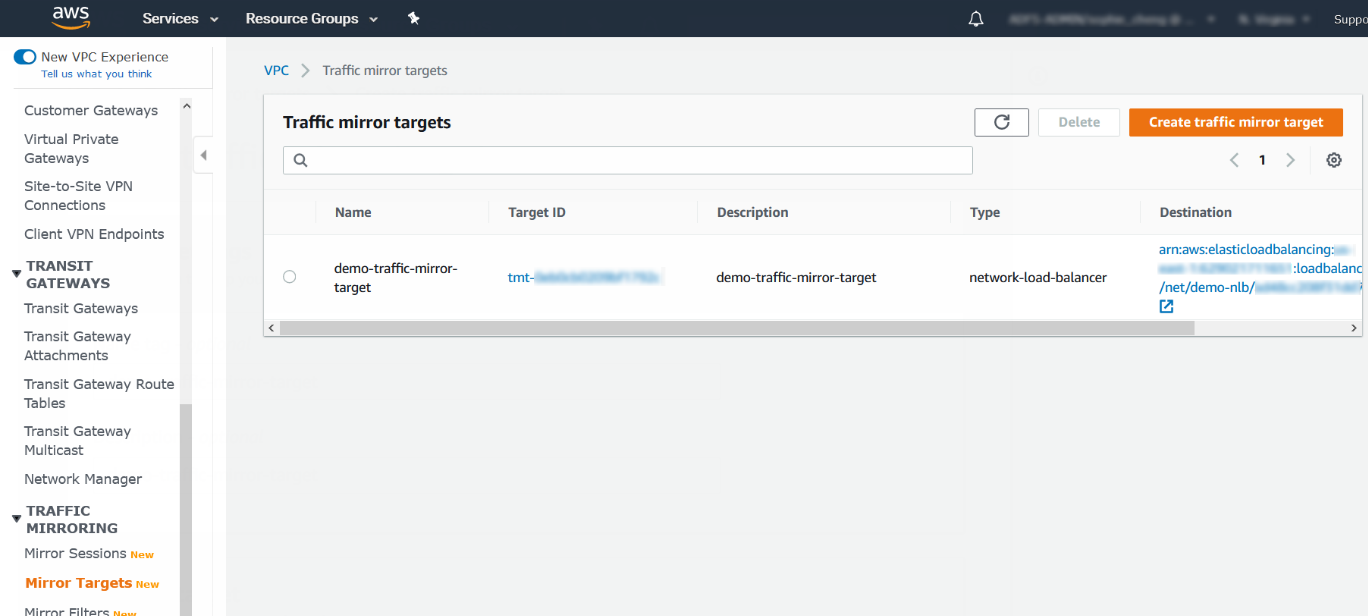
- Select Create Traffic Mirror Target.
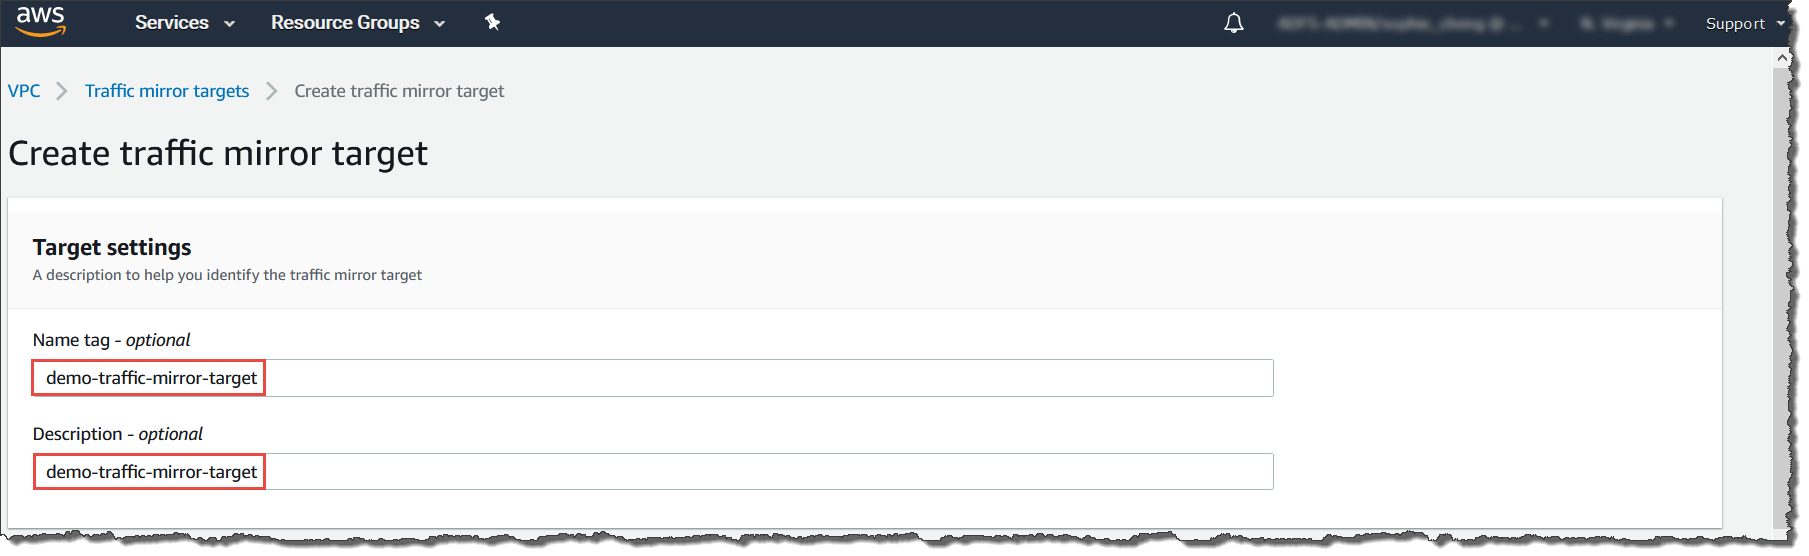
- For Name tag, type a name for the traffic mirror
target.For example, type demo-traffic-mirror-target.
- (Optional) For Description, type a description
for the traffic mirror target.For example, type demo-traffic-mirror-target.
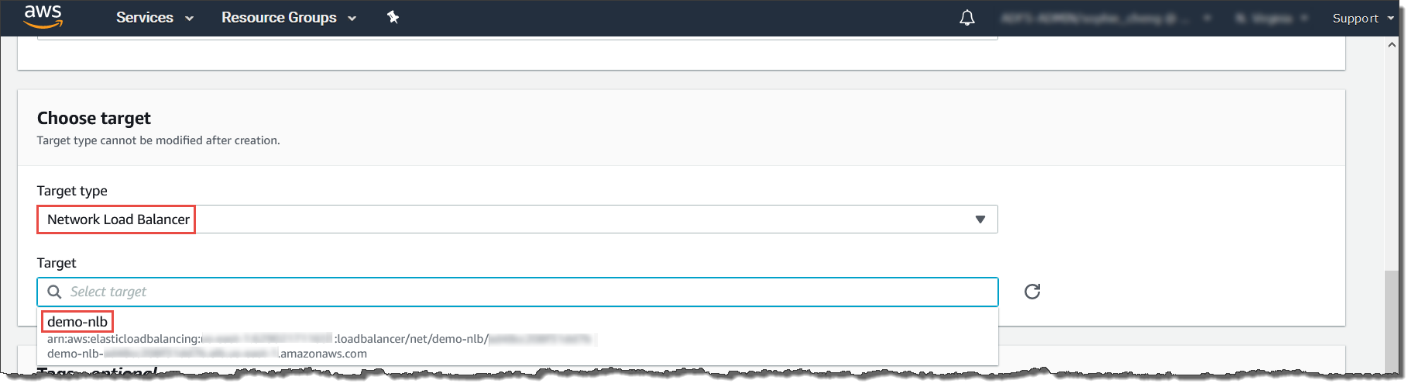
- For Target type, select Network Load Balancer.
- For Target, select a Network Load Balancer as
the traffic mirror target.For example, select demo-nlb.
- Click Create.
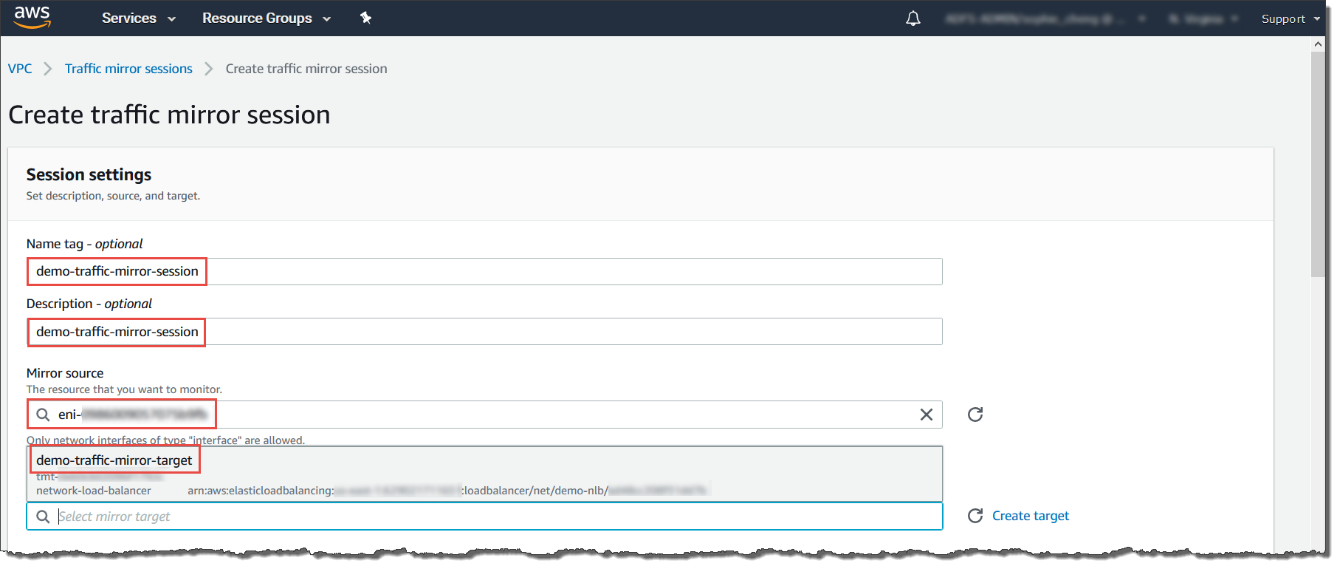
- Configure the traffic mirror session.
- On the navigation pane, select .
- Select Create traffic mirror session.
- For Name tag, type a name for the traffic mirror
session.For example, type demo-traffic-mirror-session.
- (Optional) For Description, type a description
for the traffic mirror session.For example, type demo-traffic-mirror-session.
- For Mirror source, select the network interface of the instance that you want to monitor.
- For Mirror target, select the traffic mirror
target.For example, select demo-traffic-mirror-target.
- Under Additional settings, perform the
following:
-
For Session number, type the session number 1.The session number determines the order that traffic mirror sessions are evaluated in both of the following situations:
-
When an interface is used by multiple sessions.
-
When an interface is used by different traffic mirror targets and traffic mirror filters.
Traffic is only mirrored one time. Use 1 for the highest priority. Valid values are 1-32766. -
-
(Optional) For VNI, type the VXLAN ID to use for the traffic mirror session.For details, see https://tools.ietf.org/html/rfc7348.If you do not specify a value, AWS assigns a random, unused number.
-
(Optional) For Packet Length, type the number of bytes in each packet to mirror.If you do not want to mirror the entire packet, set Packet Length to the number of bytes in each packet to mirror. For example, if you set this value to 100, the first 100 bytes after the VXLAN header that meet the filter criteria are copied to the target.To mirror the entire packet, do not enter a value in this field.
-
For Filter, select the traffic mirror filter that determines what traffic gets mirrored.For example, select demo-traffic-mirror-filter.
-
(Optional) Under the Tags section, add or remove a tag.
The following are example settings.-
For Session number, type the session number 1.
-
For VNI, leave the value empty. AWS will assign a random number.
-
For Packet Length, leave the value empty. AWS will mirror the entire packet.
-
For Filter, select demo-traffic-mirror-filter.
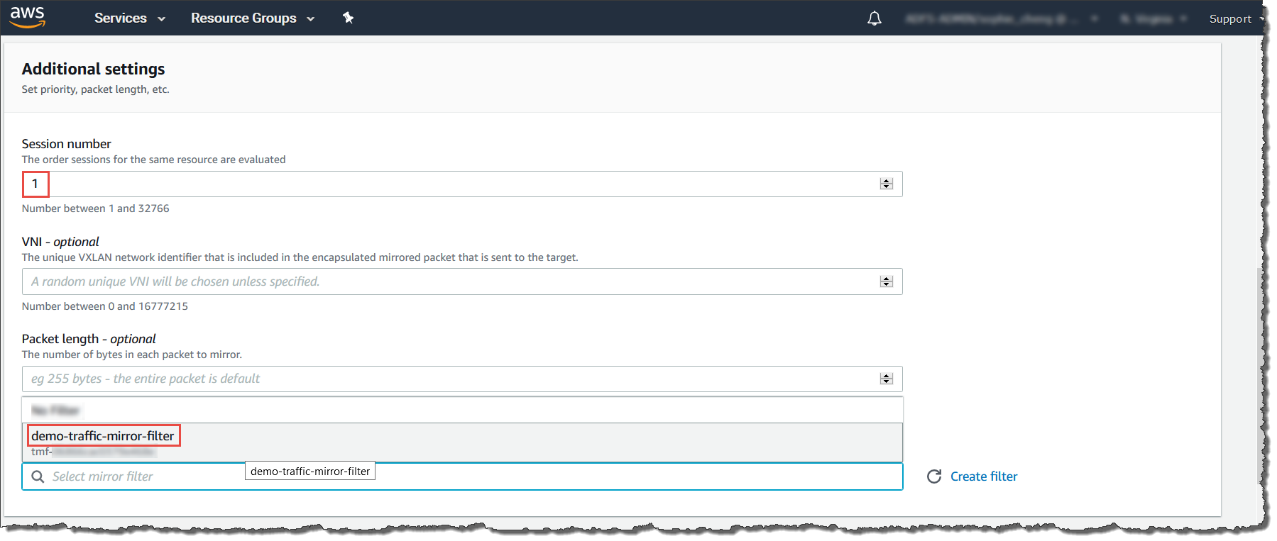
-
- Click Create.
Note
For more details, see https://docs.aws.amazon.com/vpc/latest/mirroring/working-with-traffic-mirroring.html.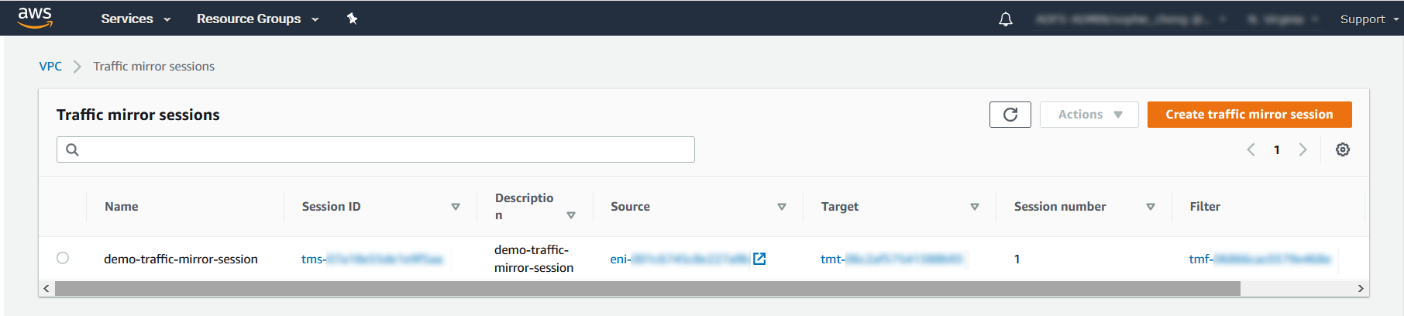
- Repeat the previous step to create more traffic mirror sessions when there are multiple sources that you want to monitor.