

Use the Command Line Interface (CLI) to deploy a Service Gateway virtual appliance with Proxmox cluster.
Verify that system requirements are met. For more information, see Service Gateway appliance system
requirements.
NoteThe following Proxmox instructions and screen captures were valid as of December 3,
2025. For further help, check your Proxmox documentation.
|
Procedure
- Go to .
- Click Download Virtual Appliance.The Service Gateway Virtual Appliance panel appears.
- Select Proxmox (QCOW2).
- Click Download Disk Image to download a QCOW2 file.

Tip
Copy the registration token for later steps. The registration token will expire within 24 hours if not used. - Upload the disk image to the Proxmox cluster.
# scp <SG_image_path> root@<VM_IP>:/<SG_image_path>
scp sg-va-3.0.24.10508-standard.qcow2 root@192.168.1.1:/SG/sg-va-3.0.24.10508-standard.qcow2
- Create a script file named
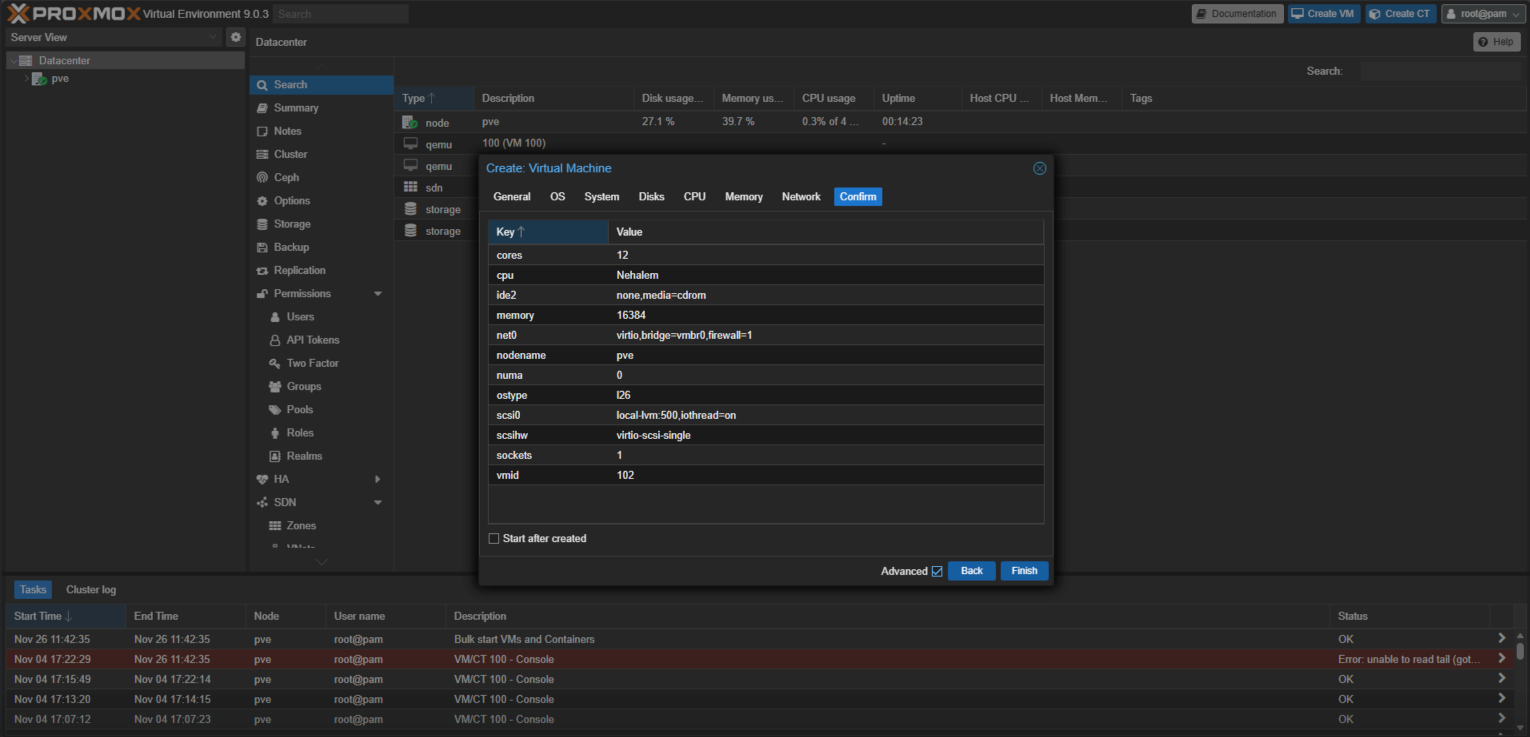
pve-import-qcow2.shin Proxmox with the following content:#!/bin/bash ############################################# # Proxmox VE - Import QCOW2 Image Script # Purpose: Import qcow2 image and configure VM # Parameters: <vm_num> <qcow2_image_path> ############################################# set -e # Exit on error # Check parameter count if [ $# -ne 2 ]; then echo "[ERROR] Invalid number of parameters" echo "Usage: $0 <vm_num> <qcow2_image_path>" echo "Example: $0 100 /path/to/image.qcow2" exit 1 fi VM_NUM=$1 QCOW2_PATH=$2 STORAGE="local-lvm" echo "[INFO] Starting process for VM $VM_NUM with image: $QCOW2_PATH" # Verify VM exists echo "[INFO] Checking if VM $VM_NUM exists..." if ! qm status $VM_NUM &>/dev/null; then echo "[ERROR] VM $VM_NUM does not exist" exit 1 fi echo "[INFO] VM $VM_NUM exists" # Verify qcow2 file exists echo "[INFO] Checking if qcow2 image file exists..." if [ ! -f "$QCOW2_PATH" ]; then echo "[ERROR] File not found: $QCOW2_PATH" exit 1 fi echo "[INFO] Image file exists" # Step 1: Import disk image echo "[INFO] Step 1/5: Importing disk image to $STORAGE..." echo "[INFO] This may take a while depending on image size..." echo "" # Import disk and suppress verbose output, only show progress qm importdisk $VM_NUM "$QCOW2_PATH" $STORAGE 2>&1 | grep -E "(transferred|successfully imported)" || true # Verify import completed successfully sleep 2 if ! qm config $VM_NUM | grep -q "^unused0:"; then echo "" echo "[ERROR] Import failed - unused0 disk not found" exit 1 fi echo "" echo "[INFO] Disk import successful" # Step 2: Get unused0 disk name echo "[INFO] Step 2/5: Getting unused disk information..." UNUSED_DISK=$(qm config $VM_NUM | grep "^unused0:" | awk '{print $2}') if [ -z "$UNUSED_DISK" ]; then echo "[ERROR] Could not find unused0 disk" echo "[WARN] Please check VM $VM_NUM configuration" exit 1 fi echo "[INFO] Found unused disk: $UNUSED_DISK" # Step 3: Attach disk as virtio0 echo "[INFO] Step 3/5: Attaching disk as virtio0..." if ! qm set $VM_NUM --virtio0 $UNUSED_DISK >/dev/null 2>&1; then echo "[ERROR] Failed to attach disk" exit 1 fi echo "[INFO] Disk attached successfully" # Step 4: Adjust boot order (put virtio0 first) echo "[INFO] Step 4/5: Adjusting boot order..." # Get current boot order CURRENT_BOOT=$(qm config $VM_NUM | grep "^boot:" | sed 's/boot: //' | sed 's/order=//') if [ -z "$CURRENT_BOOT" ]; then # If no boot order is set, use default NEW_BOOT_ORDER="virtio0;scsi0;ide2;net0" echo "[WARN] No existing boot order found, using default" else # Remove existing virtio0 (if present) and add to front CURRENT_BOOT=$(echo "$CURRENT_BOOT" | sed 's/virtio0;//g' | sed 's/;virtio0//g' | sed 's/virtio0//g') # Clean up possible extra semicolons CURRENT_BOOT=$(echo "$CURRENT_BOOT" | sed 's/^;//' | sed 's/;$//' | sed 's/;;/;/g') if [ -z "$CURRENT_BOOT" ]; then NEW_BOOT_ORDER="virtio0" else NEW_BOOT_ORDER="virtio0;$CURRENT_BOOT" fi fi echo "[INFO] New boot order: $NEW_BOOT_ORDER" if ! qm set $VM_NUM --boot order=$NEW_BOOT_ORDER >/dev/null 2>&1; then echo "[ERROR] Failed to set boot order" exit 1 fi echo "[INFO] Boot order configured successfully" # Step 5: Set SMBIOS tag echo "[INFO] Step 5/5: Setting SMBIOS tag..." if ! qm set $VM_NUM --smbios1 "manufacturer=Proxmox,product=ProxmoxVE" >/dev/null 2>&1; then echo "[ERROR] Failed to set SMBIOS tag" exit 1 fi echo "[INFO] SMBIOS tag configured successfully" # Complete echo "" echo "=========================================" echo "[INFO] All steps completed successfully!" echo "[INFO] VM $VM_NUM has been configured" echo "=========================================" echo "" echo "[INFO] VM Configuration Summary:" qm config $VM_NUM | grep -E "^(virtio0|boot|smbios1):" exit 0 - Create a virtual machine on the Proxmox cluster.TrendAI™ recommends following the CPU and memory requirements specified for Service Gateway installation.The following uses Standard Image as an example to describe how to create a VM.
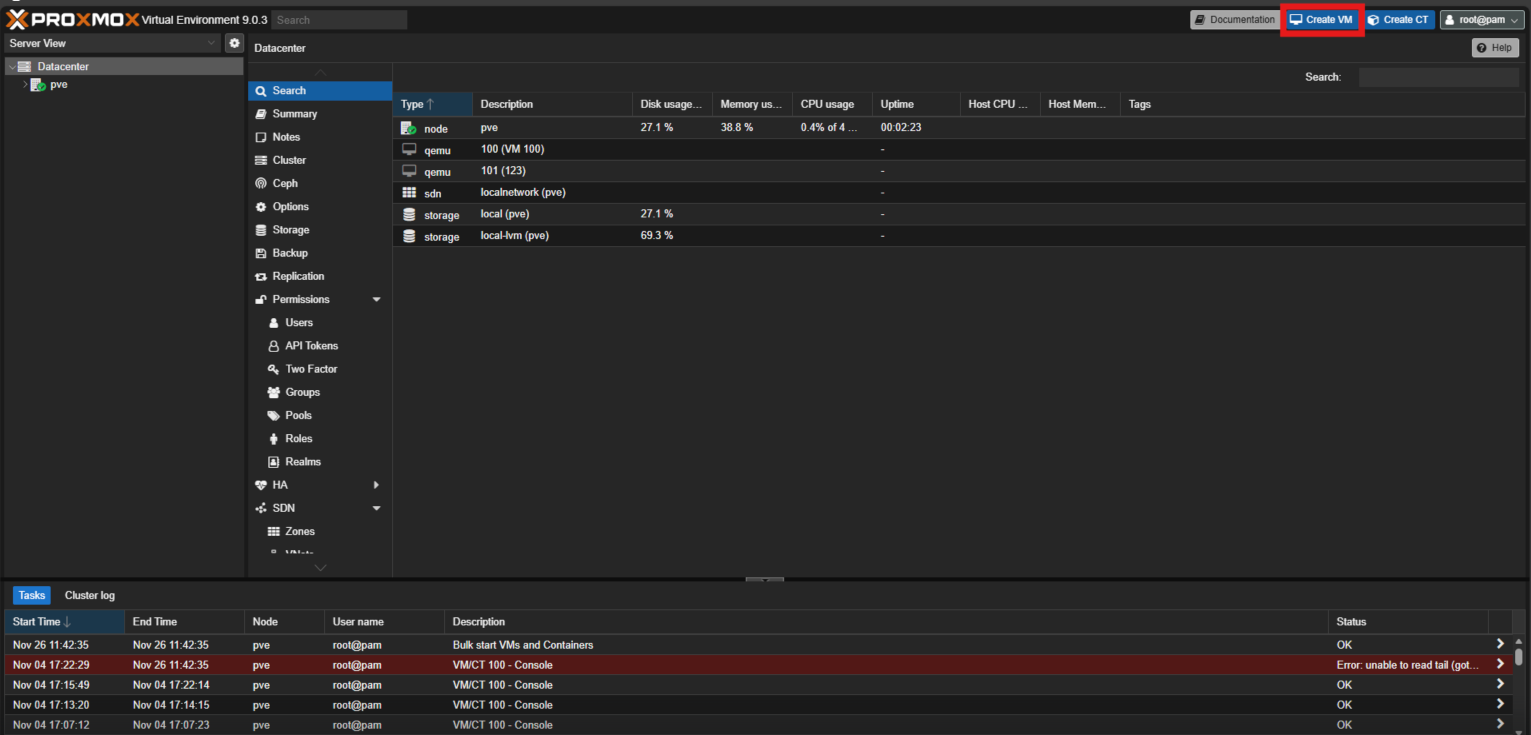
- In Proxmox, click Create VM.
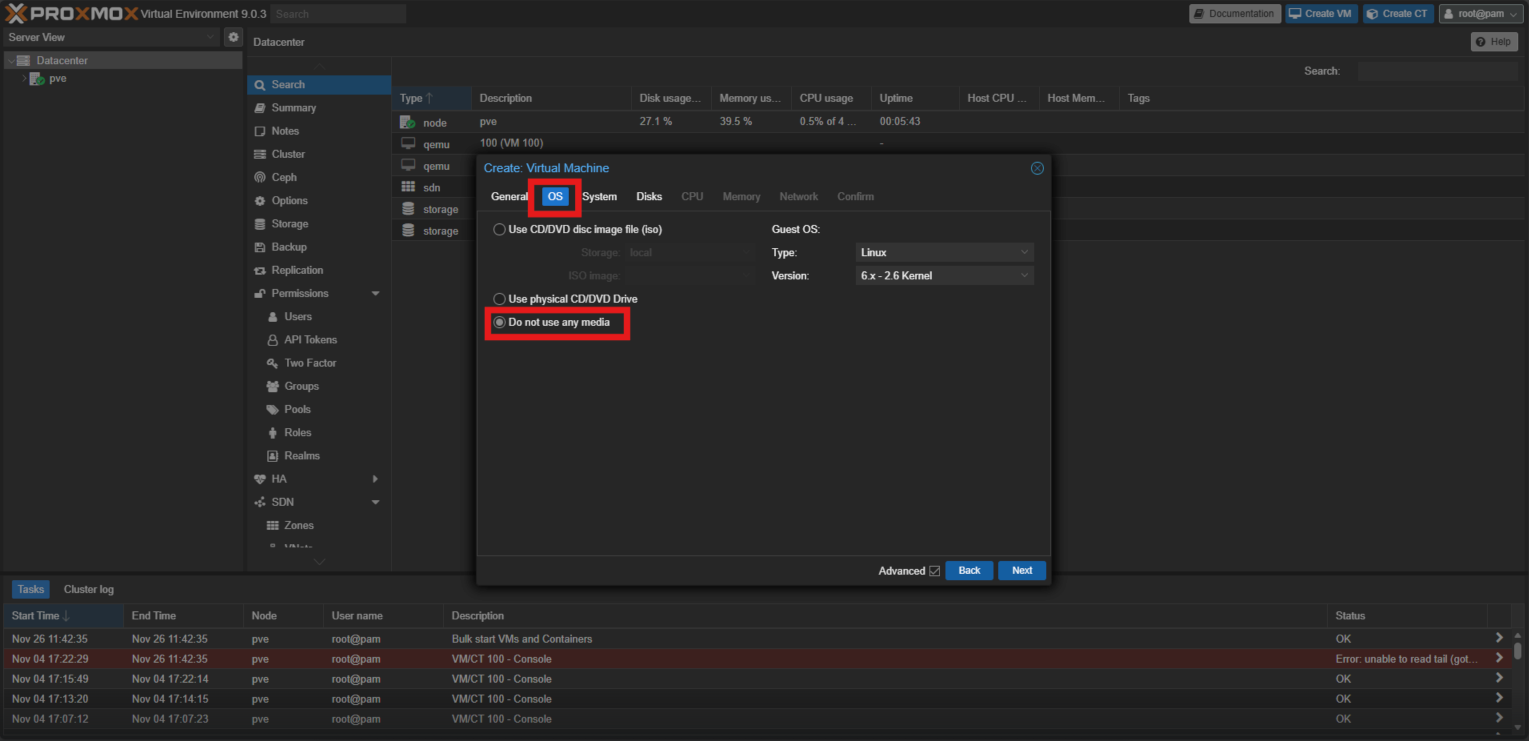
- In the Create: Virtual Machine window, select the OS tab, choose Do not use any media, and click Next.
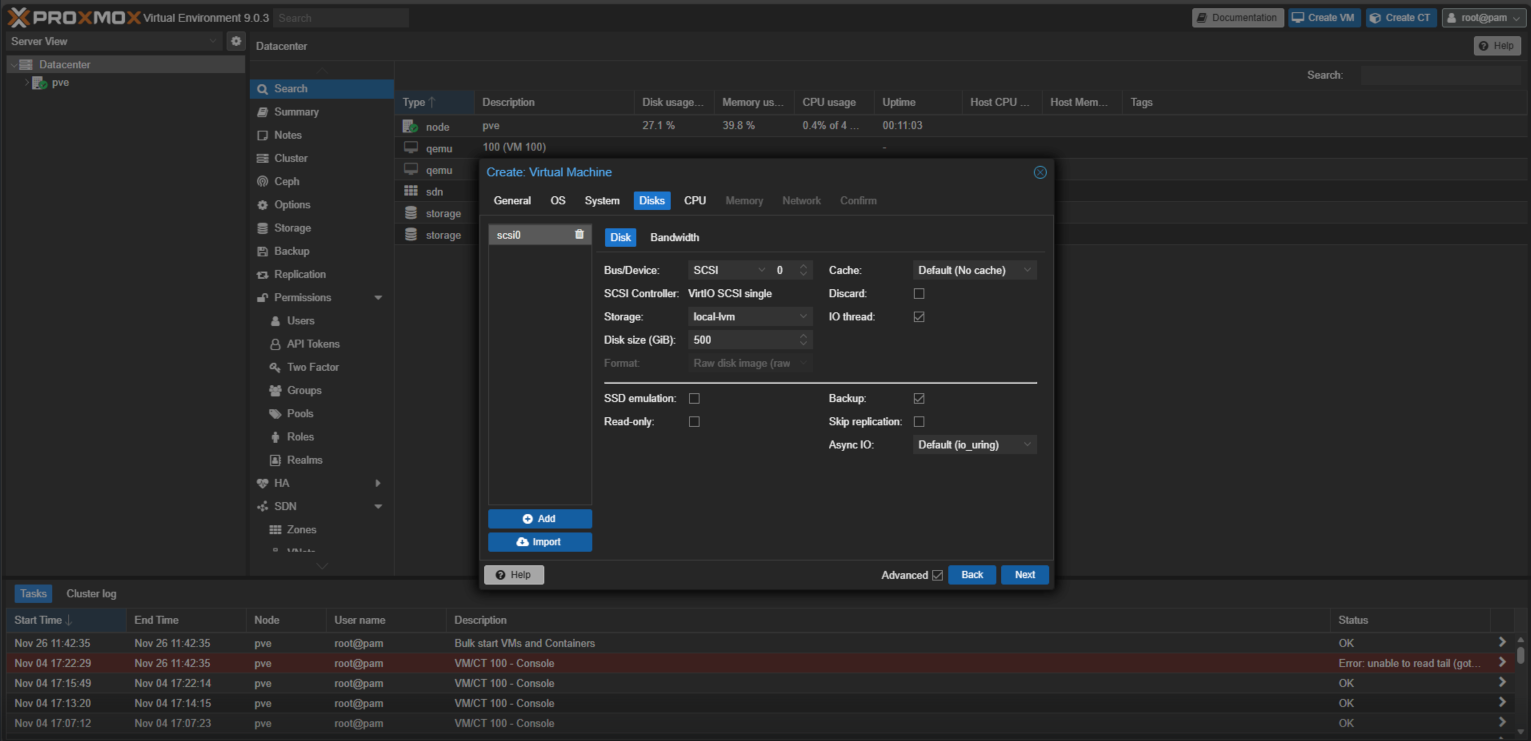
- On the Disks tab, specify the requirements of Service Gateway installation and click Next.
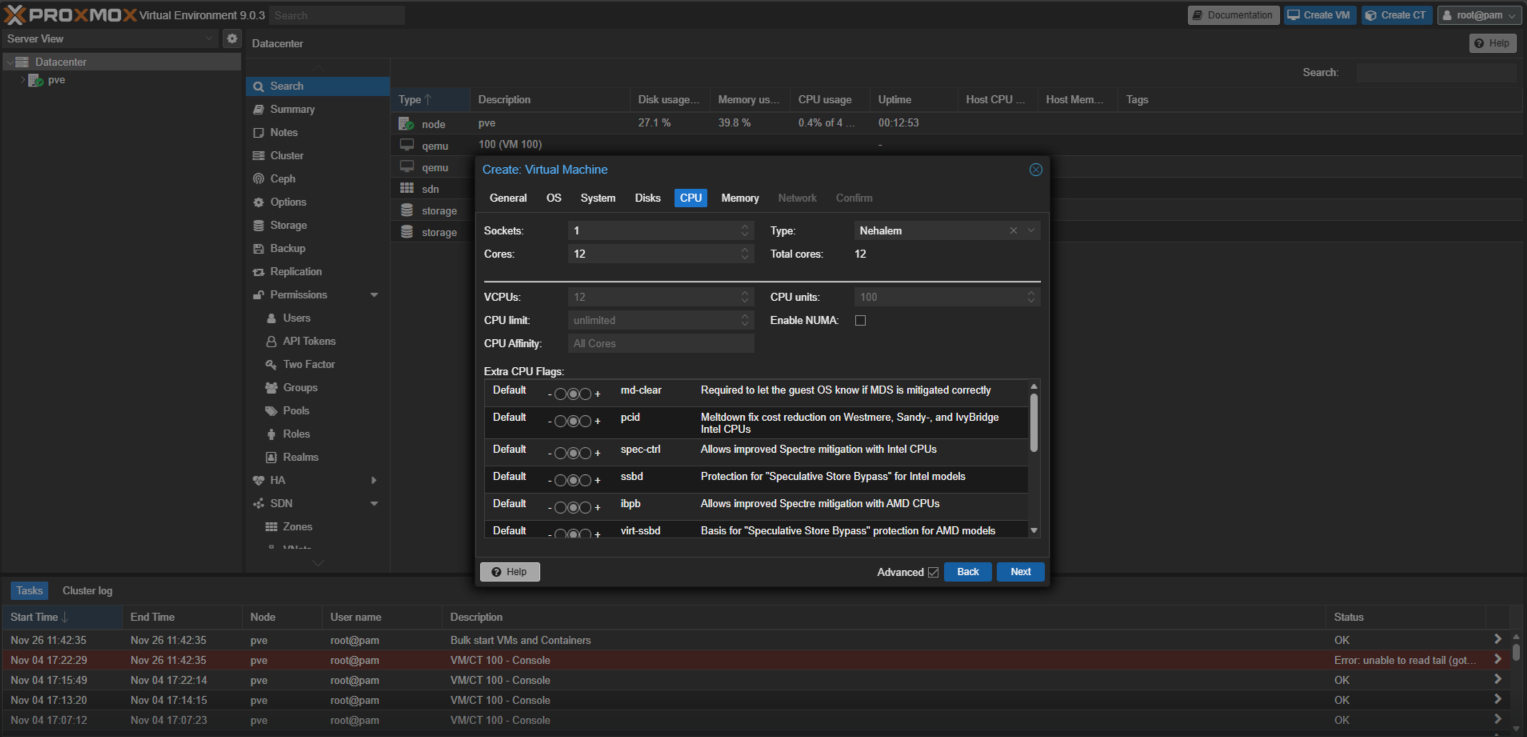
- On the CPU tab, specify the requirements of Service Gateway installation and click Next.
- On the Memory tab, specify the requirements of Service Gateway installation and click Next.

- Check the VM configuration and click Finish to create the VM.
- In Proxmox, click Create VM.
- Log on to the Proxmox cluster and run the
pve-import-qcow2.shfile to deploy the Service Gateway appliance.# bash <SG_script_path> <VM_NUM> </SG_image_path> bash pve-import-qcow2.sh "100" "sg-va-3.0.24.10508-standard.qcow2"
- On the Service Gateway virtual appliance, log on to the Command Line Interface (CLI)
with the default credentials.User name: adminPassword: V1SG@2021
- Change your password.
- Type enable and press the
ENTERkey to enable administrative commands. Provide your password when asked.The command prompt changes from > to #. - Configure the required network settings using the following CLISH commands.
Configure network primary ipv4.static <interface> <ip_cidr> <gateway> <dns1> [dns2]
                              [cni]
Configure static IPv4 network settings for the primary network interface<interface>: Name of the network interface (for example, eth0)<ip_cidr>: IPv4 address of the network interface in CIDR notation<gateway>: Gateway router address<dns1>: Primary DNS server address[dns2]: Secondary DNS server address[cni]: Internal network address pool (IP address ending in .0.0) - To register the Service Gateway virtual appliance to TrendAI Vision One™, use an SSH tool, such as the latest version of PuTTY, and using an account with
administrator privileges, type the following command.
register <registration_token>You can obtain the token from the same screen you download the virtual appliance on TrendAI Vision One™ (step 4). - Use the CLI to configure other settings, if required.For more information on available commands, see Service Gateway CLI commands.For details on setting up a virtual appliance with two network cards, see Service Gateway Virtual Appliance dual network card configuration.