To manually create a Network Security AMI instance to inspect network traffic, complete
each of the following tasks in order.
NoteFollow these steps if you are manually deploying Option 1: Edge protection
deployment.
|
1. Create security groups 
Network Security requires a minimum of two security groups. These security groups
are
used when you create the ENIs. Learn more about security groups.
From the EC2 Dashboard, scroll down to Security Groups, and click Create security
group.
Management security
                        group
Use this security group for the Network Security management port.
- Security Group Name: Enter
Management security group. - Description: Enter
Allows you to access Network Security from the
                        CLI and the Network Security management interface
. - VPC: Select the Inspection VPC.
Select the management group, scroll down to the Inbound Rules and Outbound Rules tabs,
and click Edit Rules to add these required rules.
Inbound rules
|
Type
|
Protocol
|
Port range
|
Source
|
Description
|
|
SSH
|
TCP
|
22
|
<IP or CIDR addresses that need access to the management port for
the Network Security instance> |
Allows you to SSH into Network Security and manage the instance with the
CLI
|
Outbound rules
NoteWe recommend that you keep the outbound rules for this group open to all traffic on
all
ports to all destinations.
|
|
Type
|
Protocol
|
Port range
|
Source
|
Description
|
|
All traffic
|
All
|
All
|
0.0.0.0/0 |
Allows all traffic on all ports to all destinations
|
Traffic security group
Use this security group for the Network Security data ports. AWS considers all traffic
that passes through the data port to be inbound traffic, so you must allow inbound
traffic
rules from the internet, even if you are only inspecting connections originating inside
your network.
The inbound and outbound rules listed below are the minimum required rules for the
security group. Add any additional rules necessary for your network environment, but
make
sure the inbound and outbound rules are the same for this security group.
- Security Group Name: Enter
Traffic security group. - Description: Enter
Allows all inbound traffic from the
                        internet
. - VPC: Select the Inspection VPC.
NoteWe recommend that you keep this security group as open as possible and that you
restrict traffic using security groups attached to your Workload EC2 instances.
|
Inbound rules
|
Type
|
Protocol
|
Port range
|
Source
|
Description
|
|
All traffic
|
All
|
All
|
0.0.0.0/0 |
Allows all traffic that originates inside or outside of your network
|
Outbound rules
|
Type
|
Protocol
|
Port range
|
Source
|
Description
|
|
All traffic
|
All
|
All
|
0.0.0.0/0 |
Allows all traffic that originates inside or outside of your network
|
2. Create an IAM policy and role
Create an IAM policy then attach it to an IAM role. This IAM policy and role allows
the
Network Security instance to send metrics to CloudWatch. Learn more about creating IAM roles.
Create policy
Procedure
- Navigate to the IAM Dashboard.
- Click Policies, and then click Create policy.
- Click on the JSON tab, then copy and paste the following permissions.
{ "Version": "2012-10-17", "Statement":[ { "Action": [ "logs:CreateLogGroup", "logs:CreateLogStream", "logs:PutLogEvents" ], "Resource": "arn:aws:logs:*:*:*", "Effect": "Allow" }, { "Action": "cloudwatch:PutMetricData", "Resource": "*", "Effect": "Allow" } ] } - Click Review Policy, and enter the following parameters before clicking
Create policy.
- Name:
CloudWatch_logs_policy - Description:
Allows CloudWatch to track metric data
- Name:
- Create a role and attach a policyAfter you create the policy, create a role and attach the CloudWatch logs policy to that role.
- Above Policies, click Roles, and then click Create role.
- Select AWS service, then choose EC2 for the service that will use this role.
- Click Next: Permissions, and then select the CloudWatch_logs_policy that you just created.
- Optionally, add any tags, and then click Next: Review.
- For role name, enter
CloudWatch_logs, and then click Create role.
3. Modify the S3 VPC endpoint policy
This section only applies to users that plan to deploy a Network Security instance
into
the same VPC that uses an S3 VPC Endpoint. The policy for the endpoint must be modified
to
allow the Network Security virtual appliance to access files in the S3 bucket.
Procedure
- Navigate to the VPC Dashboard and click Endpoints.
- Select the VPC endpoint where you plan to launch the Network Security instance.
- Select the Policy tab below the list of endpoints.
- Click Edit Policy, and add the following text to your existing policy
statement.
"Statement": [ { "Sid": "NetworkSecurityPolicy", "Effect": "Allow", "Principal": "\*", "Action": [ "s3:GetObject", "s3:GetObjectVersion", "s3:PutObject", "s3:PutObjectAcl" ], "Resource": [ "arn:aws:s3:::network-security-\*", "arn:aws:s3:::network-security-\*/\*" ] } ] - Click Save.
4. Create Network Security instances
Create at least one Network Security instance in each AZ where you have Workload
VPCs.
Procedure
- Navigate to the Network Security AMIs. Alternatively, follow these steps to search for the
Network Security AMIs manually.
- Navigate to the EC2 Dashboard.
- Under Images, select AMIs.
- In the drop down menu under Launch, select Public images.
- In the search bar at the top of the page, type
Owner :
                                 511311637224
.
- From the list that appears, select the latest AMI version.NOTEThe latest version is the AMI with the highest number. For instance, IPS_AMI--2020.10.0.10702 is more recent then IPS_AMI--2020.10.0.10605.
- After you select the correct AMI, click Launch.
- Select an instance type. Trend Micro recommends using a c5.xlarge instance type. The
c5.xlarge instance can inspect traffic at a sustained rate of 1Gbps, which supports
most
inspection needs.Select a bigger instance size for greater inspection needs. Testing indicates that instance rates scale linearly with the size of the instance. The c5n instances have sustained rates that are four times greater than regular c5 instances of the same size. For example, if the c5.xlarge instance can inspect 1Gbps of traffic, then the c5n.xlarge can inspect 4Gbps.
- Configure the following information on the Configure Instance Details page.If not specified, keep the default settings.
-
Network: Select the Inspection VPC.
-
Subnet: Select the management subnet.
-
Auto-assign Public IP: Select Disable.
-
IAM role: Select the IAM role that you created in Create an IAM role.
-
Shutdown behavior: Select Stop.
-
Network interfaces: Leave eth0, which is created automatically by AWS, as the only network interface.
-
Advanced details user data: Copy and paste the following text.
# -- START VTPS CLOUDWATCH
log-group-name < Name your CloudWatch Log Group Here >
# -- END VTPS CLOUDWATCH
-
- On the Add Storage page, select 24GiB for the size and General Purpose SSD for the volume type.
- On the Configure Security Group page, click Select an existing security group, and select the management security group that you created.
- Review the information you entered, and select Launch to create the instance.
- After you launch the instance, choose or create an SSH key.
5. Create Elastic Network Interfaces
The management port, which connects to SSH or HTTPS, is created automatically in AWS
as
eth0. Network Security uses two additional ports, 1A and 1B, for each instance. To
add
these ports, create two new ENIs and then attach them to the Network Security instance.
Learn more
about elastic network interfaces.
Procedure
- From the EC2 Dashboard, click Network Interfaces (under Network & Security).
- Click Create Network Interface to create the 1A port, eth1.Enter the following parameters.
-
Description:
eth1 -
Subnet: Select the Inspection subnet.
-
IPv4 Private IP: Keep setting as Auto-assign.

Note
Note the IPv4 IP that is automatically assigned to the port as you will need this later in the deployment process. -
Security groups: Select the Traffic security group.
-
- Next, click Create Network Interface again to create the 1B port,
eth2.Enter the following parameters.
-
Description:
eth2 -
Subnet: Select the Protected-public subnet.
-
IPv4 Private IP: Leave set to Auto-assign.NOTENote the IPv4 IP that is automatically assigned to the port as you will need this later in the deployment process.
-
Security groups: Select the Traffic security group.
-
- Stop any Network Security instances you created before you attach the ENIs.
- From the EC2 Dashboard, navigate to Instances, and select the Network Security instance you created in Create Network Security instances.
- Click Actions → Networking → Attach Network Interface, and attach the 1A port ENI, eth1, to the Network Security instance.
- Repeat the previous step to also attach the 1B port ENI, eth2, to the Network Security instance.
- After the ENIs are attached, restart the Network Security instance.
- Navigate back to the Network Interfaces page.
- Right click on eth1, click Change Source/Dest. Check, and select Disable.
- Repeat the step above to disable the Source/Destination Check for eth2 as well. Learn more about source and destination checks.
6. Configure additional Network Security settings
Complete the remaining configuration requirements. These configuration settings create
the virtual segments, register the instance with the Network Security management
interface, and create a CloudWatch metric that is used if you set up high
availability.
The following information is required to complete this task.
|
Component
|
Description
|
|
1A port IP address
|
The IPv4 private IP address that was auto generated for 1A, eth1.
|
|
Inspection subnet CIDR prefix length
|
The decimal number after the slash for the inspection subnet CIDR block.
|
|
1B port IP address
|
The IPv4 private IP address that was auto generated for 1B, eth2.
|
|
Sanitized subnet CIDR prefix length
|
The decimal number after the slash for the sanitized subnet CIDR block.
|
|
Trend Micro Cloud One appliance deployment token
|
The Trend
Micro Cloud One appliance deployment token for the Network Security
management interface.
|
|
VPC CIDR
|
The VPC CIDR block number.
|
Procedure
- SSH into the instance.
- Username:
admin - SSH key: Selected in the last step of Create Network Security instances.
- Username:
- Run the following commands.
 edit
 virtual-segments
 virtual-segment "cloud formation"
 delete route all
 route 0.0.0.0/0 <Gateway IP Address of Inspection Subnet>
 route <VPC CIDR> <Gateway IP Address of Protected-Public Subnet>
 exit
 commit
 exit

 high-availability
 cloudwatch-health period 1
 commit
 exit

 exit
 save-config -y
 cloudone register <deployment-token>
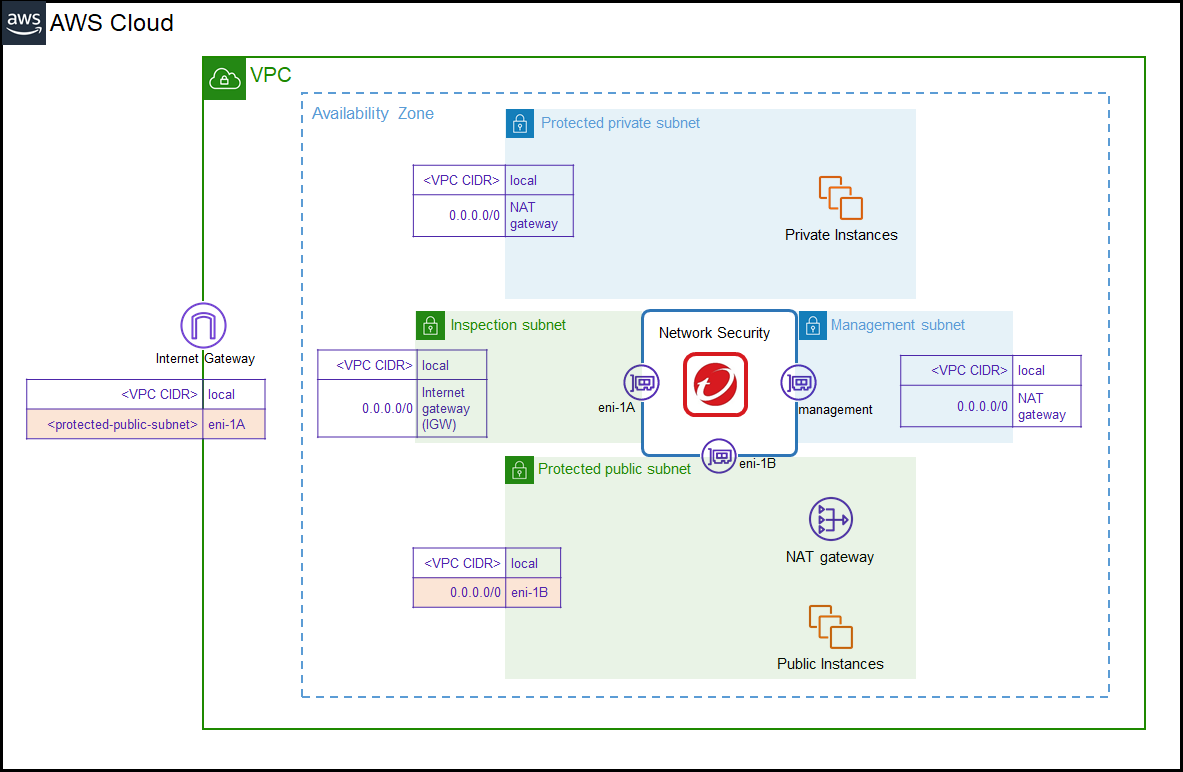
7. Route traffic for inspection
After you have completed set up of the Network Security instances, route the network
traffic so that it passes through the instances for inspection. Use the appropriate
route
tables, depending on your deployment option.
Modify the route tables that you already created to
match the route tables below for each AZ in your VPC. This routes the traffic through
Network Security for inspection.
VPC access route table
|
Destination
|
Target
|
<VPC CIDR> |
Local
|
|
|
eni-1A
|
Protected-public route table
|
Destination
|
Target
|
<VPC CIDR> |
Local
|
0.0.0.0/0 |
eni-1B
|
Protected-private route table
|
Destination
|
Target
|
<VPC CIDR> |
Local
|
0.0.0.0/0 |
NAT Gateway
|
|
ON PREM CIDRs
|
eni-1B
|
Management route table
|
Destination
|
Target
|
<VPC CIDR> |
Local
|
0.0.0.0/0 |
NAT Gateway
|
|
ON PREM CIDRs
|
eni-1B
|
Detailed image
The image below is a detailed view of what your network environment should look like
after you insert the Network Security instances.