

Widgets
are the core components for the dashboard. Tabs provide the layout and widgets provide
the actual
data for the dashboard.
NoteCustomizing the dashboard, tabs, or widgets for one user
account has no effect on the dashboard, tabs, or widgets for a different
user account. Each user account has a completely independent dashboard,
tabs, and widgets from every other user account.
|
Download the Control Manager widget pool (under
Product programs and widget pool on the Manual
Download and Scheduled Download screens)
periodically to check for new or updated widgets.
The data a widget displays comes from one of the following places:
-
Control Manager database
-
Trend Micro Smart Protection Network
- Managed products added to the Dashboard Server Visibility list
NoteSmart Feedback must be enabled to display data for widgets
that include data from Smart Protection Network.
|
The data a widget displays is controlled in two ways:
Widget Data
|
Item
|
Details
|
|
User account
|
A user’s account grants or restricts access to any managed product registered to Control Manager.
|
|
Scope
|
The data scope on many widgets can be individually
configured.
This means a user can further specify the data
source location for the widget.
Example: An OfficeScan
administrator, who manages multiple OfficeScan servers, could create
one tab and add widgets that display data for only one OfficeScan
server.
|
Adding Widgets to a Tab
Procedure
- Go to the and then open the appropriate tab.
- Click the
 Add
Widgets at the upper right corner of the tab.The Add Widgets screen appears.
Add
Widgets at the upper right corner of the tab.The Add Widgets screen appears. - Do the following:
-
Click a category from the left and then select the check box next to the name of all applicable widgets that appear.
-
Use the search bar to select a specific widget.
-
- Click Add.
All selected widgets are added to the tab.
Widget Options
The
following illustration and table provide a general overview of available widget options.
Different widgets may have different options available.
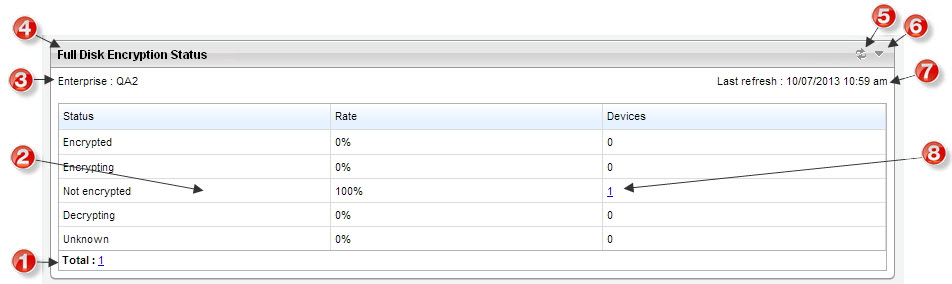
Widget Option Descriptions
|
Item
|
Description
|
|
1
|
The total number of objects (examples: events, devices, logs) that the widget
gathers data about. Click the number to view additional information.
|
|
2
|
The information that the widget displays.
|
|
3
|
The Enterprise associated with the widget data.
|
|
4
|
The name of the widget. Change the name in the Widget
Settings window.
|
|
5
|
Click the
|
|
6
|
Click the
|
|
7
|
View the last time that the widget refreshed data.
|
|
8
|
Click the number or icon to access specific widget data, such as event logs or
reports.
|