

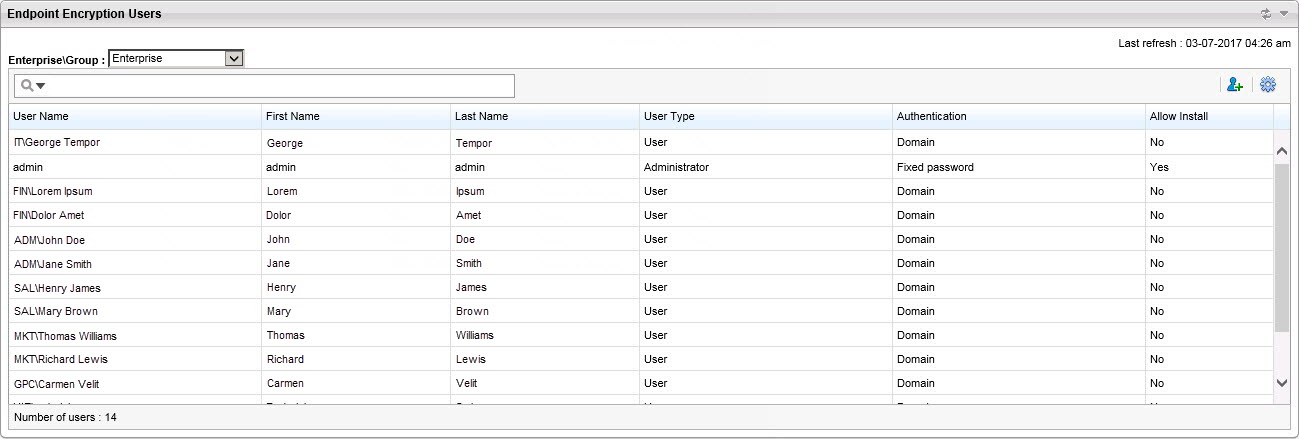
The Endpoint Encryption Users widget provides user management capability
directly from the Control Manager dashboard. Use the
Endpoint Encryption Users widget to add or remove Endpoint Encryption user accounts, reset passwords, change permissions,
configure policy group priority, import from Active Directory, and search for specific
user
accounts.
NoteFor information about adding existing Endpoint Encryption users to a
policy, see Configuring Endpoint Encryption Users Rules.
|
|
Item
|
Description
|
|
Show
|
Select which users to display: all users in the Enterprise, or users in a specific
policy.
|
|
Search (
|
Click the
|
|
Settings (
Right-click a user
|
Click the
|
|
Add users (
|
Click the
|
|
Number of users
|
View the total number of users in the entire Enterprise, selected policy, or specified
search.
|
User Settings Options
The following table explains the options available under the settings icon.
User Settings Options
|
Option
|
Description
|
|
Change password
|
Specify a new password for users using the Fixed password authentication type. The
widget does not support changing passwords for the Domain authentication type.
|
|
Delete user
|
Removes the selected user.
|
|
Modify user
|
Update the properties of the selected user. The following properties can be modified:
|
|
List policies
|
Displays the policies where the selected user is a member.
If the Allow Install column for the selected user is Yes, then the option to allow or disallow the installation of selected policies, as well
as selecting which policies should be given first priority is enabled.
|
Add New User Options
The following table explains the options available when adding a new Endpoint Encryption user.
Add New User Options
|
Option
|
Description
|
|
User name
|
Specify the account user name that the user uses to authenticate.
|
|
First name
|
Specify the user's first name.
|
|
Last name
|
Specify the user's last name.
|
|
Employee ID
|
Specify the user's employee ID (optional).
|
|
Email address
|
Specify user's email address (optional).
|
|
Freeze
|
Select Yes to temporarily lock the account. A locked
account cannot log on to Endpoint Encryption devices.
|
|
User type
|
Select User, Authenticator, or
Administrator.
For more information about user roles, see Users.
|
|
One group
|
Select Yes to only allow the user to belong to one policy
at a time. The user may not be added to any other policy groups.
If you set this option to Yes and set the User
type to Authenticator or
Administrator, the user will be a group authenticator or
group administrator respectively.
|
|
Authentication method
|
Select the authentication method available to the user.
|
Policy Membership
The following table explains how to understand Endpoint Encryption
user policy membership.
NoteEncryption Management for Apple FileVault and
Encryption Management for Microsoft BitLocker do not require authentication and are
not
affected by authentication policies. Client, login, password, and authentication policies,
or allowing the user to uninstall the Endpoint Encryption
agent software only affects the Full Disk Encryption and File Encryption agents.
|
|
Header
|
Example
|
Description
|
|
Priority
|
1, 2. 3
|
Shows the order that Endpoint Encryption applies
policies. When a policy is triggered that affects a user, Endpoint Encryption takes the action, and then no other
policies affect the user for that event.
|
|
Policy Name
|
GP1
|
Shows the name of all policies that the user is currently assigned.
|
|
Description
|
Temporary employees policy.
|
Shows the description of the policy.
|
|
Allow Install
|
Yes, No
|
Shows whether the user can install new Endpoint Encryption devices.
|
Importing Users from a CSV File
NoteImporting users from a CSV file is supported only for users using fixed password authentication.
|
Format each line in the CSV file as follows:
<User ID (required)>, <first name>, <last name>, <employee ID>,
                     <email address>
For fields with no data, use a comma as a placeholder. The following is an example
CSV entry:
example_id, name,,, name@example.comProcedure
- From the Endpoint Encryption Users widget, click
Add User and then select Import Users from
a File.The Import Users from a File screen appears.
- Click Choose File to select the CSV file.The Open CSV File window appears.
- Select the file and then click Open.
- Click Add.The users in the CSV file are imported.
Importing Active Directory Users
PolicyServer maintains a user directory separate from the Active
Directory database. This allows PolicyServer absolute security over access to all
Endpoint Encryption devices, user rights, and authentication
methods.
Use the Endpoint Encryption Users widget in Control Manager to import Active Directory users.
For more information about managing users with the Endpoint Encryption
Users widget, see Endpoint Encryption Users.
Procedure
- Log on to Control Manager.
- Go to the Endpoint Encryption Users widget.
- Click the
 icon.
icon. - Select Import Users from Active Directory.The Import Users from Active Directory screen appears.
- Specify your credentials for the Active Directory LDAP server.

Note
For Port, the value0
specifies the default port. The default port is 389. - Click Next.
- Wait for the specified Active Directory domain to
populate.The Active Directory tree for the specified domain appears in the left pane.
- From the left pane, use the navigation tree to select the container from which
to add users.The available users populate in the right pane.
- Do one of the following:
- Select individual users, then click Import Selected Users.
- Click Import Everyone in this Container.
- Click OK to add the users to the specified
location.A confirmation window appears.
- Click OK to confirm.An import status message displays.
- Click Close to finish, or repeat the procedure to select more users to import.