

NoteIf your network includes multiple directory sources, configure all of these sources
on
the Source Directory tab, to enable the Directory Synchronization
Tool to synchronize directory data from all of the sources.
|
Procedure
- Start the Directory Synchronization Tool application.
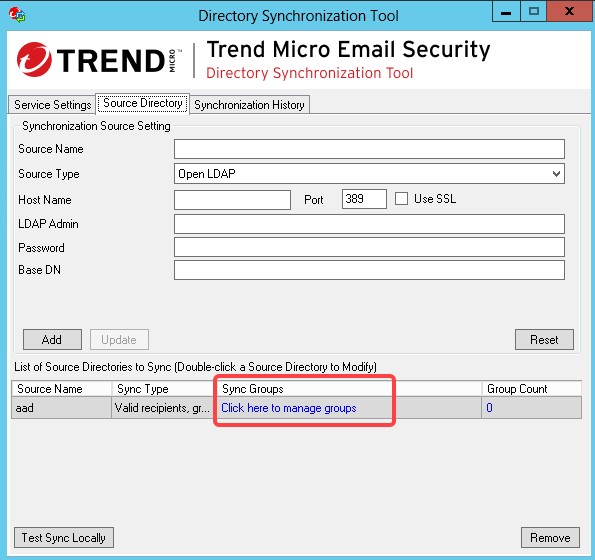
- On the Source Directory tab, complete synchronization source
settings.
- Next to Source Name, specify a source directory name.
- From the Source Type drop-down list, select one of the
following as the source directory type:
-
Open LDAP
-
Microsoft Active Directory
-
Microsoft AD Global Catalog
-
Microsoft 365/Microsoft Entra ID
-
IBM Domino
-
- Complete required settings based on the source type you selected.
-
If you select Microsoft Active Directory, Microsoft AD Global Catalog, Open LDAP or IBM Domino, configure the following:Host Name: The host name or IP address of the directory server.Port: The port number used by directory server.Use SSL: If your directory requires an encrypted connection, select this option.
-
(Microsoft Active Directory or Microsoft AD Global Catalog) User Name and Password: The user name and password that Directory Synchronization Tool uses to access the source directory.
-
(Open LDAP or IBM Domino) LDAP Admin and Password: The administrator account name and password that Directory Synchronization Tool uses to access the LDAP server.
Base DN: The base distinguished name of the directory server.
Note
Skip this field if your source type is Microsoft AD Global Catalog or IBM Domino. -
-
If you select Microsoft 365/Microsoft Entra ID, configure the following:Tenant Domain: The domain name of the Microsoft Entra ID directory, which is the sub-domain of the root domain "onmicrosoft.com".Application ID: A unique ID required for a custom application to make calls.Application Key: A unique key value required for a custom application to make calls.
For details about the Microsoft Entra ID settings, see Create an Microsoft ENTRA ID application. -
- Click Add to add the source to List of Source Directories to Sync at the bottom of the screen.
- Click the text Click here to manage groups under Sync
Groups column, or the group count under Group Count
column to manage groups that you want to synchronize to the Trend Micro Email
Security server.
Source Directory tab The Manage Groups to Sync window appears. - From the Available Groups in Directory list on the left side of
the screen, select the groups that you want to synchronize, and then click the
>> button to move the selected groups to the
Groups to Sync list on the right. You can use the search box at the
top of the list to find groups from the list.To remove groups, that you do not want to synchronize, from the Groups to Sync list, select the groups that you want to remove and then click << button to move the selected groups to the Available Groups in Directory list. You can use the search box at the top of the list to find groups from the list.
Note
You can only select up to 50 groups from all the sources to synchronize. - Click Apply.