SecureCloud Encryption Wizard - Windows Only Parent topic

Procedure

  1. Click StartTrend Micro SecureCloud AgentSecureCloud Encryption Wizard.
  2. On the Configuration tab, edit the wizard fields based on the company's SecureCloud framework:
    t_provisioning_windows_config.jpg
    Important
    Important
    Auto-provisioning is only possible with MBR-partitioned disks that have at least one file system.
  3. Click Configure.
    The SecureCloud Agent is configured and the device inventory is uploaded to the Key Management Server.

Configuration Tool - Command Line Prompt Parent topic

Procedure

  1. Navigate to the appropriate directory:
    • On Linux, type cd /var/lib/securecloud/
    • On Microsoft Windows, click Start and type cmd to open a command shell, then type cd C:\Program Files (x86)\Trend Micro\SecureCloud\Agent\
  2. Start the Configuration Tool:
    • On Linux, type ./scconfig.sh
    • On Windows, type sc_config.exe
    The Configuration Tool command line interface appears.
    config_tool_centos.jpg
  3. Select the appropriate CSP plug-in.
  4. When prompted, supply your account ID.
  5. When prompted, supply the URL of the Key Management Server.
    To use the default Key Management Server URL, press ENTER.
  6. When prompted, supply the provisioning pass phrase.
    The SecureCloud Agent is configured and the device inventory is uploaded to the Key Management Server.

Configuration Tool - Configuration File Parent topic

Procedure

  1. Navigate to the appropriate directory:
    • On Linux, type cd /var/lib/securecloud/
    • On Microsoft Windows, click Start and type cmd to open a command shell, then type cd C:\Program Files (x86)\Trend Micro\SecureCloud\Agent\
  2. Create the agentconfig.ini file in the directory:
    • On Linux, type vi agentconfig.ini
    • On Windows, use Notepad to create a new file called agentconfig.ini and save it to the \Agent\ folder
  3. Edit the file contents based on the company's SecureCloud framework:
    [Agent]
    KMS_URL=https://ms.securecloud.com/
    ACCOUNT_ID=
    CSP=Native
    POLICY=Default Policy
    AUTO_PROVISION=yes
    
    Script
    Explanation
    [Agent]
    This is a compulsory tag
    KMS_URL
    URL for the Key Management Server
    ACCOUNT_ID
    SecureCloud Account ID
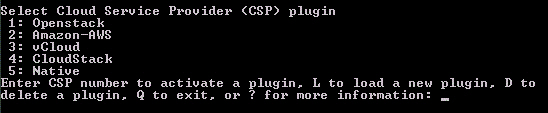
    CSP
    Amazon-AWS, vCloud, CloudStack, Native
    POLICY
    SecureCloud policy name
    AUTO_PROVISION
    Yes to turn on auto-provisioning, No to turn off auto-provisioning
    Important
    Important
    Auto-provisioning is only possible with MBR-partitioned disks that have at least one file system.
    For vCloud environments, add the following to the agentconfig.ini file and change the values to reflect the company's vCloud framework:
    [vCloud]
    VCSD_ADDRESS=172.20.0.1
    ORGANIZATION=tw
    USER_NAME=test
    USER_PWD=test
    Script
    Explanation
    [Agent]
    This is a compulsory tag
    VCSD_ADDRESS
    vCloud IP address
    ORGANIZATION
    vCloud organization name (AdministrationSettingsGeneral)
    USER_NAME
    vCloud user name
    USER_PWD
    vCloud password
  4. Run the SecureCloud Agent configuration script:
    • On Linux, type sh scprov.sh conf -c agentconfig.ini -x <passphrase> -q
    • On Windows, type scprov conf -c agentconfig.ini -x <passphrase> -q
    The SecureCloud Agent is configured and the device inventory is uploaded to the Key Management Server.